I finally got around to buying a California Air Tools 4.7 gallon compressor (https://www.amazon.com/gp/product/B07CKRLKM9). My idea was to replace my existing 6-gallon pancake compressor as well as having some more air to the laser vs the aquarium pump. Even though this is just a “Quiet Flow”, not “Ultra Quiet”, the noise is probably about the same as the aquarium pump. A quick test cut was much cleaner than before.
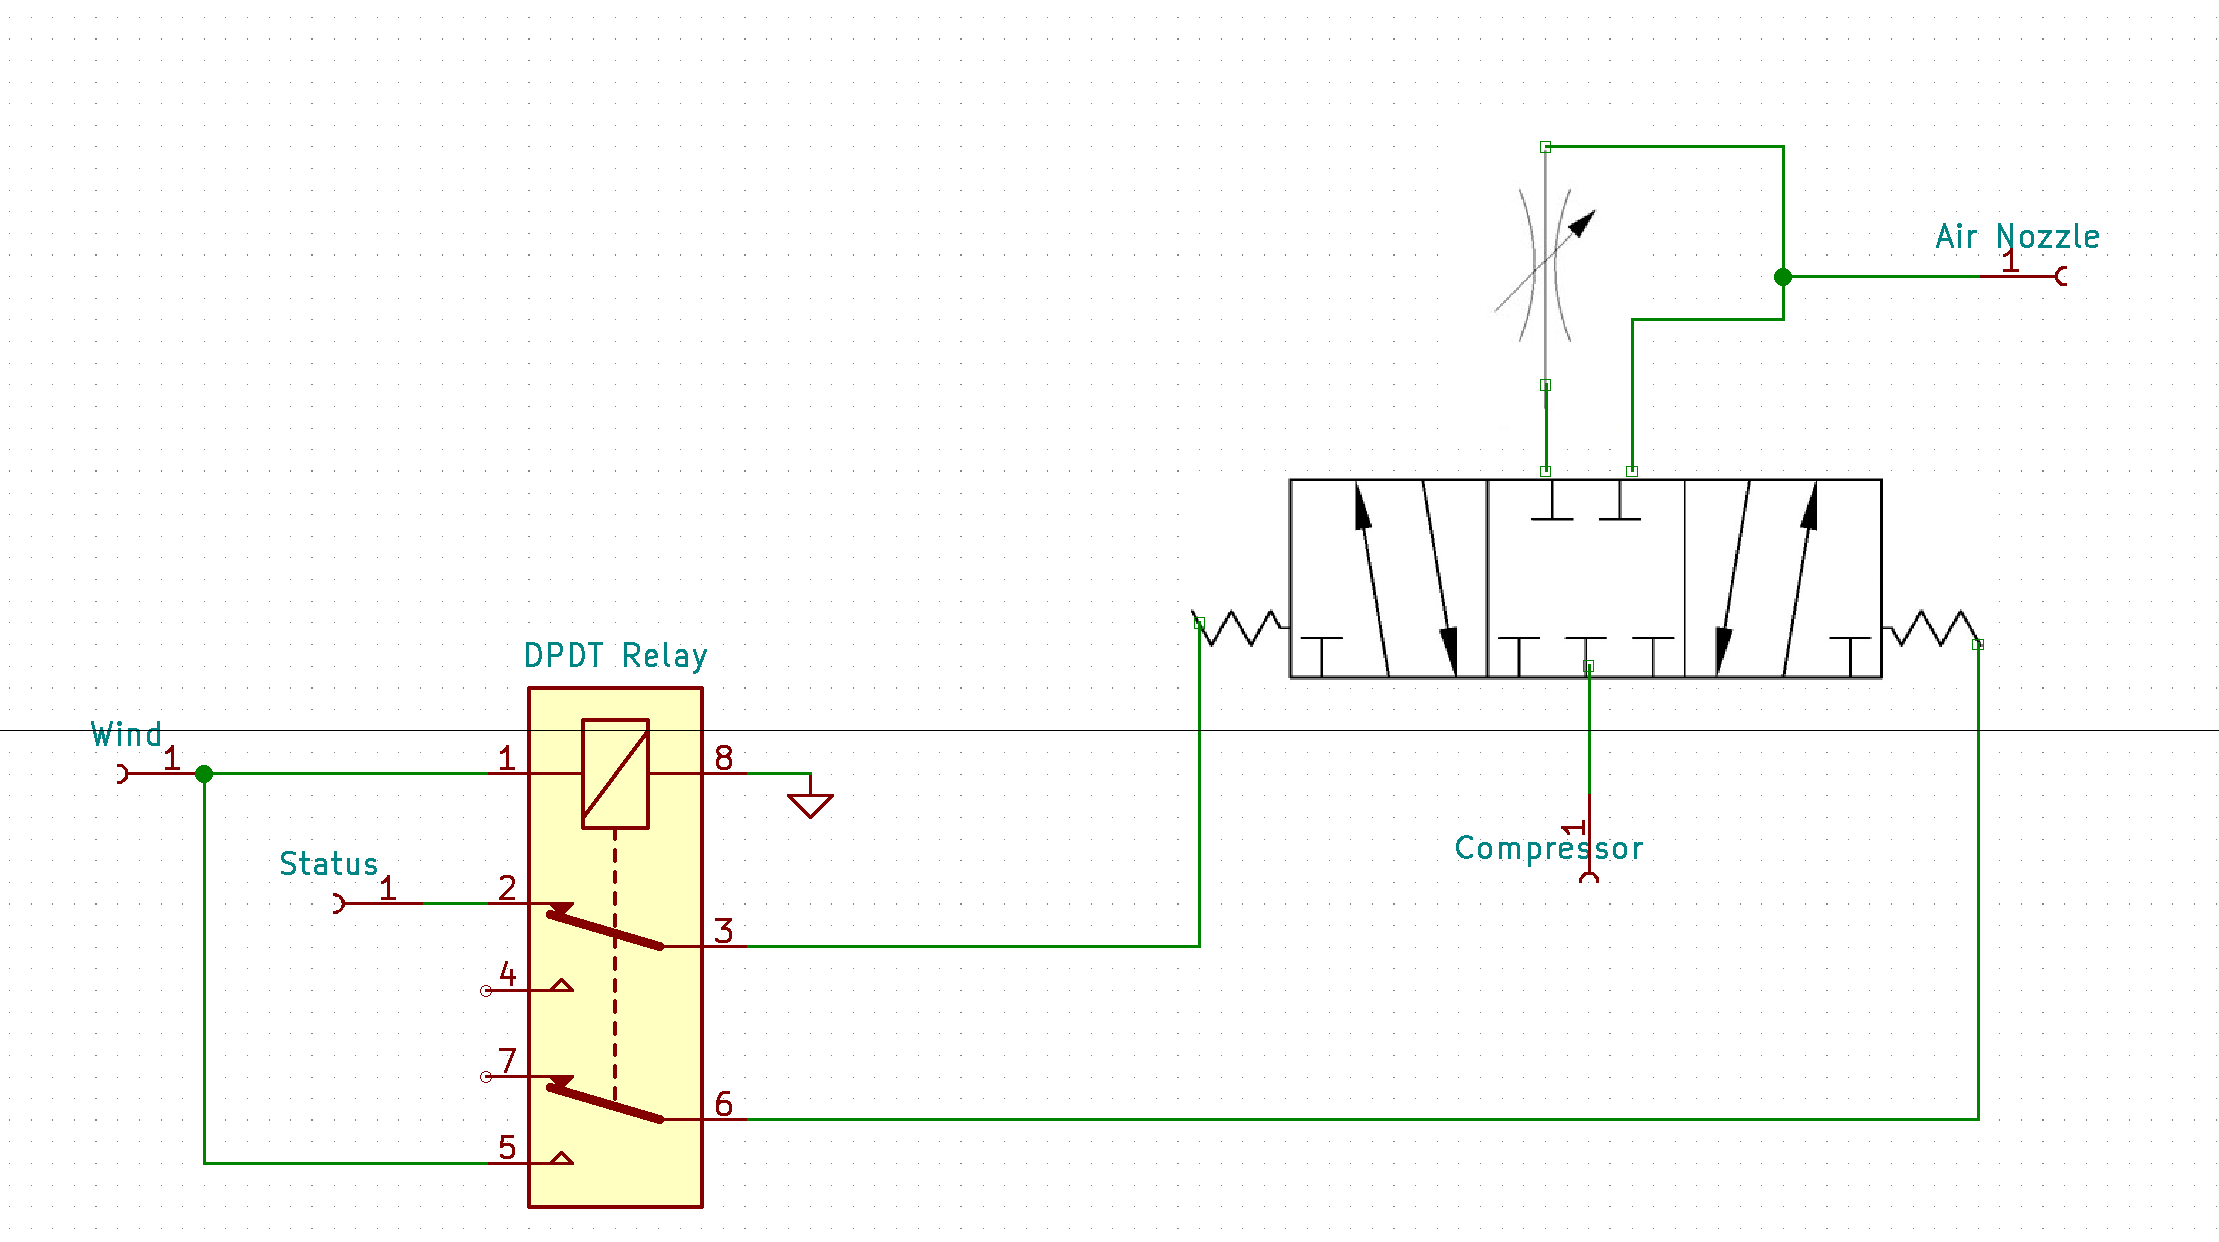
Since I want to use the compressor for the shop as well; the Ultimate Air Assist doesn’t work for me since there is a constant drain on the air for engraving mode. I got a “5/3” valve (https://www.amazon.com/gp/product/B019PTHS7Y) which has A/closed/B positions and modified the circuit to:
With no power to the laser, or with the laser idle, the valve is in the middle/closed position. The status signal opens the valve to the path with the flow restrictor in it. The wind signal breaks the path to status and activates the valve to the path with the full flow. The relay is wired so only the A or the B side can be energized, not both.
Waiting for all the various other components to get in to actually do the work.
Interesting variation. I used two solenoids. One on the status along with the minimal bypass for engraving, and then the actual air assist on the WIND. I took it one step further and added a pair of solenoids, switch selectable, for high and low pressure for acrylic vs wood. Check the air assist 02 picture
I’m thinking about putting an additional manual restrictor near the head. That will let me fine tune pressure for the specific job and still have “keep the nozzle clear” power. Will see how it goes with the initial build. The primary requirement was to prevent the compressor from bleeding down.
Since the price of the 5/3 valve was essentially the same as the 2/2, I chose “less devices - simpler” vs “more devices - cheaper repairs if one fails”.
Understand. I use the 2/2 valves because if I ever have to switch back to my little diaphragm pump in an emergency, it will still operate. Most of the larger valves require a minimum operating pressure and will not function with the diaphragm pumps. Found that out the hard way.
In my three valve set up, the bottom one without a regulator is the one hooked to the STATUS. the center and top are high and low pressure respectively. If I need to tweak the flow a bit, the top low regulator adjust is readily accessible, and I have an auxiliary gauge mounted near the control panel to see the pressure in real time while still watching the cuts.
Correct, but plastic threads will adapt, and under low pressure will not have a problem. I have an inline regulator from the big compressor that knocks the feed down to 60psi before it hits my solenoid assembly. No problems in a year from the one valve that’s NP with plastic NPT fittings in it. The difference is 1 thread per inch. Considering the plastic only threads about a 1/4" in it’s about like cross threading it. I put plenty of pipe dope on it and let it sit a couple of days before I pressurized it, but no leaks yet…
BTW, @Dave01 BSPT/PT have more differences than just thread pitch. With a plastic connector and pipe dope/tape “it may work”, but it’s more than a cross-threading/interference fit.
The first item from my air assist arrived today. While
Amazon says they had a mis-scan, but they show the valve delivered, but with a different tracking number, and nothing at all like that in our orders or with the actual tracking number. It’s supposed to still be delivered… will see what happens.
Everything is here to start putting stuff together this weekend. I did a dry fit of supply line + regulator + closed pneumatic valve and no audible air leak. Will see how much it bleeds down overnight. I have the compressor set to 90psi and the laser set to 60psi (max gauge) for testing.
@Dave01 How did you get off/bypass/low/high pressure with only 2 control lines? Or, are you letting bypass just blow by as a bleed down and WIND controls high/low pressure?
I have three solenoids, four wires. +, STATUS, High, and Low.
The main solenoid is an on / off function. Unless the STATUS is energized or the over ride is tripped, there is no air flow.
When a job starts, the STATUS energizes and turns the main air on. If no air is selected via the layer command, the only air that flows is the engraving bypass. If air is selected, then either the High or Low energizes via the WIND terminal depending on the selection of the switch on the control panel.
Over ride, via diodes, will energize the main solenoid and which ever of the High / Low solenoids is selected on the main panel. The High and Low solenoids also have individual regulators on them. I love Harbor Freight.
Ah. You have a separate, manual, switch for high/low. I’m going to have the “high” pressure regulator control exposed on the front panel, along with gauge, so I can adjust the pressure on-demand.
I had that for a while, but kept forgetting to change it when I switch from acrylic to MDF and back, and was getting a bit of ugly cuts on the MDF until I upped the air. I still forget once in a while, but it’s a switch flip instead of cranking a knob. It sits right next to the override switch, so it kinda made sense.
I tried this with my laser a few years ago, in fact, with the same exact compressor. First thing I can recommend is to scrap the factory regulator on those, its complete garbage. Grab one with a water separator.
But, i would aslo say I had more luck with changing the shape of the orifice on my laser head than experimenting with other pressures. We tried everywhere from 2 psi up to 50, and it did not make a difference in most substrates, until I got to .75" thick hardwood. Even then, not much of a difference, just a tiny bit less char.
Im running a pond pancake pump now, with just my modified nozzle. To modify it, I took a 1/16" drill bit and opened it just a hair. The chinese factory hole was an ellipse, being round and centered helped a ton. Before that, the beam would slightly catch, and the head was getting hot because of it.
On my full spectrum laser, I made a air assist nozzle out of a .223 brass casing.
Interesting. I have some nozzles from Cloudray, but never thought to verify the tip hole was actually round. I’m not having any problems, but another tid bit to tuck away.
I made a air assist nozzle out of a .223 brass casing.
Wouldn’t 5.56 be better?
Independent of the nozzle orifice (and I’ve already drilled mine out by a hair just to clean it up), the valving system being able to bypass or go to full pressure by itself is going to be helpful. The argument for variable pressure is very persuasive. I did see a notable difference in a test cut with 3mm birch with air pump vs compressor dialed down to 30psi. So, at some point “more than the air pump and less than 90 psi”, pressure makes a difference.
As far as the compressor and regulator itself, unless it starts leaking it’s “good enough” for use; laser, tire pressure, finish nailer. I do want to get a separator for it though, but that’s separate (heh) from the laser modifications.
I have been planning to build a two stage air assist if Ruida would ever enable alternative use of outputs 1 and 2 beyond status light functionality. Frequently, I run jobs needing no air assist on engraving layers, light air assist for specific engraving effects on other layers, and normal air assist for cutting.
I’ve actually considered a digital solution. Something that uses number/duration of laser pulses to select from “N” number pof power levels…
My mental image is a pulse detector that would take something like _-_-_____-_-_-_----------------------------
and intercept/disable the laser signal while setting power. An “escape” signal followed by power level It shouldn’t be “that” difficult, but also a bit of overkill…
Place an object on the first layer with perforation or dot mode, use it to set the power, then move on to the active layers. For your use case, you could even adjust it between layers…


 An “escape” signal followed by power level It shouldn’t be “that” difficult, but also a bit of overkill…