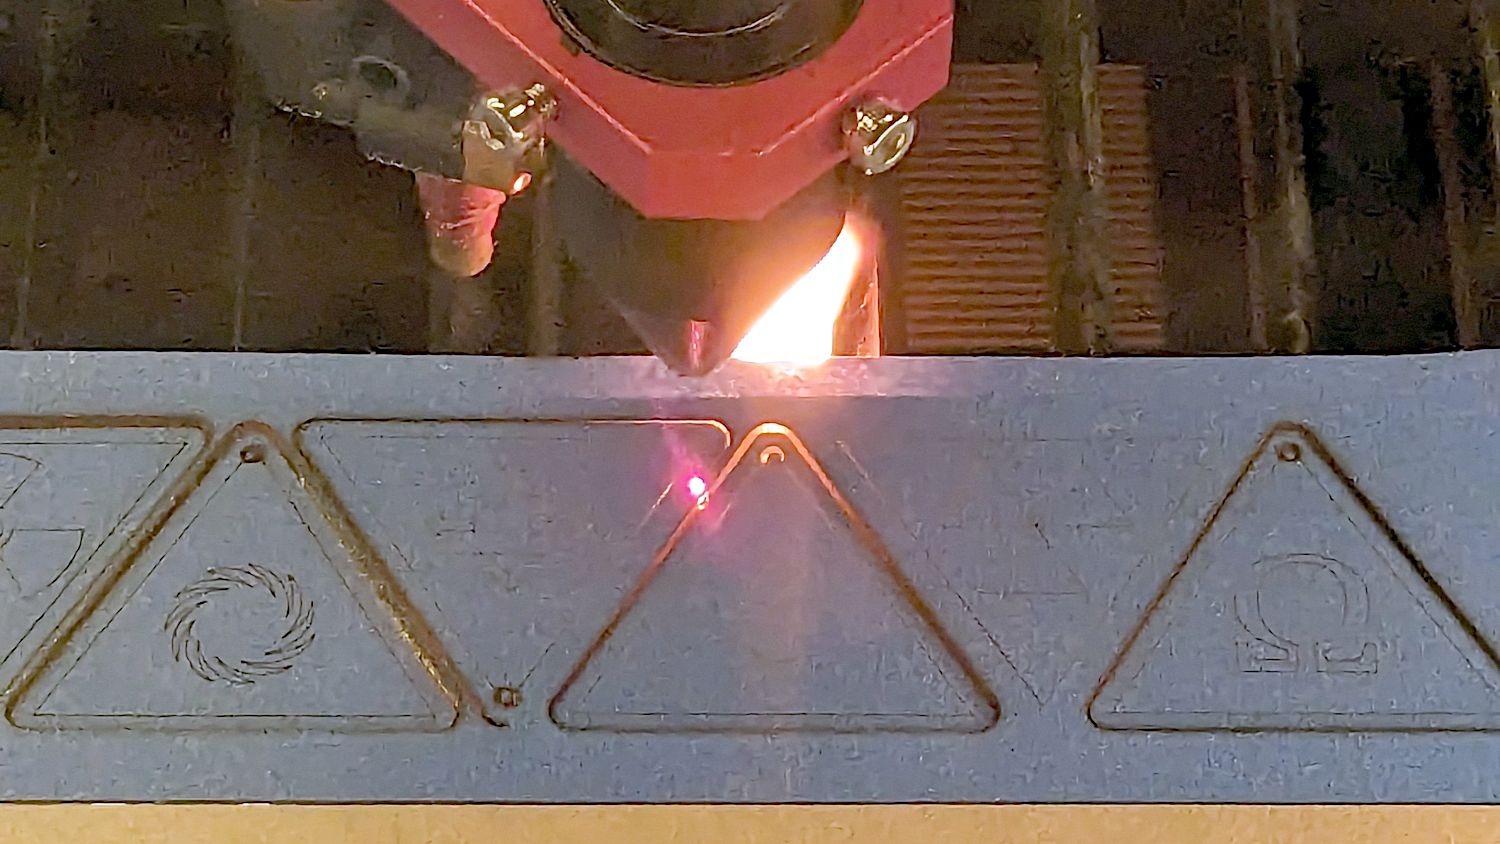
I want to be able to engrave and cut cardboard, etc. What do I do if the material catches fire? I presume dumping the fire extinguisher all over the laser would be A Bad Thing.
So first step is to press the emergency stop button. Then what do you-all do if the material is still burning? Anything I should have adjacent to the machine to put out the burning material? Maybe a box of sand so I pull it out of the laser (tweezers/pliers) and put it in the sand? Then what should I do with the laser afterwards?
Get the laser head to home position…hopefully that’s away from the flames, and have a damp towel handy and a mister with water. You wont be far away when working with combustibles.
I have 3 machines I have been using for several years. I have cut or engraved wood, foam, bamboo, cardboard, felt, plastic, rocks, Seaboard, and some stuff I had no idea what it was. Never a fire. I do have have air assist on all the machines.
I always start with less power than I think will work. Then I increase the power, or slow it down, as needed to get the intended results.
And yes, I have a couple of fire extinguishers (ionized water I think) at the lasers just in case.
Not much more to say other than that in such a situation it proves unwise to monitor the machine with a camera from another location while it is producing (or burning)
With respect to the advice “use lowest power” - I’m thinking about doing materials tests on various sets of materials (wood, plywood, chipboard, laserboard, mdf, etc.) Now if there were a clear set of "at this power laser, for this material, never exceed x speed + y power), that would make it easier to avoid an accidental fire…
This is the recommended path. LightBurn will move from the least flammable settings and move towards ‘higher-risk’ settings.
From our documentation:
The order in which test boxes are cut or engraved is determined according to an ascending list of potential risk of burning or charring material.
In other words, boxes with the highest Speed and lowest Power will run first, followed by the next highest, lowest, and so on.
There are also many resources online where you can get approximate settings based on your laser type and output wattage. Start your material tests around those settings found online and see what settings your laser/environment/material acutally require.
Also, to hop on with the others here as well, please please please do not leave your laser unattended while in use
Simple facts when using a laser like this, is it burns material. Saying that, it sometimes catches the material on fire.
Usually with these, it’s a relatively small area and you can usually blow it out.
I have a 5lb co2 extinguisher. Working in many computer rooms, it’s not advisable in these enclosed area, but on both of my smaller machines, it’s the safest option, I believe. Co2 can suffocate you pretty quickly if it displaces enough oxygen, this is why is isn’t used in enclosed computer rooms and other enclosed areas with animals (humans) of any kind.
Powder type extinguishers leave a residue that bad for the machine and it’s really bad for electronics. Especially if fans are involved. This ends up in everything.
I think he means de-ionized water. If it was ionized, the ions would conduct.
I wouldn’t recommend either be used on a machine that has electronics and moving parts.
If you go through your carer with no fires, you’ll be lucky, so prepare for one anyway. But if you’re there watching it, like you should be, it should be easily extinguished with the simplest of tools.
As @joed said, there are loads of information on the internet. I rarely use the Material Test on previously unused materials because max power/low speed may be too much with my guess for the number ranges.
There is no “clear set” because there are way too many variables involved.
Laser module performance
Commanded power
Machine response to commands
Commanded speeds
Constant or variable speeds
Stability of the laser frame
Power line flunctuations
Thermal characteristics of the material being used
Air flow at the machine
Ambient temperature
Coolant temperature (CO2 machines)
Relative humidity
Sunny or cloudy day
UFO passing overhead
I am sure I missed a few, but I think you see what I mean.
Grab the water spray bottle prepositioned at the machine, open the cover, and extinguish the smallest of flames.
If the spritz fails, grab the CO₂ extinguisher prepositioned at the machine and smother the flames. In my case, there are two CO₂ extinguishers near the laser, but that’s just me.
If you’re across the room doing something else and only notice a problem after flames punch through the enclosure, then your insurance agent will not be sympathetic at all.
Some flame seems inevitable, which is why paying attention is so important …
Well, there are a lot of variables… But are there -statistics-? The way I’d tackle this as an engineering problem would be sampling followed by statistical analysis. In particular, I’d expect something like a bell-shaped distribution, and 1-sigma +/- values would provide a Great Set of starting points for material tests. In particular, I’d expect a set of statistics for common laser kind/power, i.e. 10w diode, 20w diode, 40w diode, 50w CO2, etc.
Looking at the stuff I’ve been able to find on the internet, there was a lot of advice for 3mm basswood, but not much for 0.6mm (1/16"). But that’s what I expect to be my primary material, so that’s where I started doing material tests.
Those of you with experience have learned (the hard way?) what values would be good starting points for material tests, and in particular have intuition on the sensitivity of speed changes versus power changes. Those of us just starting out don’t have that experience… I was surprised, by the way, that on 1/16 basswood, the best values for cutting were at the ‘hotter’ side of the range from the test. 5mm/sec@30% worked, 8mm/sec@30% did not quite cut through.
I’ll probably try chipboard for my second material tests.
It might be a surprise to you how much less cleaning of pieces .is needed after job completion when a nice steady cut is applied with enough passes that the extraction fan isn’t overworked and the module isn’t sucking in volumes of sticky smoke.
You’ll know when the quality of the cut face is important. All that heat has to go somewhere as the beam does what it’s asked.
AFAICT, materials don’t have much of a dynamic range, so sample-to-sample variations swamp any particular setting.
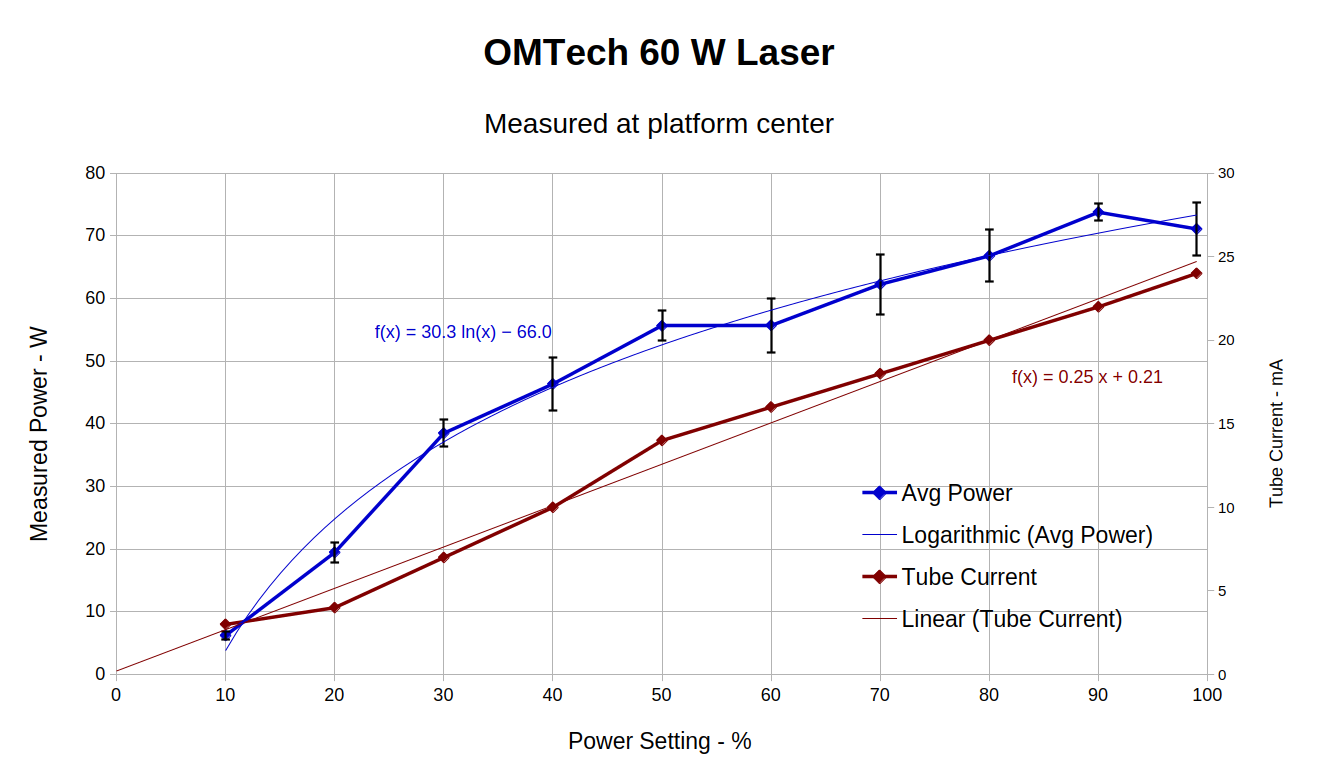
The “didn’t cut” and “good cut” power levels for a particular material at a given speed may be 20% and 30%. That’s not necessarily a 50% increase in power, because the actual power output (for a CO₂ laser, anyway) is strongly nonlinear. For my tube, 20% is about 20 W and 30% is 40 W, as measured with an optical power meter:
So that 10% increment doubles the power.
With that in mind, your “wood” comes from a different bottom-feeder seller than my “wood” and, probably, from an entirely different forest through an entirely different mill / factory: there is no such thing as “the same wood”, no matter how it’s labeled.
For example, the various power & speeds to cut different thicknesses of various types of plywood:
3 mm - 60% 20 mm/s
5.3 mm - 55% 10 mm/s
6.5 mm - 70% 11 mm/s
8 mm - 80% 6 mm/s
You can rub those power percentages against that graph to find the optical power, but it’s fairly obvious there’s no nice relation between thickness (of different plywoods!) and the energy (speed & power) required for a cut, other than the obvious “more thickness requires less speed and more more power”.
Not to mention you will have none of those plywoods in your collection.
But you need only about two material tests per wood to figure out a good starting point for your machine. The first covers much of the entire power and speed range, the second covers only the range producing interesting results on the first.
Then you fine-tune on actual jobs, because the actual speed depends on the length of the vectors, which varies with the job. Long cuts go faster than small details, so whatever you measured in the Material Test will be close-but-not-precise.
The first material test on the next sample of “similar” wood need not cover the entire range, because you can make a guesstimate based on previous results.
This is very much a physical process, so apply your thinking to the results of tests on your machine and your materials. Start making a Material Library with the results, cut more stuff, update your library settings, and you’ll make remarkable progress.
Edit: For example, consider the variations on a theme going on in this thread:
“Same” materials, “same” images, “same” settings, vastly different results. Maybe “similar”, rather than “same”, but IMO there’s no way to quantify the differences.
Those of us that were also once starting out also had the same feelings. Anytime we start a new adventure, we look for the shortest path to success. Those of us that appear to be seasoned users went through a LOT of trial and error, gaining experience along the way. Learn what you need to know, as you need to know it, and not worry about the rest.
I also work with the 1/16" material but it is not 0.6mm. It is 1.8mm thick. If you do not get the numbers right, you will always have issues.
My 10w diode cuts 1.8mm Baltic ply at 1000mm/m, 90% power, 3 passes, Constant power, and with air assist. I will leave it to you to interpolate these values for a 20w diode.
I emphasized units, which is required for comparisons.
Although some of the newer laser machine manufacturers offer their own materials and material libraries with qr codes and all the presets for processing, this can only be seen as a starting point.
As @ednisley writes “you should not over-engineer” laser processing.
Make a test pattern that covers your machine optimally and use it to test all the materials you work with, engraving and cutting.
Proceed systematically, save the values in your own material library and save the physical test plates for later comparison.
The side effect of this process is that you become much more familiar with your machine and get the best individual results.
Did you purchase a laser? It’s not in your profile…? You can reenter your profile, it’s under the License Management → Update Forum Profile. Use the pull-down on the browsers tool bar.
There are a couple of types of machining. Doesn’t matter if it’s additive (3d printing) or subtractive, such as a milling machine or a laser.
Most of these will do the job at a large number of settings. However there are much smaller area of those setting that will produce the best job with the current material and tool (in this case the laser).
If you have a milling machine with all the information, such as bit diameter, number of flutes, spindle ability, you can use/buy time for online calculators to compute much more closely to a starting point. Speeds/Feeds are milling type operation, but speeds in a laser sense is the lasers power and feed is how fast the tool moves, relative to the material. Some machines have the tool and material are moving simultaneously. We usually don’t have both moving, so we mostly ignore this. I wonder how Lightburn will handle this with the flying galvo software…?
The way I did it was just trying to cut a line near the edge of the material. Inspect it for depth and cleanliness. It takes time to find a starting place and maybe more time dialing the settings in for that ‘great cut’. Moving to engraving is easy from here.
If your house caught on fire would you come here and ask… doubtful as it’s already past tense.
When an emergency drops in your lap, it falls back to how prepared you are, in any event it’s just a fire. The e-switch should drop power to the whole machine and a blanket would likely smother it, maybe even a slight breeze from your breath. We cannot figure out what you’re going to try and lase with an unknown machine.
Simple fact is you’re burning something in normal operation, so a fire shouldn’t be a dead point (like this thread) you have to worry about.
Lots of people post their work and usually give setting and other information so it can be duplicated, so you can hunt there. In any case they are starting values, which I believe was given to you already. Depending on the type of laser some manufacturers will give you starting settings, but none would even think about a no-fire guaranty. Especially since the only way a co2 works is by heating something to high temperatures.
If you’re unprepared, you have to use what you have on hand, worst case, maybe your feet.
Good luck, let us know when you have a fire and/or get a laser. We can be much more specific.