Why would the same speed cut deeper at lower power settings?

The power is not increasing as expected at settings above 45%

55w OMTech - less than 1 month of use. I am having trouble cutting through materials that I easily cut through before. Previously I could easily cut through 1/4 birch ply at 10mm/sec 50% power.

Also I’m having trouble cutting through black 3mm acrylic, though I easily could a week ago.

The stranger thing is that I can cut through the 1/4 ply at 5mm/sec at power ranges between 40% and 70%, but not above.
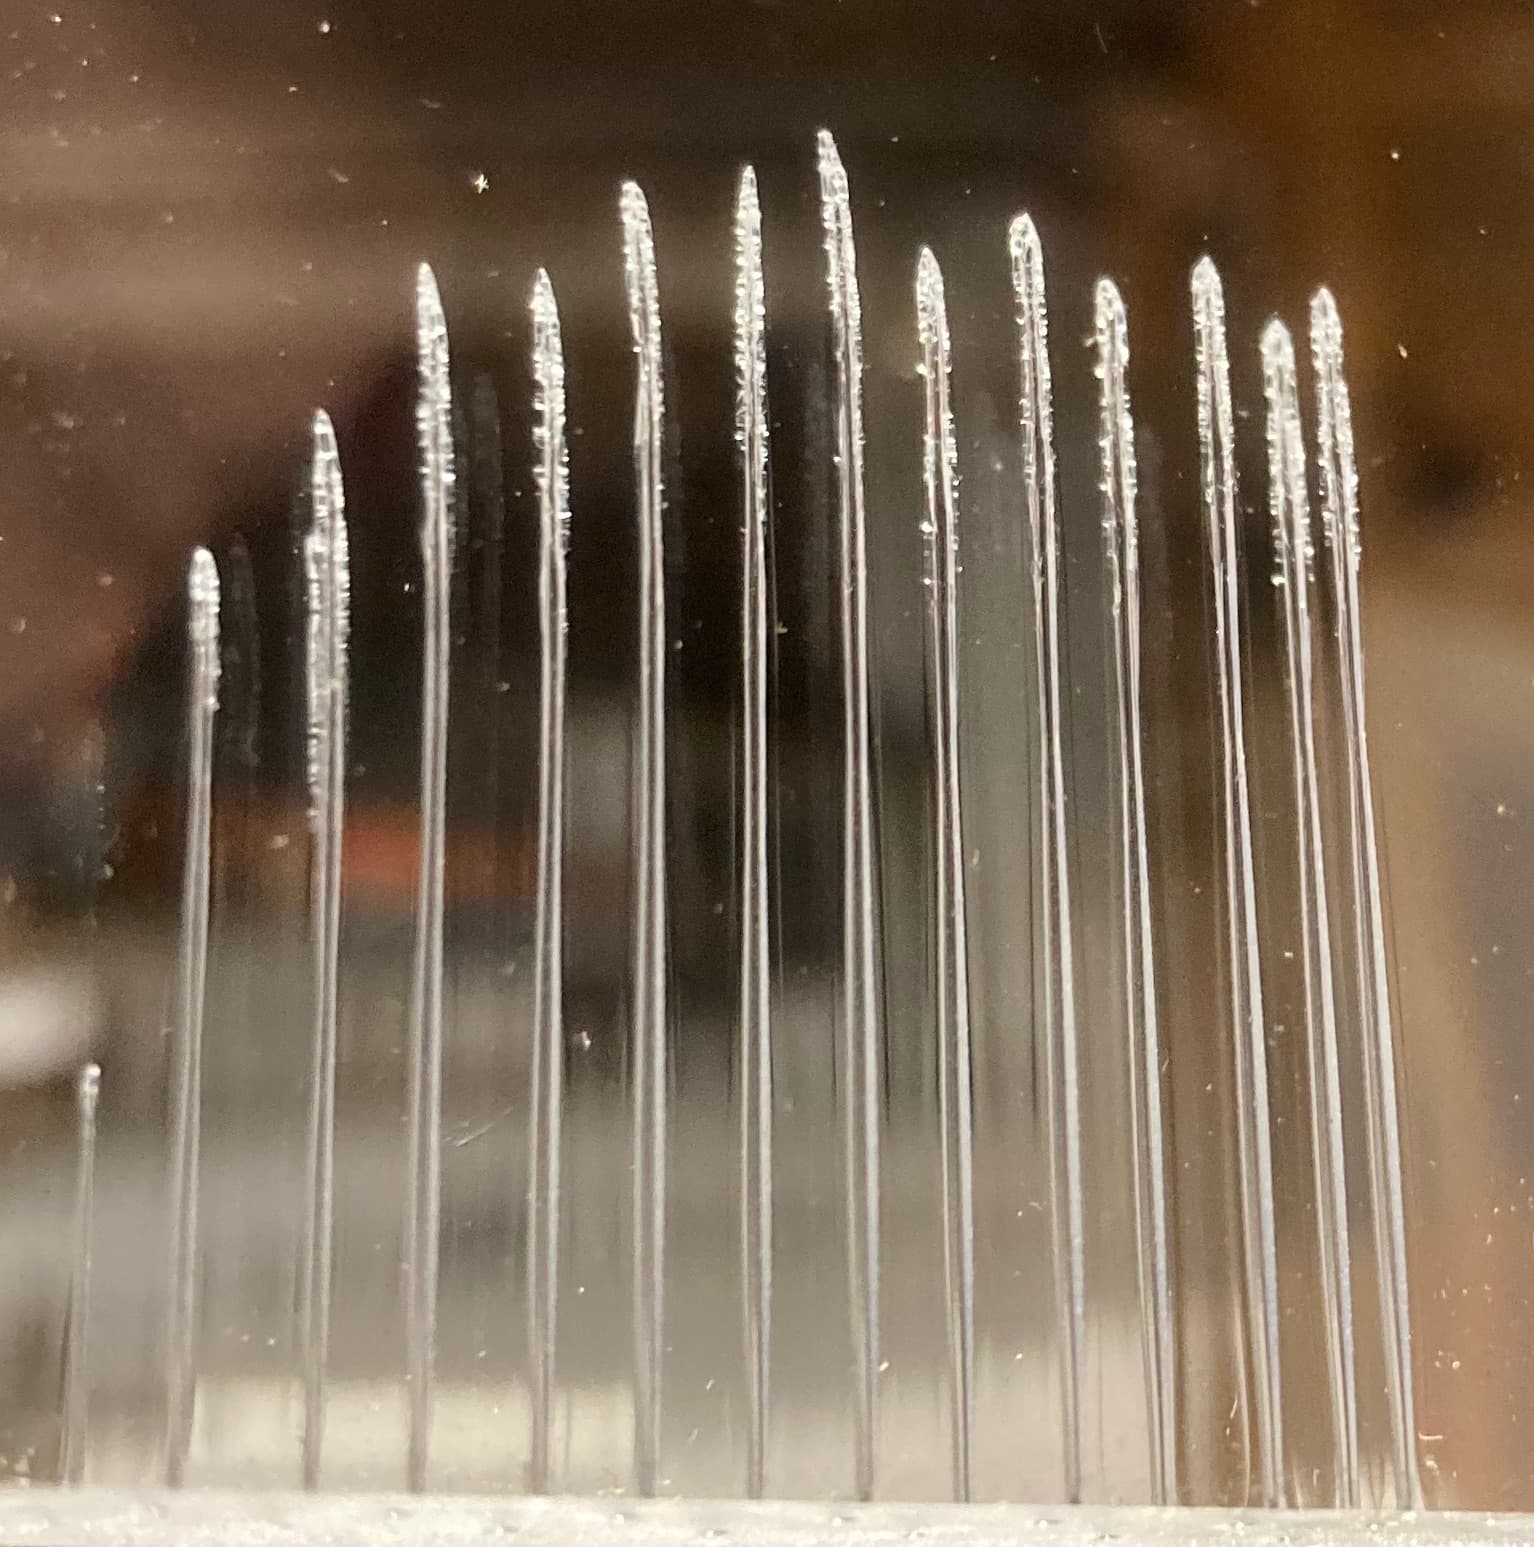
Here I show how easily I could cut below. Setting that worked easily for birch were 9-10mm/secon at 50% to 70% power. Acrylic cut at 17.5mm/sec with 45% power.

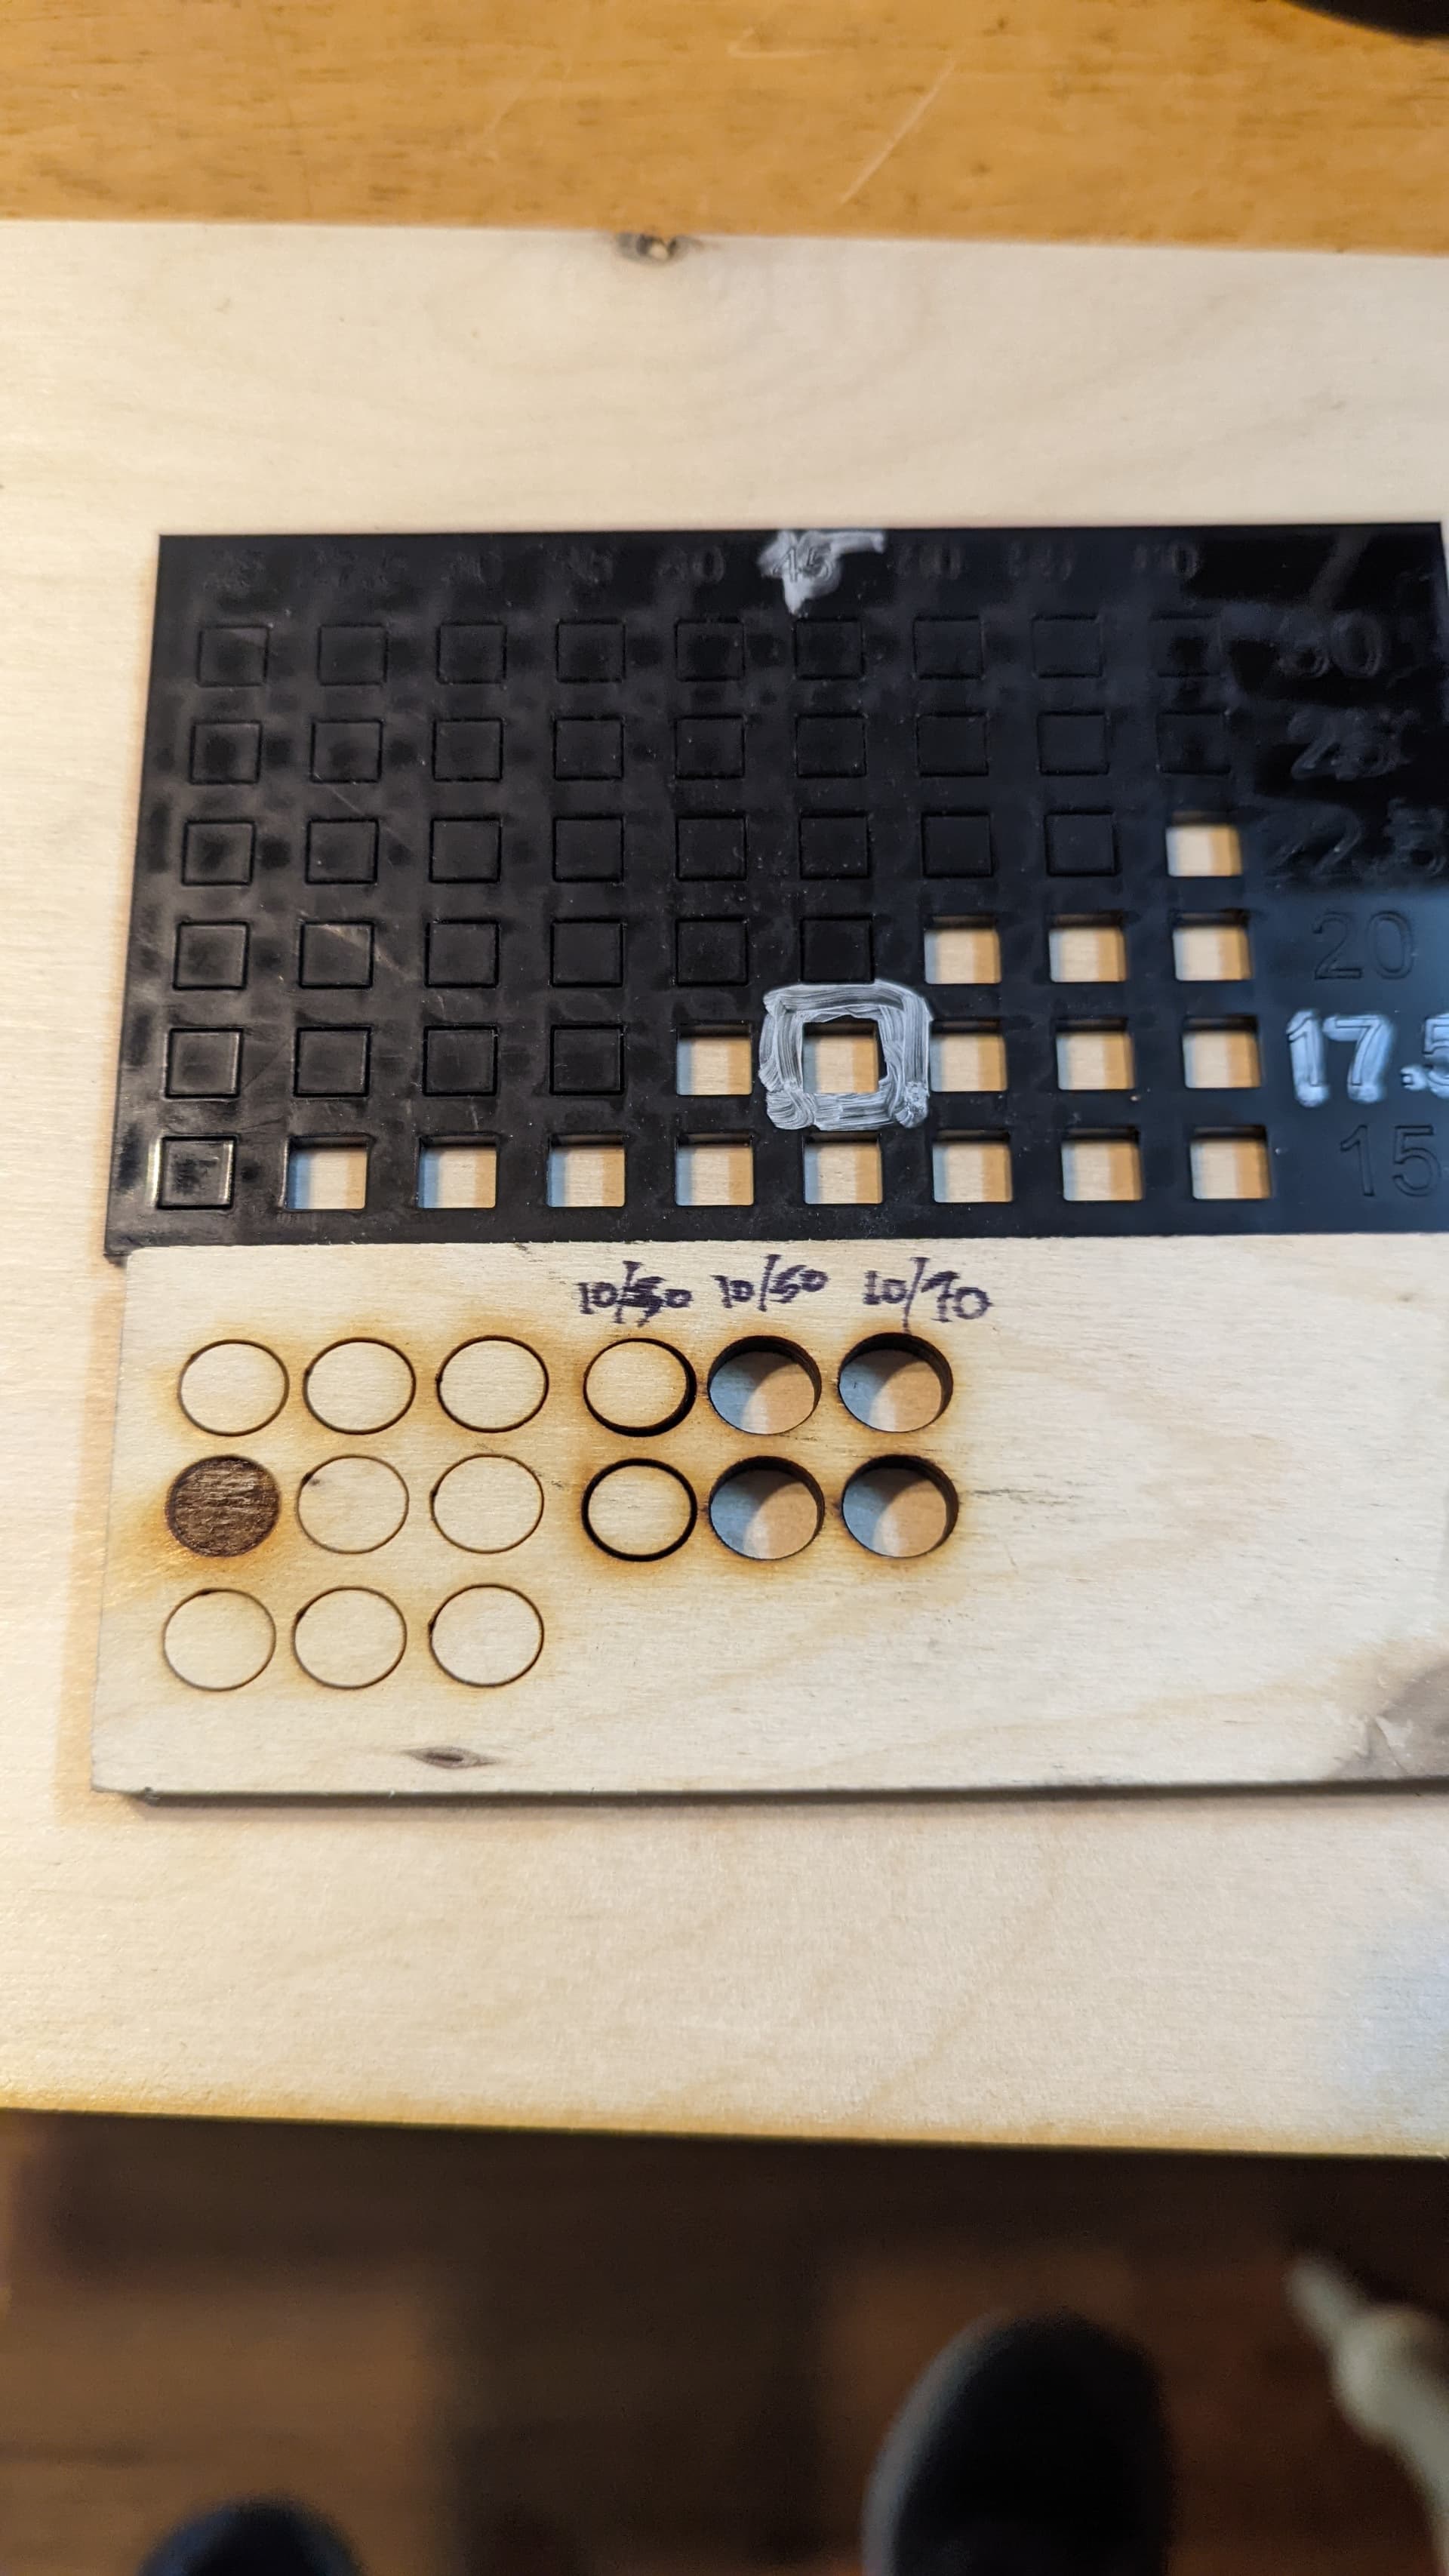
But now the Birch is cutting only at much slower speeds, and with strange power settings. I also tried adjusting the height of the z table slightly up or down from the standard focal distance.

Last night I was unable to cut through the 3mm black acrylic at any setting. Then today I tried cleaning the lense and mirrors. I was then able to cut thought the acrylic and thought the problem was solved. But when I try birch, I still am having issues.

I have been watching the digital ammeter on the power supply and it is responding as expected - i.e. the 85% is about 20ma and the lower percents are correspondingly lower ma.

I have a lot of questions that hours of forum reading have not quite been able to answer.

Can the digital ammeter on the power supply be relied on?
Do I need an analog ammeter to be able to test for tube issues? Are there step by step instructions for installation that anyone can point me to?

If the mirrors were out of alignment, how would I know and what would the effect be?

How do I know if my bucket of distilled water with pump is insufficient to cool my tube and if it is causing problems?

Could etching annodized aluminum at 45% power for many hours cause a problem due to reflection? Why/how and what can I do to resolve it?

Are tiny smokey specs (1mm or smaller) on the surface of mirrors and lense a problem? What causes them and how can I fix that? The do not clean off with 99% alcohol and cotton swabs.

Does anyone have a link to a step by step instruction for troubleshooting tube health issues? What and where can one buy a device for testing laser output power?

Thanks in advance for any help!

You have many questions :wink:
I will take some of them.

The recommended operating current for 50-60Watt tubes from OMT is between 16 and 18mA (It is possible but unlikely that a 55Watt tube has completely different values).

It’s very unfortunate that you have worked without an analog ammeter (if I have understood you correctly), it’s like working blind.

It also sounds as if you do not have complete control over your cooling water temperature nor whether you have had air bubbles in your laser tube. Both things are very crucial for the life of a co2 tube.

The laser beam’s precise adjustment of the focus point as well as completely clean and intact mirrors and lens are just as important to be able to work correctly with a laser machine as the 4th tire on a car.

Everything in between the nozzle / lens and material to be machined reduces the effect of power. This also applies to soot and smoke.

… I’m sure others will come up with some comments as well, but my well-meaning advice is that you just need to have a little more control over the theory around the operation and maintenance of a co2 laser machine. There are tons of good and less good videos on the web which deal with everything you ask for and if you go to OMT`s website you will also find here advice for operation and maintenance of your machine.

It is possible that your laser tube is on its retreat, but then you can use the knowledge you need to gather to extend the life of the next one.

Thank you for your answer. Would you mind confirming my interpretation of your answers?

It is likely that my tube is going bad.

The digital ammeter on the power supply is not sufficient.

I definitely need a chiller as a bucket of water with pump as recommended by the manufacturer cannot protect the tube, regardless of tube wattage.

Am I correctly interpreting you?

Regarding OMTech: their information is woefully inadequate. The bucket of water is their recommendation.

New info: when I press the pulse button the digital ammeter shows 2 ma and does not mark anodized aluminum as it did before.

All laser tubes have only a limited life. Even under the most optimal conditions, the gas mixture degenerates in the tube. The ammeter that is integrated in the power supply certainly works as intended, but who works with his head down in the control cabinet all day? If you want to use a measuring instrument seriously, it must be visible while the machine is running, in my opinion. Cooling, a bucket of water and an aquarium pump may be suitable to start the machine with to do some tests, but for a serious production this solution is not suitable. If you have been keeping an eye on the water temperature during the operation of your laser, then you have seen that the temperature rises fairly quickly above the recommended 20 degrees Celsius. With my old K40 it took under half an hour, then I had to change the frozen cooling elements at regular short intervals. If you have been running your laser machine at 20 mA as you have been writing for a long time, then the risk of your tube dying is reasonably high. Have you tried replacing mirrors and the lens ?, and checking your focus? It could be that you are lucky and that is all that is needed.

Have you considered that the material may not be level with the Laser Head
(If the material is at an incline, you could experience similar behaviour)

2mA? what have you set the controller / power to?

Some clarification. I don’t generally run the machine at 20 mA. As far as I know I have run it at that for only a few seconds a handful of times for testing.

The change in performance happened when I came back and failed to run some jobs a week after successfully running them the first time. I had cut a couple small jigs from wood and black acrylic, then spent a week or so running engraving on anodized aluminum at 35 to 45% power, for couple hours per day, maybe 5 hours one day. Then I tried to cut more jigs and neither wood nor acrylic would cut. I tried cleaning the mirrors and lens with alcohol, which seemed to help but I was still unable to cut through the wood (same exact piece of plywood that I cut before, right near the previous cuts). I put weights on the plywood to flatten it to the waffle platform. The power seems to top out around 45%, then decrease gradually as I increase power. The ammeter says the power is increasing.

This might seem obvious, but I can’t find any explicit answer to this:
If a tube goes bad, would the digital ammeter be sufficient to test it as compared to an analog ammeter self installed? And would it read expected power at specific percents power, while the performance of the laser did not respond as expected. And conversely, if the ammeter reads unexpected mA, would that indicate the power supply failing?

I have never re-set the controller power that I know of. I adjust settings of the controller only through lightburn and I have not set power min max. They are set at 2% and 98%.

No, I mean in the Ruida panel under “Power”, where you can set the current power and speed, it’s independent of LightBurn.
This is where I set my test shot power, in a submenu you can then decide whether the pulse should be constant or up to 999ms.

Did you manage to do a power test when you got your machine?
I have a spreadsheet with all the LightBurn power% and the corresponding mA values. For me it is necessary to have, because I can then register immediately when my tube becomes weak and when it reaches a critical level I can order a new tube. I also used it to fine tune all my projects that I have to run again after some longer time. When 50% is no longer 12.5mA (example) and I find a general power decrease, then I have to compensate with the missing percent instead of running all my material tests over and over again.

Regarding power curve, it is unfortunately not linear. The tests I have done show a curved line up to 65-70%, then it does not rise anymore, it can even fall a little. So all the power over e.g. 70% is waste and just contributes to a faster death of the tube.

The picture shows the first 6 shots with 10% interval, then with 5%, Top is 70%, the first short line is 75% and so on.
(65% corresponds to 16-16.5mA at my 60Watt tube.)

1 Like

… do you have control over your min.max. power in relation to speeds below 10mm / s? … only a quick thought

Got it. The power was set at 15% on the ruida controller.
Thank you for the post with image. That is extremely helpful and specific information. I’ll run a similar test.

If a tube goes bad, would the digital ammeter be sufficient to test it as compared to an analog ammeter self installed? And would it read expected power at specific percents power, while the performance of the laser does not respond as expected. And conversely, if the ammeter reads unexpected mA, would that indicate the power supply failing?

If I’m understanding you correctly - my “start speed” in machine settings was set at 10mm so I did not have control. I changed that to 4mm so that I do.

I performed this test multiple times. The depth tops out around 50-60% then dips very low between 75 and 85% then increases a bit again between 90 and 100% but still much lower than at 50-60%.

It will at least be a good indication that there is something wrong with the tube OR one’s laser beam alignment OR the mirrors and lens.
It’s these things I first check when I think my “normal” mA values no longer fit the same task.
If you set the machine to 50% and nothing “comes out” or too little, it points to the tube, conversely the ammeter does not show the selected mA which corresponds to the percentages it could indicate that the power supply is faulty.
But again, buy an analog ammeter, it costs almost no money and is easy to install, there are many installation videos on the web and we here on the forum are also happy to help each other with advice and tips.

This is the normal image with variations of plus / minus some%. It fits very well with my second 50Watt tube (rated) that I got for a defective 40Watt tube from my K40.
It it is a bit confusing and irritating that 60% from tube is 100% in the software.

Some here have the option and make it that they reduce the output power of their PSU so that it matches with LightBurns 100%. I rather saw it that there was a software scaling for it in LB.

Thanks for all your help. I have cleaned and realigned the mirrors - no change in cutting ability. I then changed all the mirrors and lens. Still no change.

I have a new tube arriving in the mail today. I’ll first manually set my power supply to a lower max output. What would you recommend for a 50w tube? Are there any issues with setting this with my old tube installed before switching to the new tube?

After installing the new tube, I plan to do a power test as you suggested so that I can compare later.

I want to install the new tube and keep power below 50% to begin with. If it looks “normal” I will do a power test but keep the output power below 16mA, the curve I expect to be flat anyway at this power plus / minus few%. When you do not get deep penetration then you have got your max power and it should not be far from the 16mA.
And remember to keep an eye out for air bubbles in the new tube, they can occur at any time (after the machine has not run for a while). I have it as a regular routine when starting up my machine.

1 Like

They sent me a 60w tube instead of the 50w that I ordered. Being that the power supply they originally installed in this machine was rated for 60W, would this be an opportunity to upgrade to 60W? There is a small removable panel at the end that could be removed to make room. Would there be any settings other than the mA output that need to be adjusted for a larger tube?

I think I understand your problem a little better now.
If you have run a 50 (55) Watt tube with a 60Watt PSU, then the risk of you running your first tube with too high a voltage is very high. Now that you have a 60Watt tube, there should be no other issues besides you still lack (in my opinion) an analog ammeter.
You do not have to change anything in the setup of the machine but have to find your power range with the test I referred to or something similar.
I would also recommend making a list of LightBurn power% and the corresponding mA values. You will then be able to keep an eye on your 60Watt tubes “health and life cycle”
The plate you are referring to is “standard” on many machines, and they are, as you yourself write, intended to replace the tube with a larger (longer) one.
I think as a starting point you can use 60-65% as max, that is what many with 60Watt tubes use and corresponds to about 16-17mA. It can easily vary a bit, depending on the quality and condition of the tube. I run mine not higher because there is no real power increase, after 16-17mA at my tube.

Now all that is left is to set up your new tube and laser beam perfectly and burn some wood :wink: