Hi Rick, just wondering why you went with NC switches instead of NO?
I run Ubuntu, same age and also have an eye exam coming up… 
Sucks getting old 
Hi Rick, just wondering why you went with NC switches instead of NO?
I run Ubuntu, same age and also have an eye exam coming up…
Sucks getting old
Hey Mate it is Bruce from original post. I get new glasses next week! Hooray. I went with nc switches because of the fact that when one is triggered it will halt whole machine. Although is debateable as i have six limit switches.I have set no soft limits, and approximate table size size in lightburn. It has been suggested to go normally open switches but is quite a job as machine is enclosed and switches can be difficult to reach,
I also have just installed a non bloatware windows ten on another ssd with only lightburn software on it and also upgraded bios. So i will have two systems to try once i get the new board tomorrow,
Sounds like a design issue. You really can’t use a NC switch in a system designed as a ‘wired or’ especially when you use a limit on both ends of the same axes. I don’t see how it worked at all.
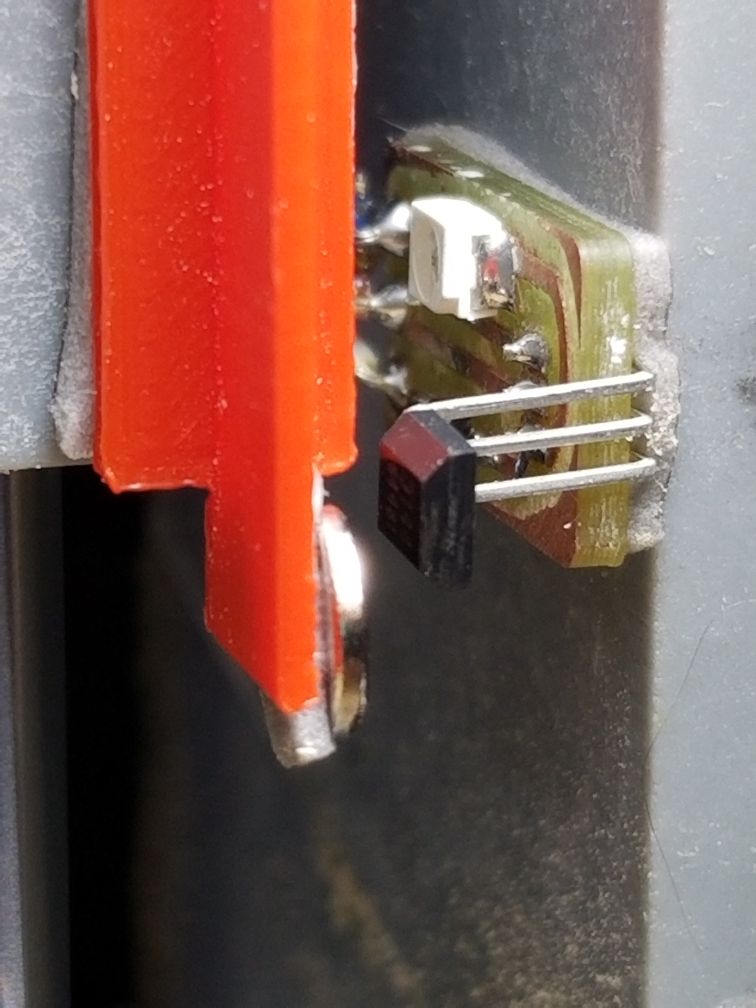
This is from a while back when I built hall effect limit switches for the little CNC3018. This picture is the Z axis.
I ended up building them because all the commercial ones were configured to go high on proximity. The PCBs were made on that machine with the gates (orange) made on a 3d printer.
Copy your working lightburn machine configuration to the other machine.
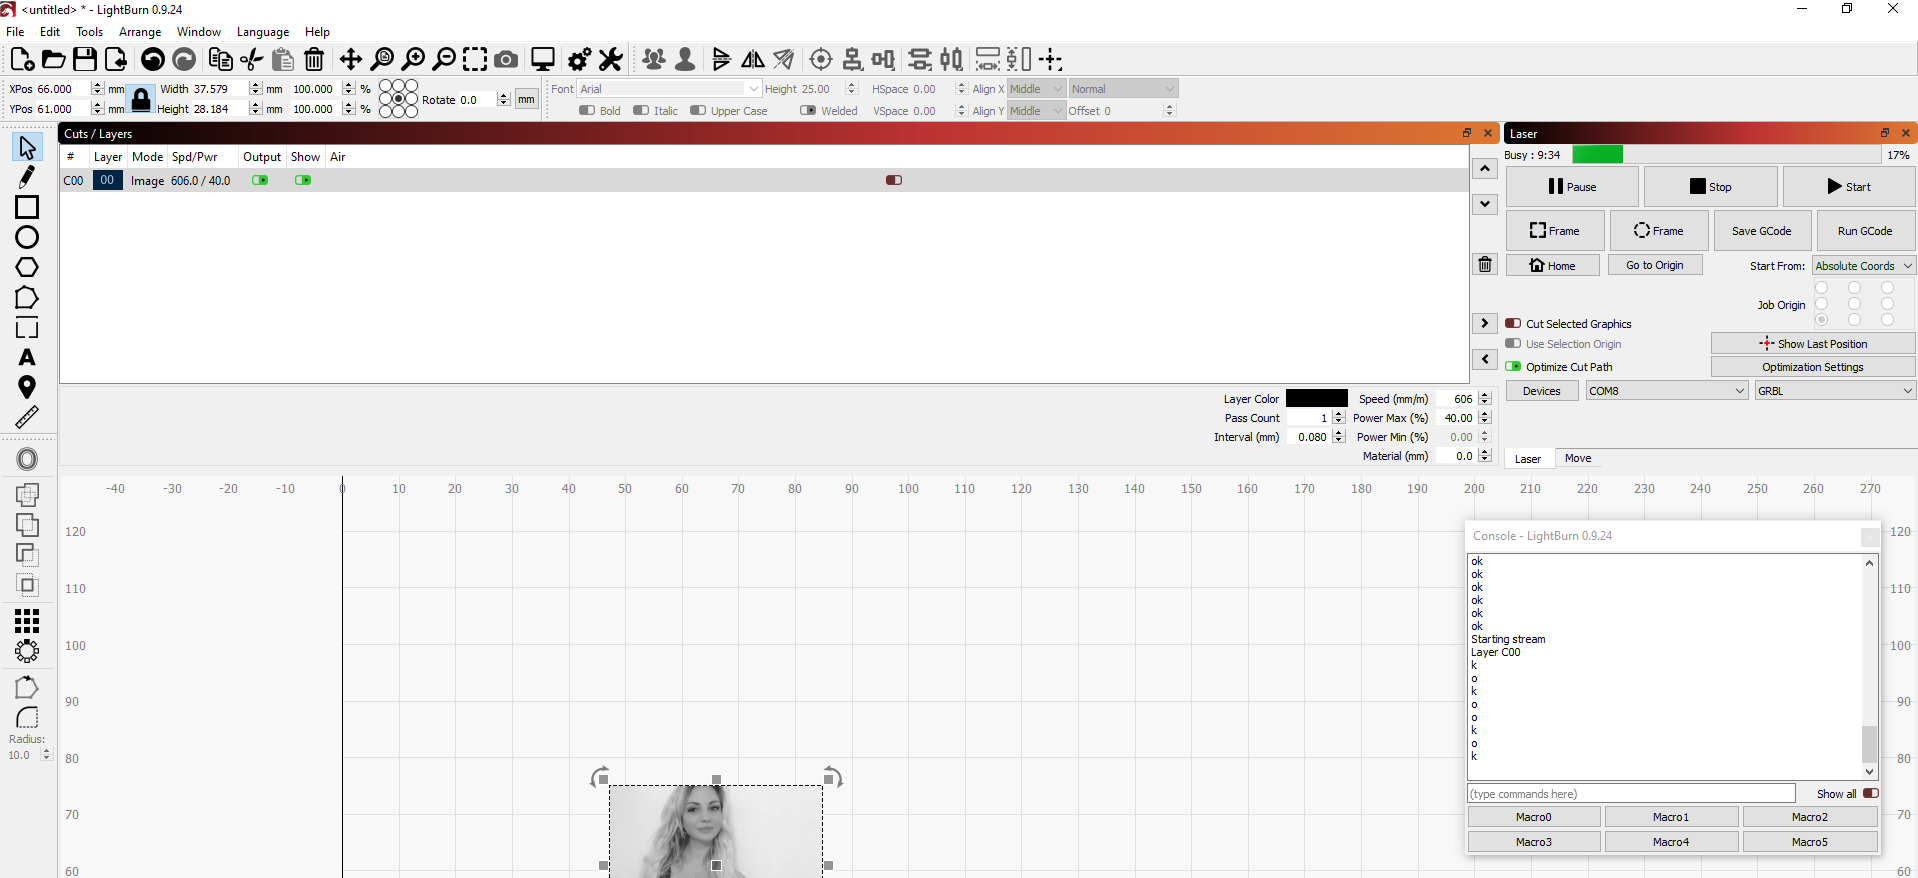
Hi Jack i have just received my new contriol board and installed. Got the same problem again and machine just stops. One thing i did notice is laser also stays on. I have included a screenshot this time as it shows the code when it stopped and also the time and the busy status, Not really sure what to do now as this is what i got the laser for mainly photos.
Lacking time, but maybe a few ideas before I go.
This shot of the output from the grbl command window
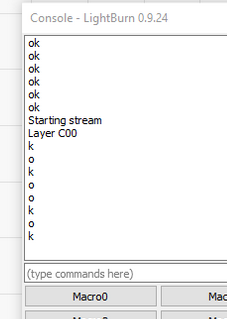
Has a strange output. The line after “Layer C00” should be an ‘ok’, not a ‘k’ The following lines also indicate some problem in communications. It’s outputting ok, then ok, but you get each character on a single line.
“If you’re using an 8-bit GRBL controller to process GCode, they have a limit of about 400 instructions per second or a bit less.” You’re Arduino is probably considered in the class.
Check out the post it’s from, it addresses the grbl processing speeds.
You are engraving so the speeds apply to your controller and the communications mode you’re using. USB implementation on these devices are not tops in their class. 
The $$ command will list the configuration details of your machine. That may help. Put it in a file and post it. Just a copy and from the command window into a flat file.
Good luck…
Catch you later, take care.
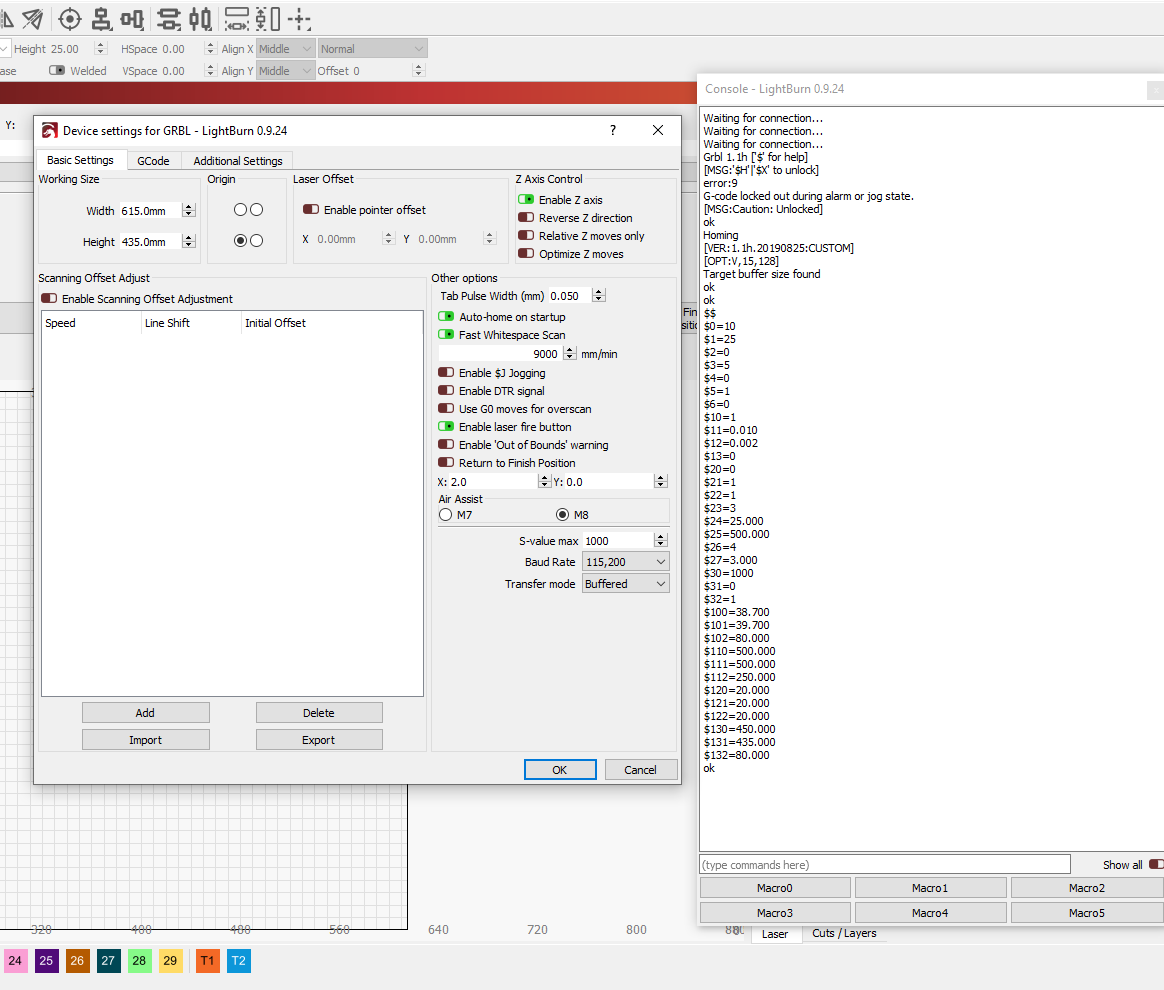
Hi Jack thanks so much for your help. I was also thinking that perhaps my pc is too slow. But getting a new one at the moment is out of the question, maybe upgrade my ram. My configuration file is below, maybe there is something wrong in it, i am pretty ignorant and new to GRBL.
Grbl 1.1h [’$’ for help]
[MSG:’$H’|’$X’ to unlock]
[MSG:Caution: Unlocked]
ok
$$
$0=10
$1=25
$2=0
$3=5
$4=0
$5=1
$6=0
$10=1
$11=0.010
$12=0.002
$13=0
$20=0
$21=1
$22=1
$23=3
$24=25.000
$25=500.000
$26=4
$27=3.000
$30=1000
$31=0
$32=1
$100=38.700
$101=39.700
$102=80.000
$110=500.000
$111=500.000
$112=250.000
$120=20.000
$121=20.000
$122=20.000
$130=450.000
$131=435.000
$132=80.000
ok
Another thing i dont really understand is that my table size is set to x 615 mm and y is 435mm, shouldnt that show in grbl code?
Bruce
Forget about your PC being too slow. If anything it’s grbl processor. Besides all that happening is the data is being sent, bit by bit to the controller. When you engrave it probably sends a command for each time the laser fires. That takes time to process. The mechanical will never catch the electrical.
The firmware is set to 450 (X - Max Travel (mm)) X 435 (Y - Max Travel (mm)) and 80 mm (Z - Max Travel (mm)). As shown in $130 - $132… Do you really have a Z travel of 80mm? That’s nice if you do.
It’s pretty clear it’s not set up as you describe it should be.
Here is a list of some of the grbl configuration ‘registers’ and what they mean. This is was an early version of grbl, but there are just additions such as $32 and a few others for these low cost machines.
Hope this helps some…
Thank you Jack, i will play around a little more. Yes the laser is fully enclosed with ventilation and has a z axis. Has no soft limits and has six normally closed limit switches. I have built many things in my life and this was my first attempt at a laser. I also built it so it can be adapted to a 40w c02 laser (with modifications). I have the settings in lightburn set to 615mmx435mm so i dont understand why grbl is not showing that. I will have to adjust it in grbl. But seems strange i have to do it that way. Thanks so much for the information and grbl information.
Bruce
Lightburn expects you to know what your machine size is and configure it properly in the ‘device settings’. That’s how lightburn knows how to deal with your device.
The machine on the other hand has to be configured properly, also. Part of that configuration is the Z, Y, X maximum travel, motor pulse length, motor directions… Basically everything on that ‘cheat sheet’ I posted. Fortunately, most of it is set up for you in the Woodpecker board.
If you have homing you probably should enable soft limits.
Speaking of homing, I have limit switches on both ends of two axes. The photo is from the Z axes and it’s one hall switch and two magnets for both end limits. I can configure it to home in any corner (and Z up or down) by a configuration change. You still have to deal with it’s coordinate system.
I don’t understand how you can get duplicate NC switches on the same axes to work. The inputs are inverted by $5 setting, so it’s looking for a logic high state at it’s limit detection. When the head in not in contact with either of it’s limits, the switches (both) are closed, pulling the line low.
When the head moves into the limit switch, that one will open, but the other switch is still closed keeping it low. It would (should) fail on homing…
There is no way to get NC switches at each end to work together without external logic. That’s why these are all configured for NO, so contact with either switch will pull the line low.
Please enlighten me on how you accomplished this
NO: Wired parallel - When one closes, the input triggers
NC: Wired series - When one opens, the entire chain is broken, and the input triggers
(unless I’m not understanding the issue)
That works…Thanks… Didn’t even go down that road. All the CNC stuff I was around (decades ago) had one wire to it the other side went to ground at the switch. They were very good at counting how much wire they used…
This should also work on a Ruida… Think I saw the limit switch invert somewhere. Kind of get stuck in a mind set with this stuff…
Good luck, take care…
Hello again, i wired them NC because of the fact that if a switch is triggered it will create an alarm state and stop all axis. I didn’t like the idea that in a NO configuration that only that axis would stop. As i say i am not experienced in lasers but have experience in other areas of mechanical and electrical building. On the shield i have called Maker Shield i can connect the switches in either open or closed configuration by altering the orientation of the Dupont plugs, one way is open and other is closed. And all the functions seem to work correctly after a few adjustments in grbl. Originally even with everything setup in laserburn it would home in the opposite corner of the machine, i changed a setting in grbl and it then homed in the correct corner. One small problem i have is that if i run the machine to the extreme extent of the y axis and trigger that limit switch and then press home it will home again on that end of the y axis, strange. But then if i jog the machine away and back towards me and press home it will again home in the correct front left position. Not sure why. I took a screen shot of lightburn device settings and the grbl code after turning the machine on.
thanks again
Bruce
If you hit a trigger a limit switch during an run operation the whole machine is supposed to stop, irrelevant of the type of limit switch you use.
Yes, very much so. That’s an interesting one.
When I hit a limit, I thought my machine required a ‘reset’ to let it accept commands again. I don’t think a ctrl X would do it. But I’ve been wrapped up in the Ruida controllers and have kind of forgotten the grbl stuff. They are great machines… ![]()
Thanks Jack for enlightening me on limit switches. I really do appreciate it.
Thanks
Bruce
That’s what’s great about his. Everybody dumping how they did it. Unfortunately my grbl machine is boxed up while we look for another home. So all of this is from memory with no parity code for corrections Generally I use it to make PCBs, it currently has a 500 watt spindle on it. I have a 30 watt SS diode laser that I mount on it sometimes, but I have to change out the Z motor mount to fit the laser to it. I think it was the cause of this (my) addiction. lol…
I have the big machine (CO2) in the garage and have been using it for a few months now. They are all great machines and lots of fun associated with a steep (if not an overhang) learning curve. 
Take care.
Hi Jack thanks so much for all your help. I am currently putting the whole laser and enclosure back together. Everything is working great except the problem of printing photos. The Maker Store has suggested that it could be the Arduino Uno not being able to stream the dpi i was using and suggested dropping back the dpi. I had it set to roughly 300 dpi and they suggest i try at 96 dpi. I think i already tried this but will try again. I want good images not low res ones. If necessary i will look for another controller that can do what i want it to do. When i move from where i am the next step will be a co2 laser. I could modify what i have but each type of laser can be used for slightly different purposes so would be nice to have both. I live in a small flat and have built and will run the laser in my living room! Will ventilate out of the window!
Bruce… Have you watched any of Russ Sadlers videos? He’s an engineer (also a bit britsh) but he applies the math to show you how to get the best results. This one’s on Lab 115 The Russ Formula for Photo Engraving you will find it interesting I’m sure. I and many others have learned a great deal from Russ’ videos. Stick through the dry humor.
Maybe he’ll give you an up on your engraving.
Take care…
Hi Jack thanks for the video link and i am currently watching. He knows his stuff very well. I wanted to tell you that i spent all day putting my laser back together and finally i got it to work with an image. In testing on cardboard i selected an image of a dragon, not really much shading but an image none the less. After lOTS of tests and different settings i changed the DPI from 300 to 96, changed the speed to 400mm per minute, 25% power for laser, 35mm from z table and used Jarvis to engrave it. The machine ran faultlessly after all my testing. Took about an hour, one of these days i will get a co2 laser.
Thanks again for all your help
Bruce