X-Axis Angled Movement After Extension Kit Install - Replacement Idler Brackets Issue

X-Axis Angled Movement After Extension Kit Install - Replacement Idler Brackets Issue

Hi everyone,

I’m having alignment issues with my Laser Master 3 after installing the extension kit and need some help.

:clipboard: Background:

  • Recently installed the extension kit on my LM3
  • During installation, the original idler brackets broke
  • Ortur sent replacement idler brackets and screws

:warning: The Problem:

The replacement brackets are significantly different from the originals:


Old vs New Idler Brackets - Notice the size difference and missing tension markings

  • Larger and longer than the original brackets
  • Missing the tension marking indicators that were on the original brackets
  • After installation, my X-axis no longer moves straight - it travels at a slight angle instead of true left-to-right movement

:wrench: What I’ve Tried:

  • Tensioned the belt to achieve a “guitar string” sound when plucked
  • Moved X-axis fully down before installing belt in the slit
  • Adjusted tension multiple times on the replacement brackets
  • Ran test engravings at various speeds (200-2000)

:chart_decreasing: Current Results:

The engraving quality has degraded significantly:


Text engraving test - Notice the inconsistent letter quality and alignment issues


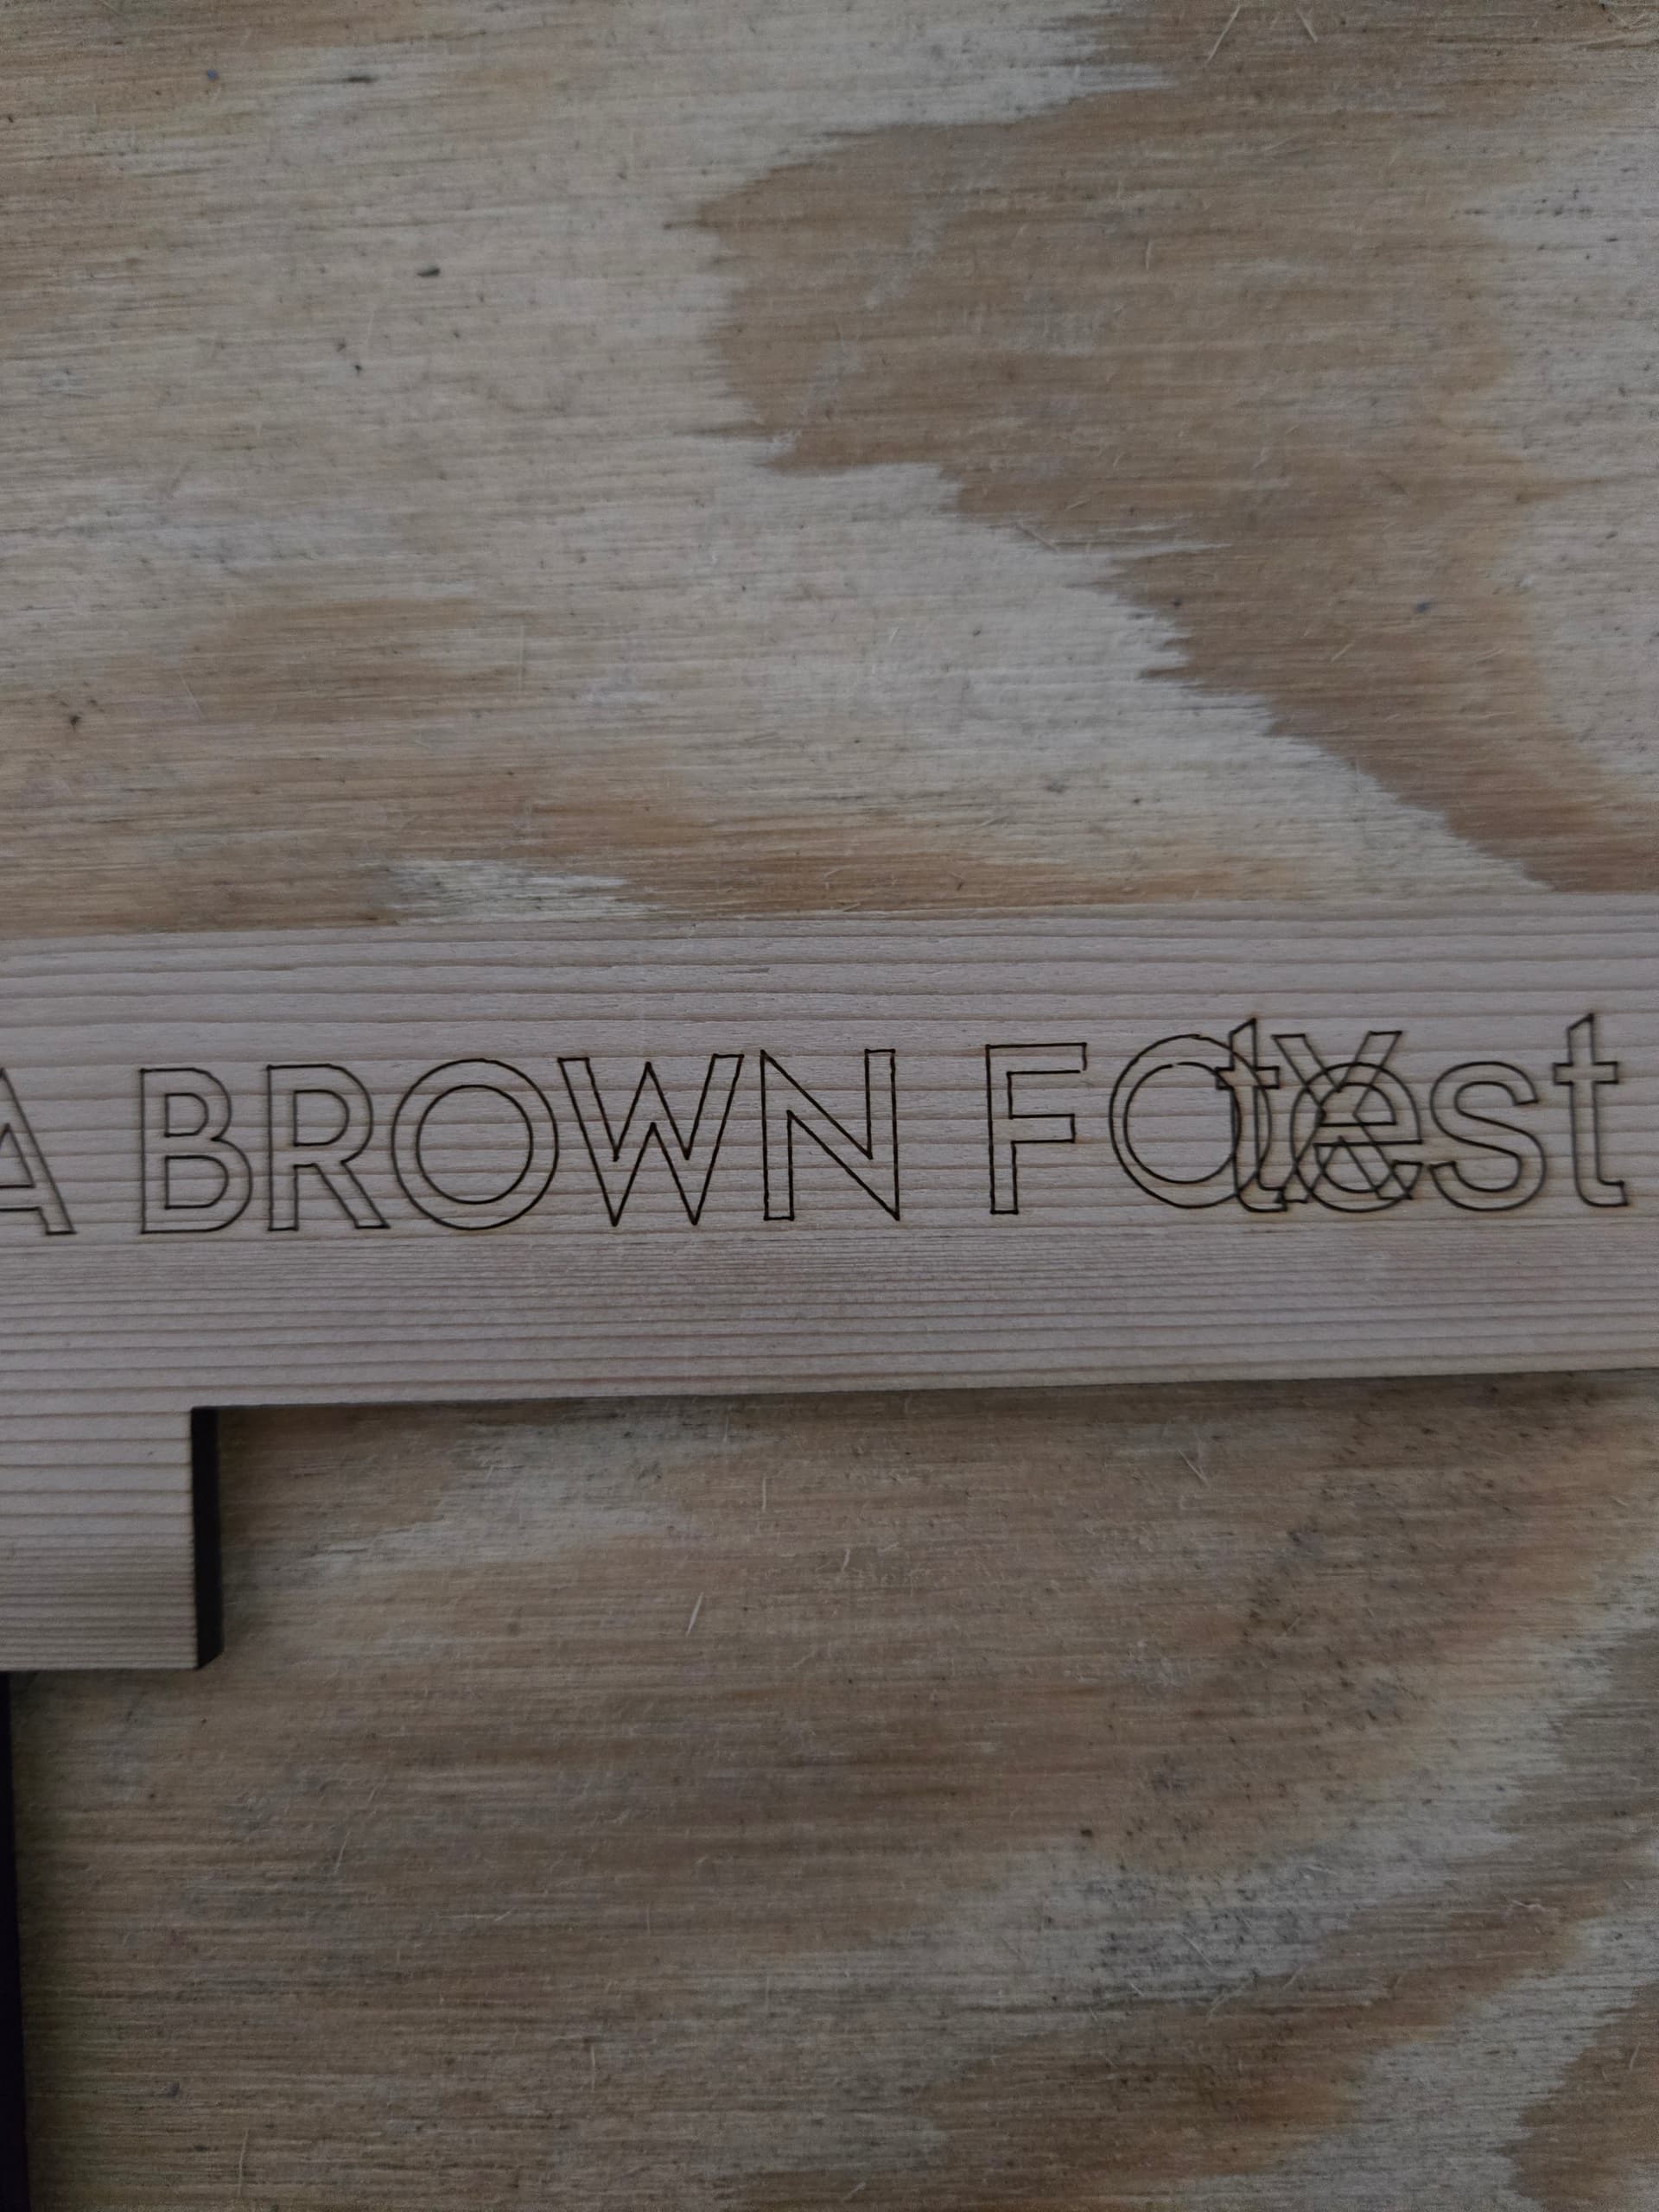
Additional text test showing “wonky” letter formation


Circle engraving test - Circles aren’t perfectly round, showing the X-axis alignment issue

Issues I’m seeing:

  • Text engravings come out inconsistent and “wonky”
  • Lines don’t align properly
  • Circles aren’t perfectly round
  • Overall engraving quality has degraded significantly

:red_question_mark: My Question:

Has anyone else experienced this issue with replacement idler brackets? The machine worked perfectly before the extension kit installation. Are there specific tension settings or installation tips for these newer bracket designs?

Key observations:

  • The X-axis angle issue started immediately after installing the extension kit
  • The replacement brackets have no tension reference markings
  • Standard “guitar string” tension doesn’t seem to resolve the alignment problem

Any help would be greatly appreciated! :folded_hands:


Machine: Ortur Laser Master 3 with Extension Kit
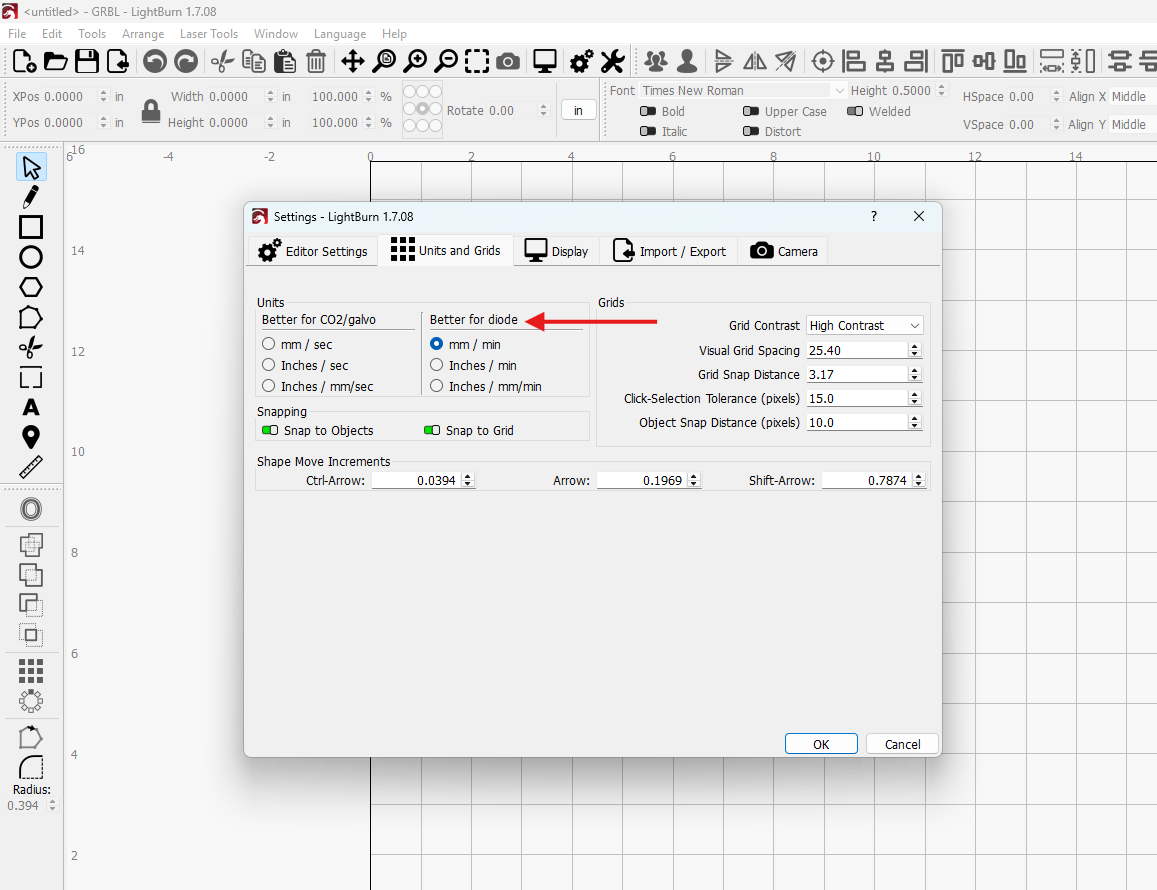
Software: LightBurn
Issue: X-axis angled movement causing engraving quality problems

If the pulley is the same size, the size of the mounting should make no difference in the gantry tracking. It sounds like the belts are synchronized, in other words, the forst tooth of each belt is not the same distance from the frame.
Solution: Loosen the coupling to the shaft that goes across the gantry. Make sure the gantry is square, then tighten the coupling.

This is much too tight. It should just be snug with no slack. If you tilt the frame 45 degrees, does the gantry move under its own weight? This should also apply to the Xaxis.

Until you get the machine properly adjusted, use the test engravings to help you with the adjustments.

Thanks for your response! I am going to try all of this when I get home from work tonight, or early tomorrow and see if it helps. I did make two videos about some of the issues I’ve been having, Just wanted to post them to this thread.

Video 1: https://youtu.be/TFfX83e8jVA

Video 2: https://youtu.be/0SVKKN1IZlU

1 Like

In your video, I noticed that your speed is set to millimeters per second. For a diode laser, it’s best to set the speed to millimeters per minute. You can adjust this in the device settings.

1 Like

Unless you have a 70w diode, 200mm/s is too fast to engrave. That is 12,000mm/m at 30% power. My 20w laser burns good at 3000mm/m and 30% power.

Your fast approach to home is very slow. About 1000mm/m would be a big improvement. That is set in a GRBL parameter.

Unless you hit the rails, there is no need to Home more than once.

You appear to be trying to extend the travel range by resetting the coupling to the timing belts (belts out of back in the slots). Did you notice you kept getting the same result every time? Travel range is set in the GRBL parameters.

Do you have 2 Yaxis stepper motors? Tight belts could cause missed steps on acceleration. I noticed one time you had equal gaps at the back, and the next time it was uneven. That indicates a loose coupling on a cross shaft or one stepper missed some steps.

Finally, it appears your laser head focus point is just barely beyond the light guard. Is your focal point really almost on the piece being engraved?

And one more thing, switch to mm/m like @Woodcraft said.

1 Like

Thanks again for all the recommendations! I’ve finally had some time away from work to address these issues, but regrettably, I’ve only been able to figure out how to change my metrics to mm/min. :sweat_smile:

I’m very new to laser engraving, so some of the vernacular is confusing. I apologize for my ignorance, but you may have to dumb things down for me if you wouldn’t mind!


Coupling/Gantry Questions

MikeyH said:
“Solution: Loosen the coupling to the shaft that goes across the gantry. Make sure the gantry is square, then tighten the coupling.”

I’m not sure what this means. I think the gantry is the part that moves from left to right along the length of the Y-axis - from the part that has the buttons on it to the part that has the switch on it. If that’s the case, there seem to be several fasteners on that assembly, so which specific ones are you referring to?


Belt Tension Test

MikeyH said:
“This is much too tight. It should just be snug with no slack. If you tilt the frame 45 degrees, does the gantry move under its own weight? This should also apply to the X-axis.”

I made a video showing what happens when I tilt the machine 45 degrees in both directions (because I’m not sure exactly what the gantry is). Here’s the video: https://youtu.be/0p-jhsaP0jQ


Speed Settings :white_check_mark:

Woodcraft said:
“In your video, I noticed that your speed is set to millimeters per second. For a diode laser, it’s best to set the speed to millimeters per minute. You can adjust this in the device settings.”

Done! Thanks for that tip!


Homing Speed Settings

MikeyH said:
“Your fast approach to home is very slow. About 1000mm/min would be a big improvement. That is set in a GRBL parameter.”

I have no clue where this setting is. Once again, apologies for being ignorant - I’m trying to learn! Could you point me in the right direction for finding GRBL parameters?


Homing Frequency :white_check_mark:

MikeyH said:
“Unless you hit the rails, there is no need to Home more than once.”

Noted, thanks!


Travel Range Question

MikeyH said:
“You appear to be trying to extend the travel range by resetting the coupling to the timing belts (belts out of back in the slots). Did you notice you kept getting the same result every time? Travel range is set in the GRBL parameters.”

The only thing I did was follow this installation video when I installed the extension kit: https://www.youtube.com/watch?v=v_8Lufv8HdI

This video instructs to change the Y Max travel to 850-860 (if my memory serves correctly), which is what I did. Was there something else I should have done?


Y-Axis Stepper Motors

MikeyH said:
“Do you have 2 Y-axis stepper motors? Tight belts could cause missed steps on acceleration. I noticed one time you had equal gaps at the back, and the next time it was uneven. That indicates a loose coupling on a cross shaft or one stepper missed some steps.”

I’ve never purchased Y stepper motors - I’m not sure what that refers to. Are you asking if my machine came with two motors for the Y-axis movement? How would I check this?


Laser Focus Point

MikeyH said:
“Finally, it appears your laser head focus point is just barely beyond the light guard. Is your focal point really almost on the piece being engraved?”

I have no idea… I feel really stupid after reading through these responses! :sweat_smile: Could you explain how to check or adjust the focal point?


Summary

I really appreciate everyone’s patience with a newbie. If you could help clarify:

  1. Which specific fasteners to loosen for the coupling issue
  2. Where to find GRBL parameters for homing speed
  3. How to check if I have 2 Y-axis stepper motors
  4. How to properly set the laser focus point
  5. Video showing more stuff lol (posted above, reposting here for visibility): https://youtu.be/0p-jhsaP0jQ
  6. Belt tension is the belt tension in the video adequate?

Thanks again for all your help! :folded_hands:

By the numbers:

First, we were all beginners at one time. If we use a buzz word you do not understand, ask. There is no shame in trying to learn. There is only shame in giving up.

  1. You may have to turn the machine upside down to see the motors and couplings. The Gantry moves front to back, and this is the Yaxis. The laser module is mounted on the Trolley, moves left-right, and this is the Xaxis.
  2. Two ways: [A] Enter the GRBL parameter in the Console window. If you enter $$ in the Console window, it should list a bunch of numbers preceded by the $ sign. [B] You can also view and change GRBL parameters using the Machine Settings window. DO NOT CHANGE ANYTHING UNTIL YOU ARE VERY SURE WHAT IT IS FOR AND WHAT IT WILL DO..
  3. Google “stepper motor image” and you will see what to look for. In your video, the motor(s) would be located at the opposite end of the frame where those belt tensioners are located. My SF-A9 laser has one motor located in the front of the frame with a belt on one side and a shaft on the other. My tensioners are in the back.
  4. Lightburn has a Focus Test in the Laser Tools drop down. Search the LB Docs for how to use this feature. A kludge is to burn a line about 100mm long in the Xaxis, move the head up 2mm +/-, move 2-3mm in the Yaxis and burn another line. About 10 lines should give you a pretty good idea of where the best focus height is going to be.
  5. Video reviewed. Xaxis tension is almost there. I would leave that one alone for now. Yaxis is too tight. If you tilt it almost 90 degrees and it still will not fall, you know you have some adjusting to do. Do not adjust any GRBL parameters until the mechanical adjustments are correct.
  6. Read #5.

So we ALL have a copy of your current GRBL parameters, enter $$ in the Console window. Then copy-paste everything below the $$ in a reply. Also paste into a text file and put in a safe location. You will need this in case you have to undo a change that did not cooperate.

This should be enough homework for now. :nerd_face:

Ortur Laser Master 3 Connection Log

Click to expand log

Waiting for connection…
[MSG:25:Info: USB SERIAL STREAM CONNECTED]
Ortur Laser Master 3 Ready!
OLF:211.
OLH:OLM_ESP_PRO_V2.4B.
OLM:GENERAL.
GrblHAL 1.1f [‘$’ or ‘$HELP’ for help]
ok
[ORIGIN:China]
[PRODUCER:ORTUR]
[AUTHOR:LEADIFFER]
[MODEL:Ortur Laser Master 3]
[OLF:211]
[OLH:OLM_ESP_PRO_V2.4B]
[OLM:GENERAL]
[DATE:20230417]
[SN:BAF8E5DC2AFF645CC0A76AAD9C118928]
[VER:1.1f.20220325:]
[OPT:VNZHTS+,63,32767,3,0]
Target buffer size found
[NEWOPT:ENUMS,RT+,HOME,NOPROBE,TC,SED,UD,CLU,WIFI,FTP,TMC=7,SD,ITG,GT,YRR]
[FIRMWARE:grblHAL]
[NVS STORAGE:FLASH]
[DRIVER:ESP32-S2]
[DRIVER VERSION:220327]
[DRIVER OPTIONS:GIT-NOTFOUND]
[BOARD:Ortur Laser Master 3]
[TYPE:OLM3]
[CLUSTER:16]
Cluster size found
[WIFI MAC:84:F7:03:F8:0F:36]
[IP:10.0.0.105]
[PLUGIN:Power Detecter v1.0]
[PLUGIN:Power Control v1.0]
[PLUGIN:gyroscope sensor v1.0]
[PLUGIN:Trinamic v0.09]
[PLUGIN:SDCARD v1.05]
[PLUGIN:ITG STREAM v1.00]
[PLUGIN:ESP32 WebUI v0.03]
[PLUGIN:GADGET v1.00]
[PLUGIN:YRR v1.00]
ok
Homing
<Home|MPos:0.000,0.000,0.000|Bf:63,32767|FS:0,0|CL:0,0|PS:2,0|VA:23754,30|Ov:100,100,100|A:SFM|H:1,7>
<Home|MPos:0.000,0.000,0.000|Bf:63,32767|FS:1131,0|CL:0,0|PS:2,0|VA:23743,30|A:SFM>
ok
$$
$0=5.0
$1=100
$2=0
$3=1
$4=7
$5=0
$7=0
$10=2047
$11=0.050
$12=0.002
$13=0
$14=0
$15=3
$16=1
$17=4
$18=0
$20=0
$21=0
$22=1
$23=7
$24=600.0
$25=800.0
$26=100
$27=1.000
$28=0.100
$29=0.0
$30=1000.000
$31=0.000
$32=1
$33=2000.0
$34=0.0
$35=0.0
$36=100.0
$37=0
$39=1
$40=0
$41=0
$42=1
$43=1
$44=3
$45=0
$46=0
$56=1.0
$57=1800.0
$58=395.0
$59=6000.0
$60=0
$61=1
$62=0
$63=3
$64=0
$70=31
$73=3
$74=MAGA
$75=**
$76=OLM3_AP_0F36
$77=12345678
$100=100.000
$101=100.000
$102=100.000
$110=20040.000
$111=20040.000
$112=600.000
$120=2000.000
$121=1800.000
$122=200.000
$130=400.000
$131=854.000
$132=100.000
$140=600
$141=1000
$142=800
$150=16
$151=16
$152=16
$160=0.000
$161=0.000
$162=0.000
$180=20040.000
$181=14028.000
$182=600.000
$200=65.0
$201=50.0
$202=60.0
$210=100
$211=100
$212=100
$220=50.0
$221=60.0
$222=60.0
$270=115200
$271=115200
$272=115200
$300=OLM3_STA_0F36
$301=1
$302=192.168.5.1
$303=192.168.5.1
$304=255.255.255.0
$305=23
$306=80
$307=81
$308=21
$310=OLM3_AP_0F36
$312=192.168.5.1
$313=192.168.5.1
$314=255.255.255.0
$330=admin
$331=user
$332=255
$339=3
$341=0
$342=30.0
$343=30.0
$344=180.0
$345=200.0
$384=0
$392=5.0
$393=3.0
$600=0
$601=5
$602=0
$603=5.0
$604=6.0
$605=1
$606=1
$607=0
$608=1
$609=1.000
$610=0
$611=0
$612=1
$613=24010
$614=0
$615=api.ortur.cn
$616=0
$617=0
$622=127
ok

Arent both belts for the same axis? the two belts that the idler brackets are affixed to moves the laser left to right (x-axis, i’m fairly certain). I’ve never touched the y-axis, those came already attached from the factory. Unless I’ve mixed up my axis’… I think “X goes across” so the x axis goes across the long span of the machine, and y axis is what my laser head goes up and down on?

I typed in “$24=250” and “$25=1000” I read thats how to increase the homing speed to 1000. I dont know how to make the y axis belt looser because it came assembled from the factory. The only belts i put on are on the frame, the one the laser sits on came from the factory.
If you could send some photos or a video that would be really helpful in identfying some of this stuff because i don’t understand the lexicon very well. I feel like throwing this thing away… I’m frustrated with it.

I’m willing to pay someone for a zoom call tech support to walk me through this. I bought this Laser for work. I build escape rooms, and these issues I’m having are really getting in the way. If I can pay someone to hop on a call and provide tech support, let me know! :slight_smile:

I think I’m going to throw this laser away and buy a new one. I’m sick of dealing with it. I need it up and running immediately, and it’s causing more headache than anything.

Thanks everyone for the help. Take care.

These are the right parameters. Mone are 200 & 3000 respectively.

Only photos of the same machine would be useful.

If your up and down is front to back, then yes that is the Yaxis.

Your original complaint is that the two sides of the gantry would not travel the same distance. Your accel rates seem to be a bit agressive.
$120=1000
$121=1000

See if these clear up that issue.

Don’t give up yet. I think we are close to being done. Bying another laser could mean you are just starting over with a whole new set of problems.

I have a laser guy I used to pay for all my laser jobs before I got this. I’ll throw it away, and when I ready I’ll drop $5k on a co2 laser. I’m done messing with this one. In the garbage it goes. I appreciate your help!

We really are not close to being done. We’ve made no progress. Lol I work long hours, and I’m done messing with it. I looked up technicians, they don’t exist anywhere I can find. And no amount of money will get anyone on the phone for tech support, I can’t send it anywhere, the company is in China and unreachable. It was a mistake to buy this thing, I’m throwing it away and going back to my laser guy to do the jobs for me. I’ll buy a better one later. I’ll save time and money paying my laser guy for the stuff I need done. Novody is going to give me any help with this thing. There’s no shops I can take it to to get fixed, no technicians will come fix it, it’s more hassle than what it’s worth. This thing literally cost $800. Who cares… I’ll just throw it out. I appreciate your help, but it’s cheap junk. I should have spent $5k on a co2 laser. Lesson learned.

Even a Zoom would not work well for this. You would need someone on site. I understand you do not have the time to (don’t want to) mess with it.

Don’t toss it. You should be able to get $400 for it.

Just a note, I bought the $1200 Sculpfun SF-A9 40w/20w to cut 7/16" bamboo cutting boards. A local CO2 shop could not cut it in 20 passes with 30w of power. I could cut 5/16" bamboo with my 10w S30 machine, but the thicker board was too much.

@misken reviewed the new A70 (70w) and said it has a surprisingly small beam spot.

Where am I going with all this you ask? I have 3 different Sculpfun machines and they were all plug it in and make stuff.

1 Like

The Sculpfun one is S70, but yes :slight_smile: I was really surprised of the beam spot. Much better than the A9 40W machine also from Sculpfun. I did not update the description with my latest tests but hopefully will be able to do it soon :slight_smile:

1 Like