Th be honest while you are installing the UAA you may as well put the extra hour or so in for the manual override. You will be surprised how useful you will find it.
My main use for the override is when I am spending a bit of time cutting some waste ply or acrylic into handy useful offcuts manually with the Ruida panel controls. Set the max power and speed on the panel and just cut straight lines using the pulse and direction key.
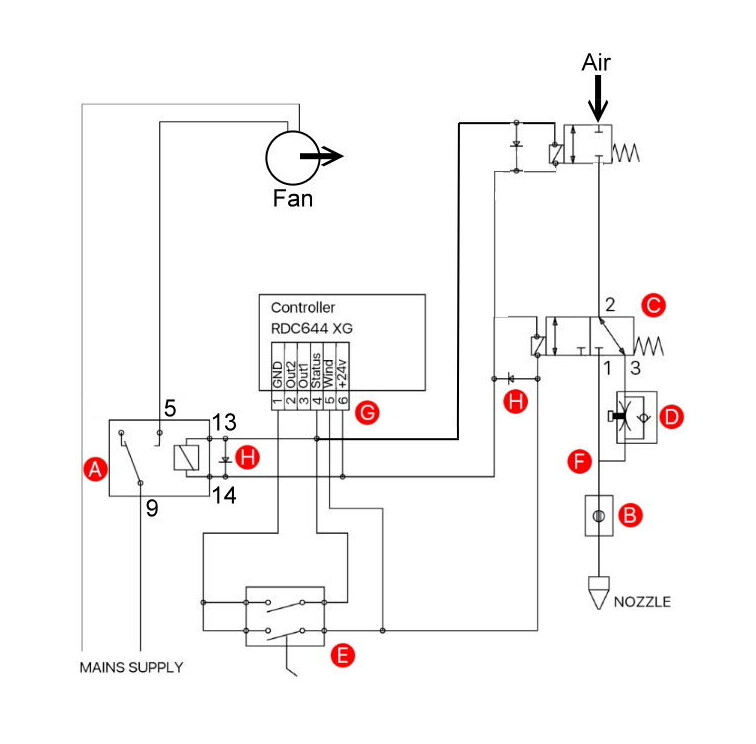
Also, as you are installing an additional solenoid I would recommend you use the supplied relay to power your extractor fan so it comes on/off with the UAA.
I have a question, especially for those who have installed this air assist upgrade. I noticed that during the cutting process pin 5 “WIND” opens the solenoid valve only when there is a laser cutting beam. When the machine moves to another drawing, the solenoid valve will close. The worst is when engraving because the solenoid valve has a lot of openings and closures. Definitely the solenoid valve will fail fairly quickly. I think that an electronic assembly with a delay of 2-5 sec would help a lot, so the solenoid valve will remain open continuously during the cutting / engraving process and will close after 5 seconds from the end of the process. There are timer relays (0-30 sec), it will be connected to pins 5 and 6. This relay will close the electrical circuit with the solenoid valve connected to pins 4 and 6. If I’m wrong, please let me know.
Simply, the Status becomes active during a ‘run’ of the job.
Wind becomes active when the layer with ‘air assist’ enabled is executed.
I use status to enable low pressure air and the ventilation. When I ask for air assist on the layer, I use ‘wind’ to bypass the restrictor and enable full pressure.
I presented something different, or maybe I didn’t understand the answer well.
I repeat, I have Air Assist activated, I drew a square with a side of 10 mm, I chose Mode-Fill / Interval 0.2 mm. I switched to Start and the result is that at each beginning and end of the line, when the laser beam closes, at exactly the same time the solenoid valve closes and opens. For this square mentioned above, there are 50 lines x 2 ends = 100 solenoid valve closures / openings. So, there are extremely many closures / openings and this will lead to the destruction of the solenoid valve. I could upload a movie, but I don’t know if the platform allows me.
I understood what you are saying but also can confirm to you that at least on my machine there is no such starting and stopping, Once the Run starts the air assist activates and runs constantly until the run is completed.
It does not stop/start/stop at the end of each line or any such thing. Just turns on and turns off after.
I measured with a multimeter all the voltages at pins 1-6. Pins 4-6 have a 24 V voltage throughout the work. Pins 5-6 have a voltage of 24 V only when the laser cuts or engraves (when switching between drawings the voltage disappears, implicitly the solenoid valve will close the air. Also when engraving at the end of each line there is no voltage).
In conclusion, we chose the first option despite the fact that all the schematic published in the virtual space indicate that the solenoid valve should be supplied at pins 5-6.
I mention that my scheme is modified compared to the published one because the compressor is supplied to the external socket of the CNC machine. I have two such sockets on the back panel.
I come back with findings.
In this scheme, the “Air Assist” function is no longer functional, but the solenoid valve will open at the beginning of the cutting/engraving work and will close at the end.
Indeed this is the case. The circuit is supplied from the 24V supply all the way through to those pins. When those pins become active they are grounded. % and 6 are opposite.
If you have air pressure and the machine is not in ‘run’ mode, sitting idle, you will have low pressure air. When the machine goes into run mode you’ll get high pressure air.
The ‘Air Assist’ in the settings layer will have no effect.
You want the solenoid going to ‘Wind’ not ‘Status’.
In the original Air Assist the ‘Status’ was used to enable the air compressor.
The compressor starts simultaneously with the machine. So I have pressure, but the problem is that I can no longer use the ‘Air Assist’ function. But what good is it to disable this ‘Air Assist’ function?
With the UAA if you trigger it from Status and not Wind then the bypass part will not function and you will have no positive pressure in the nozzle to protect your lens.
When cutting or engraving acrylic where best results are obtained with air assist off (also lens protection).
When photo engraving, particularly with a short focal point lens, so the air assist isn’t able to blow back debris and discolour intricate detail but on the next layer will automatically switch on when cutting out the result. (also lens protection).
Besides, if I understand correctly, if your air compressor is switched on automatically from elsewhere, what is the purpose of the UAA?
Bypass works all the time because it is a direct channel between the compressor and the laser nozzle. Problems occur when cutting acrylic and probably wood engraving, in these cases low pressure is needed and I can no longer disable ‘Air Assist’. But I can’t work with connecting the solenoid valve to the ‘Wind’ pin either because the opening of the solenoid valve is intermittent and this will lead to its destruction quickly. I searched in the controller menu, in the LightBurn software and in RDWorks, I don’t have that ‘Air Blow’ function anywhere, as I read on other topics.
The only option is to design an electronic scheme that will have a delay of 5 seconds when closing the solenoid valve and thus obtain its opening throughout the work period. In this case I can connect the solenoid valve to terminal 5 ‘Wind’. It is not difficult, I am already working on this scheme.
You will have to find out why you can’t change the ‘blow type’ semaphore.
If you cannot change that, air assist, as designed will never work without the solenoid issue.
It’s simply that it needs the hardware and software to work together and you don’t have either set up properly.
I broke out the spouses Windows box and I don’t have the ‘blow type’ option either. If you follow the the links, one of them has a firmware upgrade. Don’t know if that’s an issue. I have a 6442 but can’t find any higher version than I have. 8.00.67
Might try a previous version of RDWorks. Matt has one that goes back to .48, the video was done on .47
I don’t know if the access to that semaphore is blocked by the client or the device firmware. I would think it was accessible, that it would be available via Lightburn.