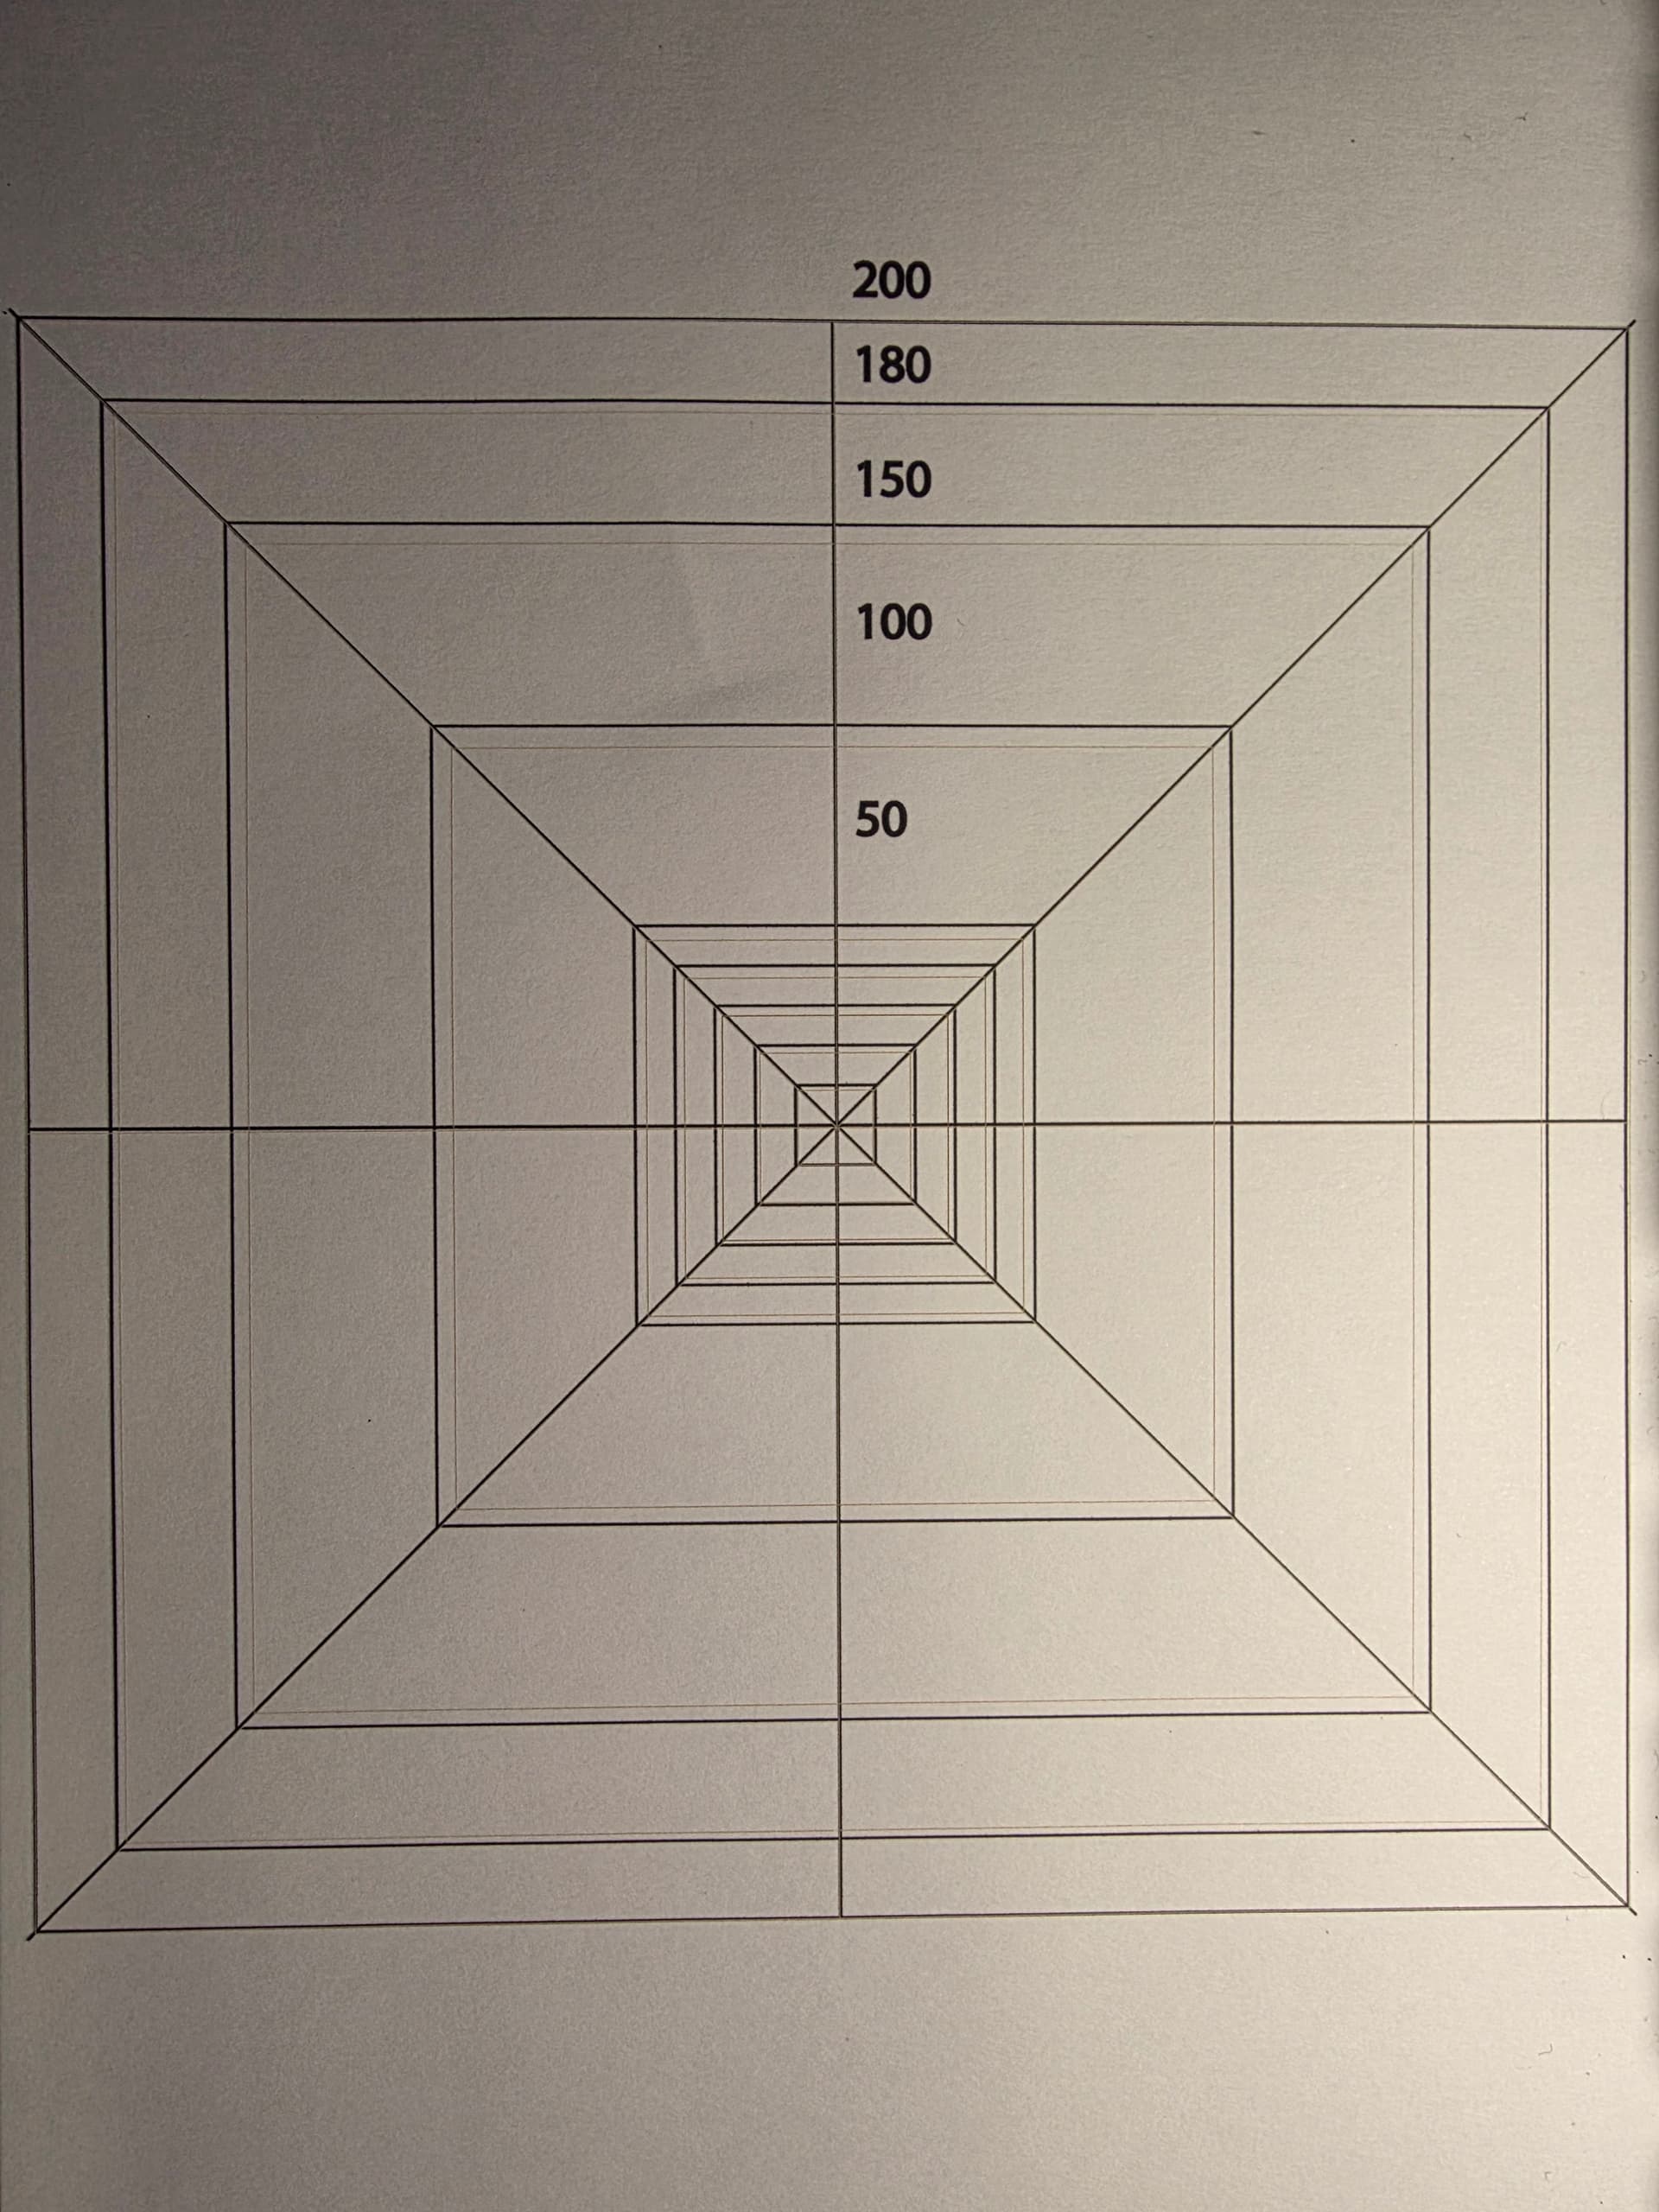
I did this 9 point calibration run with my new Commarker Omni X for the 150 mm x 150 mm lens.
After measuring the calibration lines and automatically setting the new parameters, the output is way too large. So I tried a smaller 50 by 50 mm square, which comes out with 61,38 by 61,38 mm.
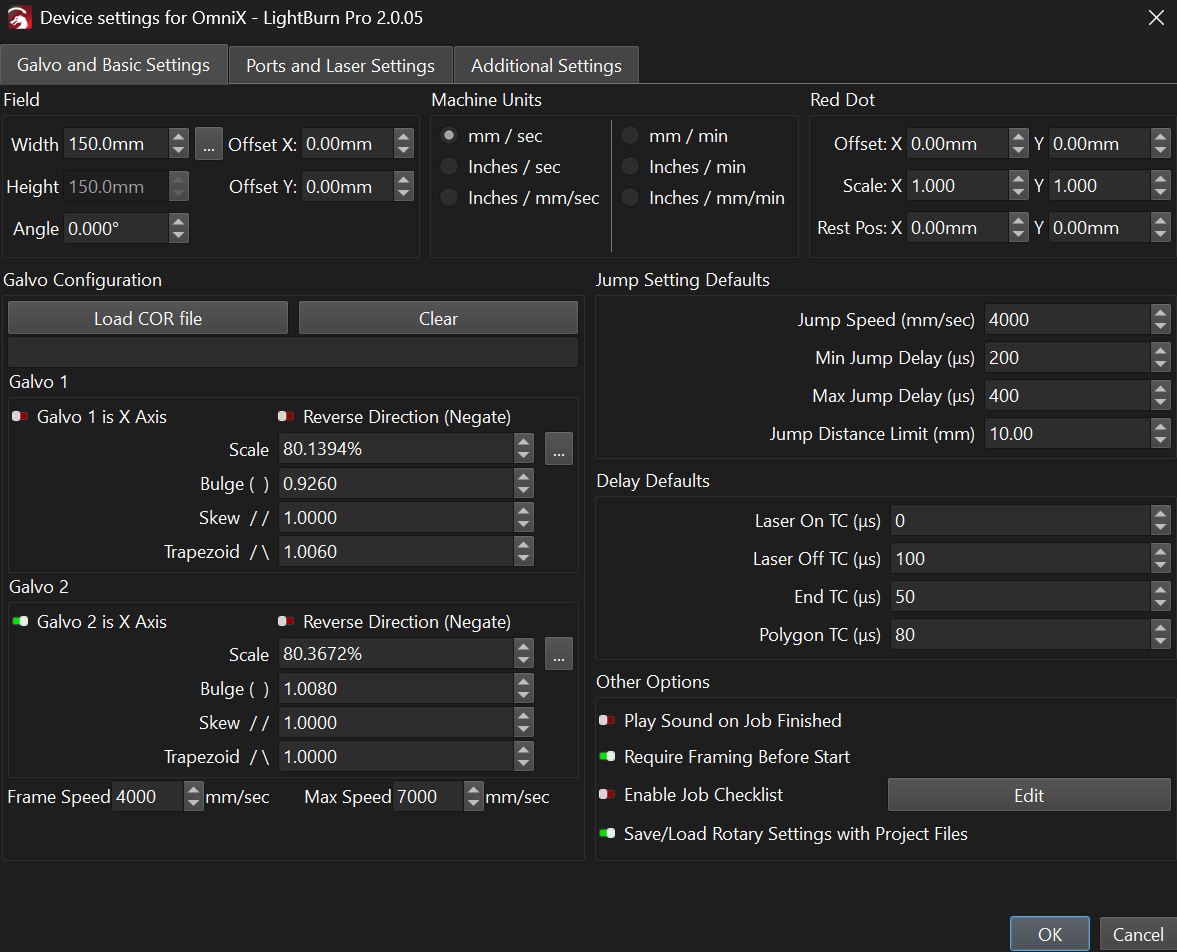
So I began scaling manually. I got it so far that the x- / y-lengths of a square had the exact length.
This resulted in bulging. I adjusted the bulging parameters and got straight lines. As a result the side lengths of my (now 130 mm test sqare) shrunk to about 128 mm.
So
Does the 9 point calibration result in erraneous scaling factors?
If calibrating manually: Is there a certain order of the particular parameters to cause no side effects on formerly found parameters?
Hey there, sorry for the delay in a reply here. It’s a very new machine that we’ve just recently got a couple of in-house, we’re walking through the calibration and setup ourselves (and we’ll be suggesting some improvements to Commarker in that regard).
I’ll set up my 150x150 lens soon and have a reply for you then.
I got an acceptable calibration manually with lots of trial and error.
With both lenses, Lightburn calculated quite erroneous results, when I used the 9 point calibration feature. In essence there had been resizing factors way greater than 100%, when they should have been around 90%.
It’d probably worth further testing the 9 point calibration feature with the Omni X, if you can reproduce my results with your machine.
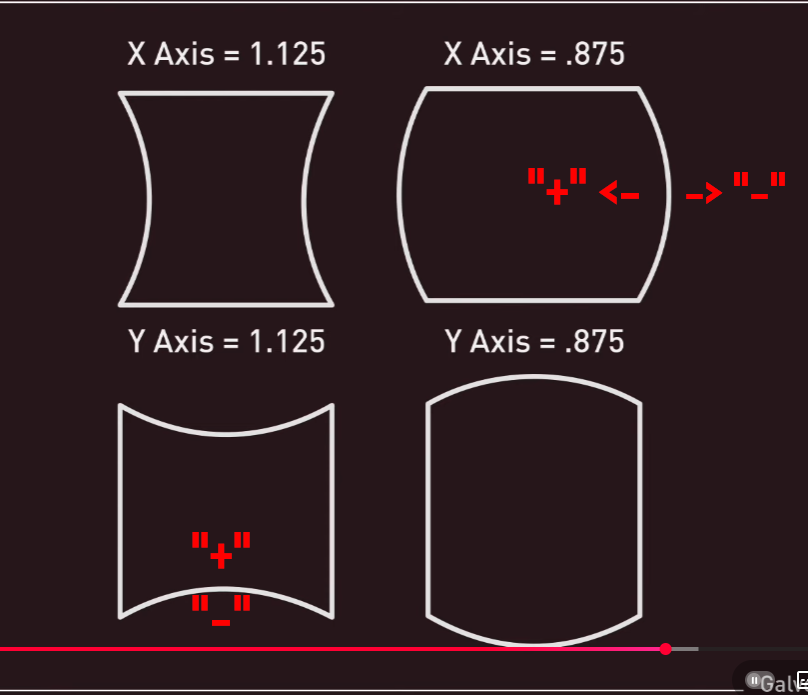
Also being a newbie with galvos, I had to struggle with the parameters for bulging, slant and trapezoid, which seemed to have sideeffects between themselves. But firstcof all it would be great to have help pop up with a graphics showing which change of parameters (lower / higher) has what effect. I had to make screenshots of your ancient (helpful, but not really up to date) video at youtube to be sure I chose the right direction …
I did the 9 point calibration last night and also got a scale that was out of whack. Will be investigating as soon as I can.
Galvo calibration is a very dense topic, and we’ll be the first to admit we want to have a smoother new-user experience, and we’re working towards that as fast as we can.
Thank you for this. I have also experienced this problem. I have used the calibration you have provided. However weirdly it then put my speed out of whack, where 1000 speed was cutting paper, whereas usually this would just engrave. When I open lightburn, it has automatically changed the speed to show 60,000?! I wonder if you experienced this problem as well? Thank you!
I have just worked out that there was a glitch in lightburn where even though I have mm/sec checked, despite this it had changed the settings to mm/min in the actual engraving window settings? After closing down lightburn and reopening, it seems to have corrected itself!
Omni X 10 Watt 250mm lens haven’t tried the 70mm. Having the same issue with the 9 point calibration. First time I engraved part of my green protective shield and the base plate. Eventually got a little better. Just tried the 100mm calibration, had to go down to 20mm to bring the size in. The measurements were just about double. Corrected them but had some skewing. Just made the mistake of running the 9 point again. Laser is all over again. With your talks with ComMarker, don’t they have a .cor file to do a good initial correction? Any turnkey solutions yet? Thanks, Russ
The values for Bulge, Skew, and Trapezoid should be correct after the [9 Point Correction]
Yeah. They should be — that is the correct form. However, there are constant issues with this. I understand that I can’t measure the calibration grid with 100% precision. Still, what was strange is that in the end I got a “pillow” effect on the top and bottom lines, and barrel distortion on the vertical ones.
I spent quite a long time — several days — trying to tune it, even after that. The best result I managed to achieve was a square where the right vertical line was neither straight nor parallel to the left one. The upper half bent sharply inward, by roughly 15% of the overall geometry.
At that point I considered buying LightBurn, but decided not to. I actually wanted to return the marker and request a refund from the company. What surprised me was how sharp and accurate the 150 mm test square was in ComMarker Studio, while everything else there provides only very basic functionality — except for autofocus, of course. That works only there.
So now I’ll finish this message and go ahead and buy your license. On top of that, I’ve already had a positive experience with your support. That alone feels like a success these days, considering how people often work now. (Grumpily walking to the kitchen for tea, thinking about how everything used to be better — the grass greener, the sun brighter.)
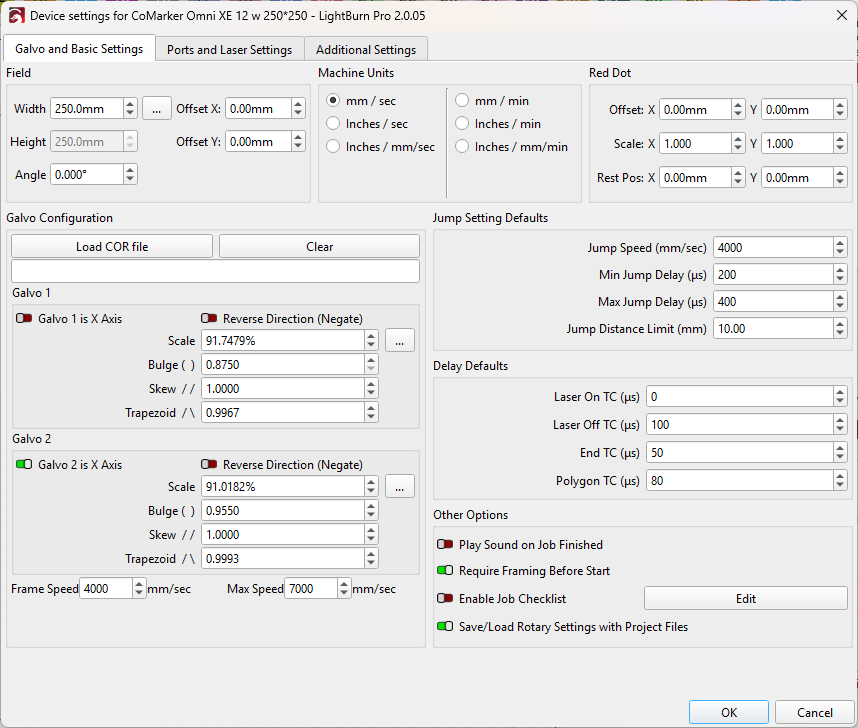
By the way, here are my current settings, although I can’t say they are ideal.
I run into the same issues as the other users with my Omni X 5W (both scale and shape were off after calibration). Is the fix coming soon or should I spend the time trying to calibrate the lens manually?
I have the new Onmi XE. the 12 Watt comes withe 250mm lense. I had no problen callibrating the 70mm but 250 is another story. The 9 point cal just isnt working. The scaling is way off. Im following this feed to see if anyone has found a fix.
9 point calibration often isn’t enough for super long lenses - a 25 point calibration is in the works to address this.
@DCDK yes, I’d recommend tweaking manually, or giving the 2.1 Release Candidate a shot, I believe some fixes for the math in the calibration on BSL devices was pushed into the RC.
As Colin suggests to try it manually, why shouldn’t you start with one of the value presets above. Buy some black paper and after an hour you should have gotten a quite good setting for your Omni X.