Is the compound lens worth going to and if so which combo of lens will cut the 5mm wood,
Merry Christmas to all you guys who help all the people on here, and the same to everyone else,
The compound lens is designed to focus your beam to a smaller spot for detail engraving. It will not perform very well at all for cutting, especially 5mm wood. You’re better off with a 2 or 2.5 inch lens, and drop your focus a couple of mm so you are focused a bit into the wood.
…can you really not cut 5 mm wood with an 80 watt laser ??
I cut 1x6 clear pine with mine with a 4" lens and strong air assist. finished thickness is around 7/8" or 22mm. The final outer cut takes 4 to 6 passes depending on moisture content, but other than that, the simple answer is yes. The guy that turned me onto it was doing it with a 50W and more passes. can’t say about denser woods like chip board or ply though.
I will agree on the compound lens answer, with a caveat. The HD compound lens you see for fine engraving will never have a chance for deep cutting, the bend angle on the beam is too sharp. But… Russ is playing with a long compound lens arrangement that looks to have some promise for cutting thicker material. The thought is to place a long focal length lens at the top of the lens tube to narrow the beam down to the center sweet spot of a shorter focal length lens giving you a much narrower and stronger thin center cutting beam. It looks promising, and I’m hoping it will work. I wish I had the right pieces to play with the idea myself, I’m just glad he does. I’d have to go back and look at his #194 video again, but I believe he was playing with a 7" lens at the top, and either a 2" or a 2.5" lens at the bottom.
Just realized I never asked. Are you using a cutting set up, or are you trying to cut 5mm with an engraving set up? Hard / dense material and an engraving set up and you would have a tough time with it.
Thanks guys for the input, It has put me on a different way as far as lenses go,
The machine came with 2" focal lense, Sometimes it will cut 5mm at around 10 speed and 35 power will cut but not that great and next day it cuts alot better, Being chinese laser i don’t know what type lense is in it. Probably a plano. maybe it would do better with a meniscus lens, What your thoughts on that,
Cutting works best with longer focal length lens’. You have a ‘narrower’ beam as the lens doesn’t bend the light as much to get to the focal point and beyond.
But that is only part of the battle in cutting. You also need GOOD air flow down close to the work. An engraving set up not only has the nozzle up away from the work, but it has a restricted air fitting. Check the first two pics on my Google Mod Page.
If you do have an engraving set up, there are two quick and dirty things you can do to get closer to a cutting set up. First is to pull the air fitting from your nozzle and drill out the center for better flow. How much will depend on the particular fitting you have.
Second is to see if there is a way to raise your lens in the nozzle and tube assembly. If your 2" is already up against the top shoulder, the your only option is to drop from a 2" to a 1.5" and take +/- 13mm out of the distance between nozzle tip and work.
Post a pic of your head and nozzle assembly, and I may hove some other options for you.
Thanks Dave, i will post pic tomorrow.
That works, time for me to call it a night as well
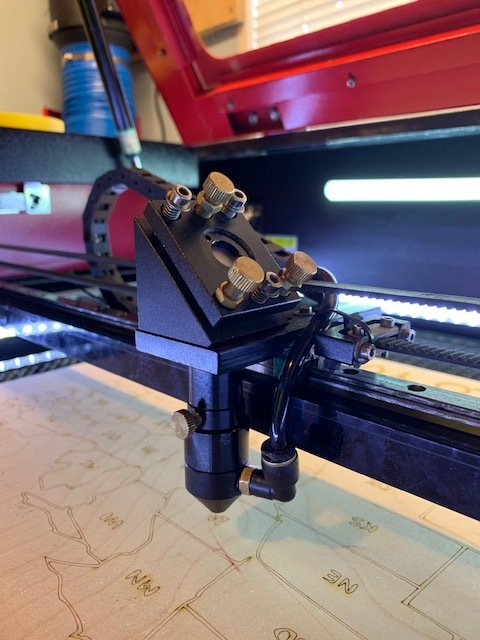
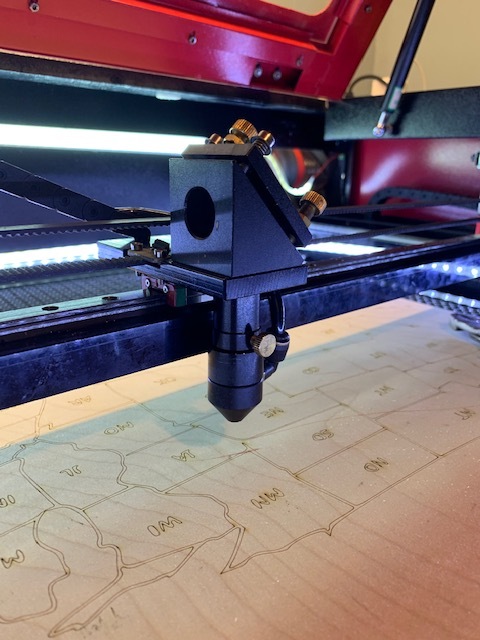
Here are the pics of the head you wanted.
The wood i use is the 5mm birch panels or a hardwood panel, which i don’t really know what is on each side. They both about the same.
Let me know what you think.
That is the twin to what mine shipped with. For 5mm Birch, you could get away with a replacement lens tube and nozzle. That would get you a cutting set up for air assist. I don’t recall what lens you said you had, but if you have an 18mm 1.5", I would add a 20mm 2.5" to that order. I know that tube will hold a 20mm 2.5" all the way up, I don’t know if it has the little lips to keep an 18mm centered. If you aren’t too tight for cash I’d get a spare set of tube, lens, and nozzle just in case. If something happens you will have them on hand instead of waiting for them to ship in.
Your other option would be to download my MK3 sliding plate from my Google Mod Page and order Russ’ MK2 lightweight head. You would get this tube instead of the adapter tube, and be able to put up to a 4" lens in if you wanted to do thick cutting down the road. You would still need the nozzle and longer 20mm lens. That nozzle does have the shelf for either an 18mm or 20mm 1.5" so that’s good either way. The C series tube had shelves for either 18mm or 20mm.
I tried various measures as I and my machine evolved. I wold have been time and money ahead to have just gotten Russ lightweight head from the start. If you do go with my slider, you will need to get a small piece of 5/16" or thicker aluminum plate and drill and tap several holes. If you do not have or have access to a small drill press, then that is not an option. The base plate that the belts attach to needs to be metal. You may need to move your X homing sensor depending on it’s location. My base plate is roughly 10mm wider on the right from the stock plate. I just shifted one screw hole and called it done.

Dave, i have this head but have never put on.
Would this be better for the nemiscus lense in one spot?
That is a MUCH better head than what you have now.
That is a cutting head that will take anything from a 1.5" to a 4" lens as it is. You can swap the NO2 nozzle for an HD nozzle / lens just by unscewing one and putting the other on. It has the L adjustment screw configuration instead of the V so it’s a LOT easier to align. If you do ever switch to Russ’ lightweight head, the lower tube moves right on over.
My only question is does it have a mirror in it? The head you have now will most likely have a 20mm mirror, the new head is set up for a 25mm mirror.
Beyond that, the question is, if you have it, why haven’t you installed it yet?
Meniscus vs. Plano. Many will say that a Meniscus is better than a Plano, but on the other hand Russ did some real world tests with mixed results. My best advise is use what you feel comfortable with.
With that nozzle, you will definitely need good air flow. I run my air assist wit that nozzle at around 15 psi flow pressure for my MDF, and around 5 psi for acrylic. I have a low flow bypass for engraving. Low flow as it it barely bubbles water to maintain positive pressure withing the nozzle. See the vid on my Google Mod Page.
I have the mirror for the head , i think 25mm. Where would be the best spot on the new tube to put a nemiscus lense
The lens position is by focal length, not lens type. Down on the nozzle is the 1.5" position. the short and long sections of the tube are the 2" and 2.5" positions respectively. You put a 4" in the 2.5" position but at the top instead of the bottom. With a short extension between tube and nozzle, you could put a 5" in the 2" position at the top.
The factory focal lengths beyond the nozzle are a bit long for my liking, I cut some flat o-rings from my 3mm MDF for spacers between the nozzle and tube. Brought my tip to work space down to just under 8mm. I know Russ likes to get his tips down to around 3mm for acrylic work, but that’s too close for MDF. I get way to much resin flash back into the nozzle if I’m that close.
If you have the 2" lens like you said, it would go up against the short end shoulder with the retaining ring holding it up there. Do a ramp test to verify your best tip to work distance and you’re set to go.
been busy doing some projects and didn’t want to be down and have some rush jobs come in…plus i really just got my mirrors aligned pretty good. but i think i will get it on now.
Plus i know the longer tube will be to long for my rotary.
I really appreciate your help and let you know when i get things switched out.
That lens fully retracted isn’t that much longer than your stock lens is it? If your machine is like mine, you have around 8" of Z travel. I can gain another inch if I pull my honeycomb and slip a thin piece of steel on my support frame.
I will check tomorrow and get back with you.