After powering up (because of lead screws), Jog to the front left just slightly off the physical limit (You are going to love limit aka Home switches!). Then click Set Origin in the Move window.
Yes, You Home the machine in some fashion after powering up. This is to establish to both GRBL and Lightburn where the laser is physically located.
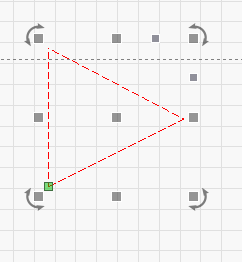
Use the Regular Polygon to create the lines. One end of that is a triangle.
Draw a line across the end, obtuse corners, to get a triangle.
Assign new line to a different layer.
Draw a connected line over the remaining part of the triangle.
Delete the original Regular Polygon.
Now you have a triangle to adjust to your specs. Use Edit Nodes to join the V with the line. Use Group Selection to link them together. Now you can adjust the size as needed.
Hopefully, somebody pops in and tells us the “right” way to do it.
Right click, Properties checks the Window, Shape Properties box.
I wonder, can the various selection windows be slid off to display on a second monitor? When I am in NY, I have a 3 monitor setup to play with. It would be good to use the middle one for drawings with the other parameter windows off to the side.
I just aligned two sides with the workspace grid. Then it is a simple task to extend or shorten the right-angle sides to get what you want.
By the way, the Rotate rotates the entire figure as built. You can add a temporary line, that can be rotated separately to any angle, to be used as a reference if you need a specific angle.
Yes, they came with wires/plugs attached. I looked online and no one seems to sell a complete installation kit. I really like the Lightburn program. I’d like to be able to see the x/y for nodes. Much thanks.
Makes the job a lot easier! the switches should be wired to the Normally Open contacts.
I hope my pix help you get yours installed. Zaxis actuator is a bit clunky, but I had to make-do with angle stock. I am sure the Yaxis switch mountings could be improved to get more travel, but I was in a hurry.