I made the changes u suggested :-
and then found that the x axis was inverted ie Move up took the carriage Down.
Went to the Lightburn soft ware blog to search search for answer and found Getting Started Read Only was not available, YouTube was no help as well.
So back to you i feel it must be my simple mistake
config.txt (28.4 KB)
1 Like
The X axis is the Left to Right (wide axis on the machine)
The Y axis is Up / down (the art space is like a movie screen it’s shorter than it is wide)
Is the inverted axis a new behavior? ( yes / no / uncertain )
When homing does the engraver go toward both switches and jump back 5mm?
Let’s get this in one capture if we can.
-
In the Console window select the switch that says ‘Show all’.
(It’s on the far right of the Console window.) -
Open the Move window and click the Move up arrow.
-
Open the Console window so we can see the instruction that was generated.
(I told the engrave head to move up 10mm.
In the pic I’ve shared, the laser head has been commanded to move 10mm.) -
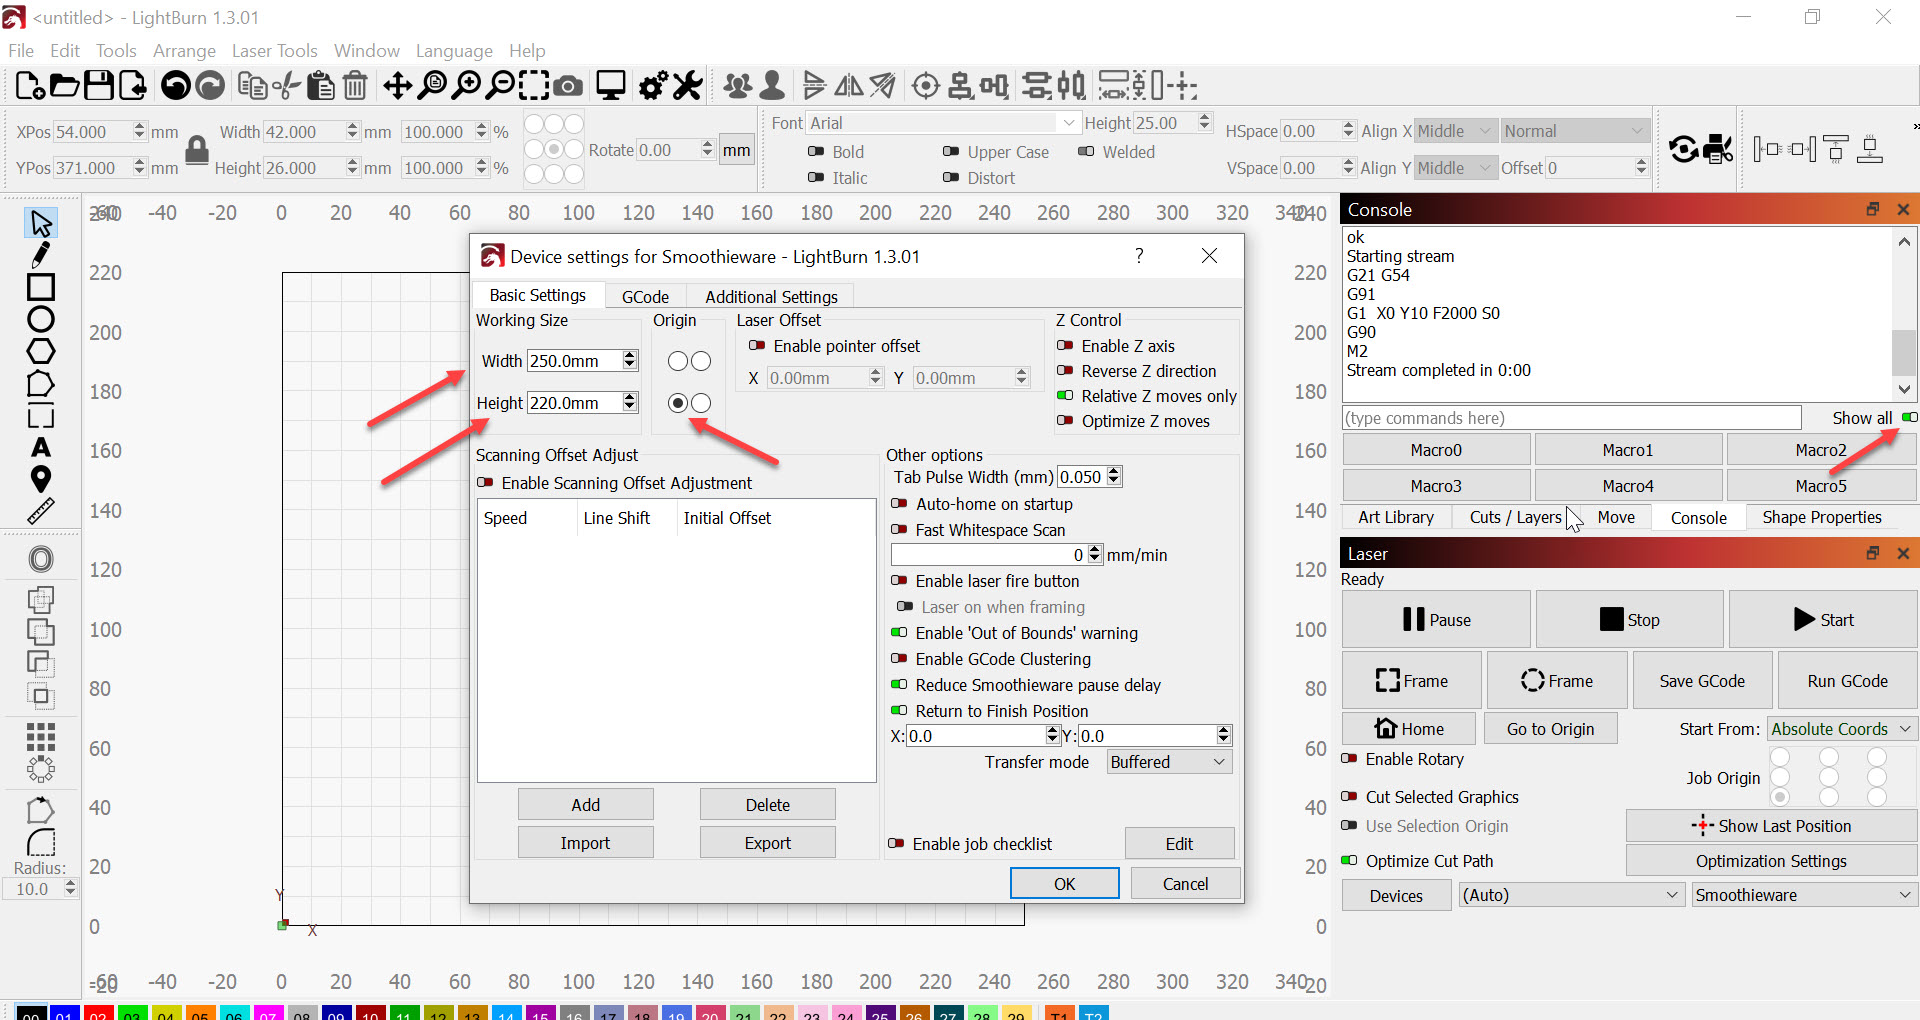
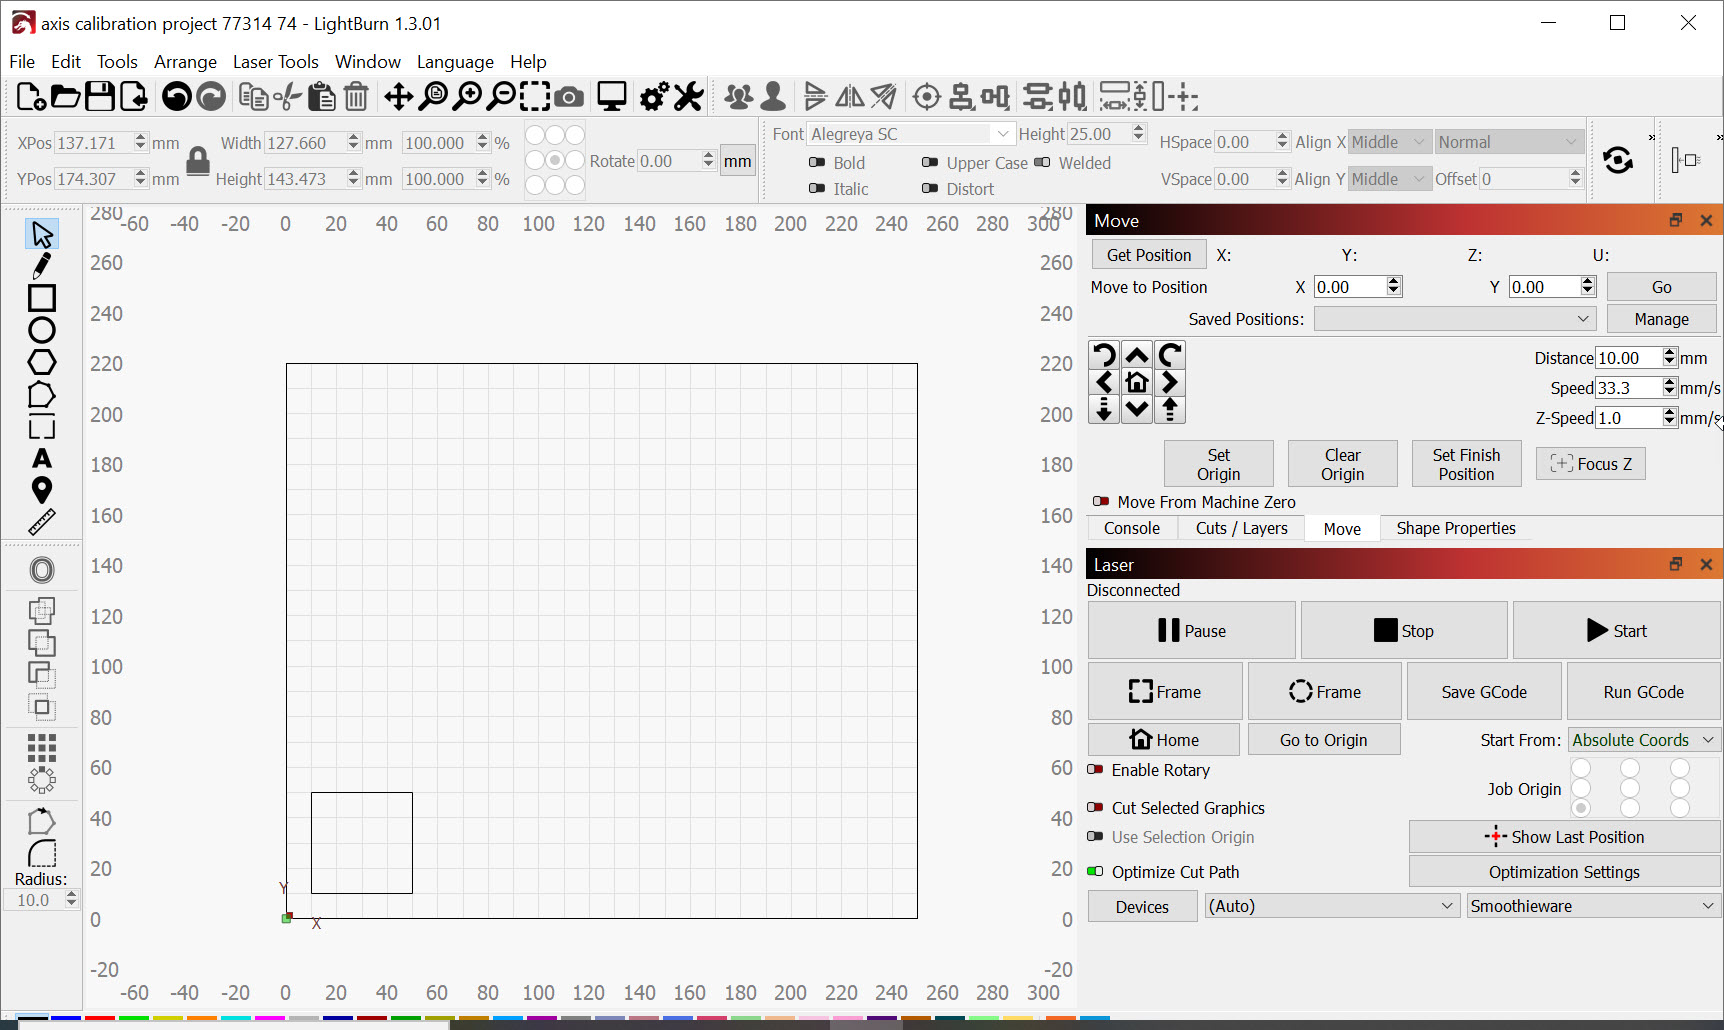
Zoom out in LightBurn to capture the whole work area
( I set mine to 250 x 220 in LightBurn like yours ) -
Click Edit and Device Settings and get this on the screen as well.
(The location of the Origin in LightBurn can reverse some behaviors) -
Capture all that and post it here. We should be hunting the last of the problems.
Re “and then found that the x axis was inverted” ie Move up took the carriage Down.
My Bad should read “Y”
Mew behavior “YES”
For the Console test i started from Home and Move UP (10mm) carriage moves Down 10mm…
Zoom out and Capture whole work area (did a screen shot)

using
config.txt (28.4 KB)
Perfect.
If the homing failed by going in the wrong direction, the axis could have been backwards.
In the Console window Y-10 was commanded.
This is caused by having the origin set incorrectly in the back left.
The engrave head moved 10 away from the origin.
The Origin location in device settings (0,0) should be Left Front.
When you change that your ‘5’ may render upside down.
I’m glad the airplane parts are symmetrical.
It saves a ton of work when fixing the origin.
Please set Origin in Device settings to front left and set Job Origin to front left.
If the 5 now renders upside-down select it, and use the Mirror Vertically tool to fix it.

Working Size in Device Settings can be increased to the size in the config file:
X=250mm
Y=220mm
Save the File.
Then click File, then click Export Prefs and pick a filename that will be easy to find if we need to revisit.
That should have it sorted.
Please let me know how it goes.
Just a quick one John
Re “Then click File, then click Export Prefs and pick a filename that will be easy to find if we need to revisit.”
Presume u mean after save, save another copy with different name to the SD card.
First we’re saving the LightBurn file.
Nope, Prefs is a local file for LightBurn - just in case.
It should be right at this point and we may want to revisit from here if something else changes.
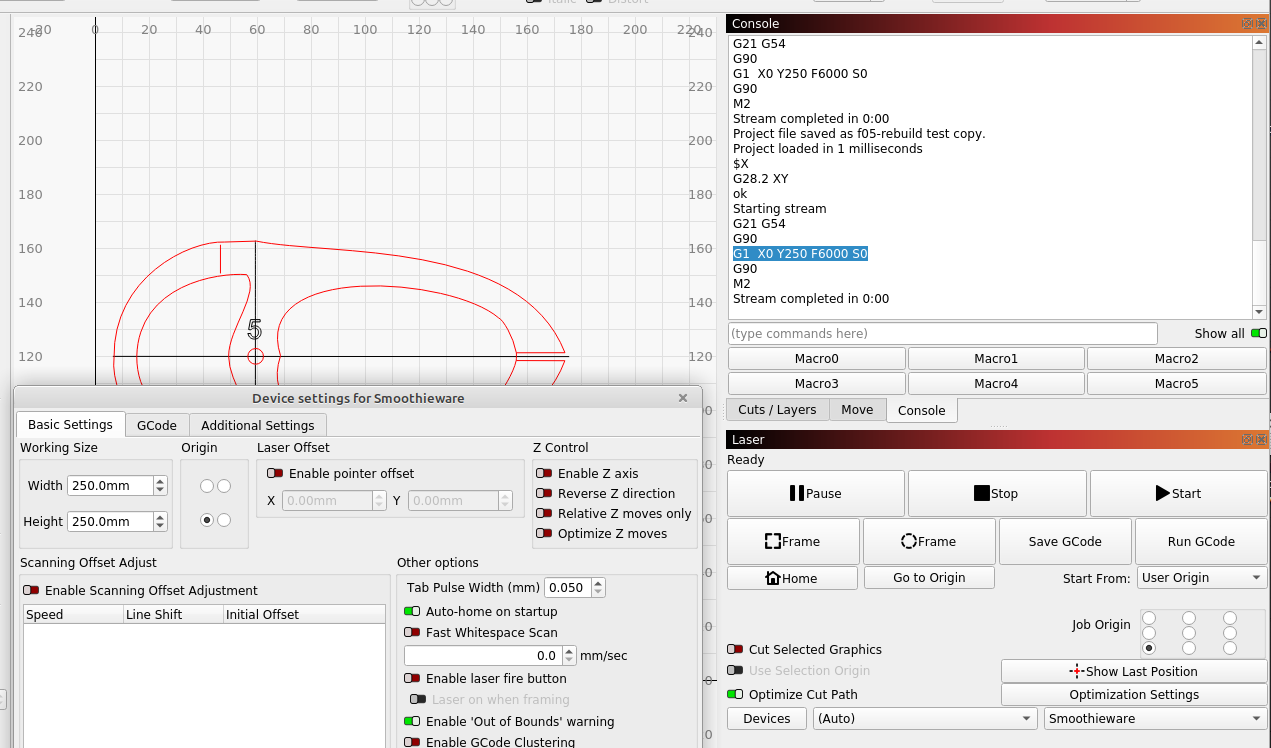
Some thing still wrong
Homing does the right thing
But Go To Origin moves 21mm toward front.
Console calls for “G1 X0 Y250 F6000 S0” so that looks right ?
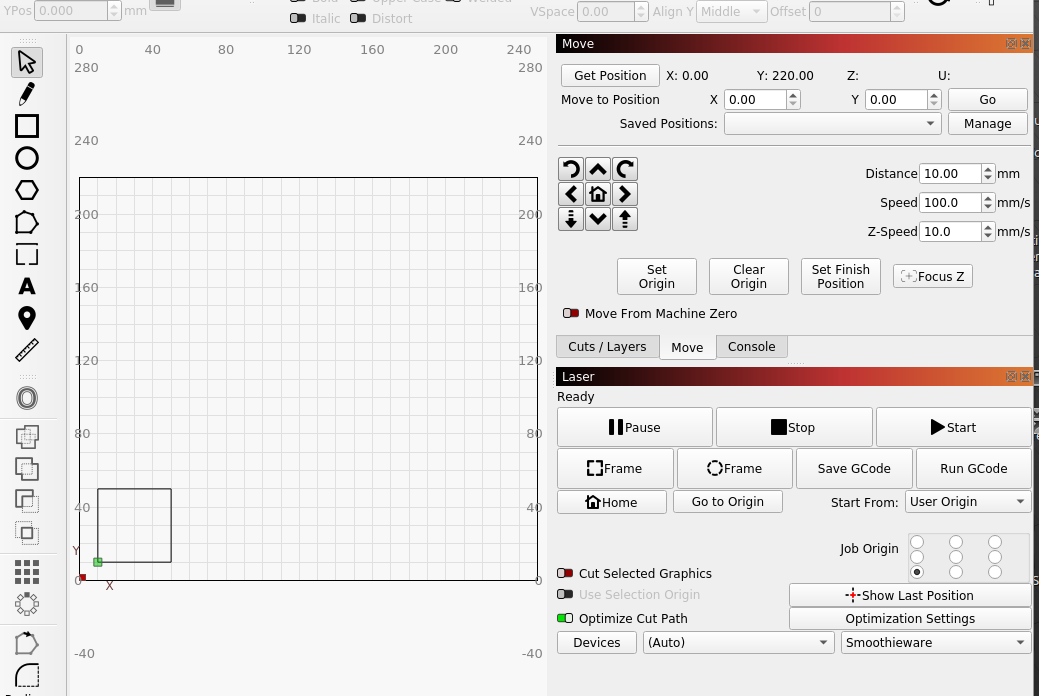
As u can see, set to Start from User Origin and Front Left ect

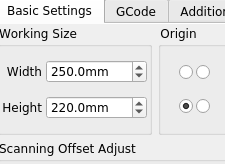
Please change the Height of the Working Size to 220mm in the Device Settings in LightBurn.
Re-save the project file.
Save a new copy of the Prefs file locally dated Feb 24th.
From what you had told me, I felt that Y=250 mm wasn’t within the available work area.
I’m sure the engraver could have attempted it and crashed. I feel that the Job Origin may have been too far forward as a result of the mismatched workspace and config file.
Hope we’ve got it this time.
Yes I reset height in the Device setting , to 220 to match the config file and saved to Prefs…
Home looks ok
Origin no movement
Move works ok but goes off the table, plus belt slippage ect
i have made a short vid, but not allowed here, will try to send to u from gmail…
As i thought is a no reply address. I could send the vid if i hat your email.
May be this will work, let me know?
From where to where?
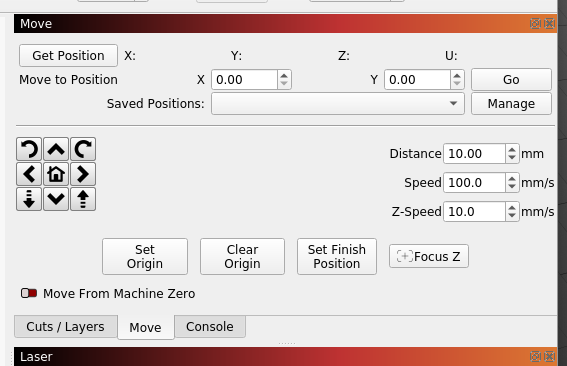
Please capture the Move window in LightBurn and share at your convenience.
Any error messages in the Console window to share?
axis calibration project.lbrn2 (2.9 KB)
If you’re so inclined, run this small file on your engraver and measure the square it makes. Then we can see what is happening. there is nothing in this file that should make it go out of bounds so it will be interesting to see what’s going on.
Be sure to turn on the Show All switch in the Console window you can have a record of the GCode moves that may be causing the unusual behavior.
Let me know what the results of this test are.
Move Window
Console

Interesting when i start Lightburn head travels to Home?
Test piece i’m on paper reduced cuts to 1, here is vid don’t know why the pixilation?
I think the pixilation is because the head tries to move up from the Home posn. and belt slippage
It cuts a square 40.5 x 40,5mm
More info travel to Home and then Origin (no movement)
Are the vids working and of any help ?
The first video worked well after I downloaded it.
The second video link states that the file has been deleted.
I was fairly certain I designed the square off the origin and it should have attempted to travel toward the middle of the work area to begin.
When the test-square finishes, you should have lots of stuff in the console window to share? Did you save it?
If not, please repeat the test and share the contents of that job from the Console window into a reply here.
Hi John
Have u got to look at the console output i sent you?
Looking forward to hearing from u…
Trevor
From the first part of the console.txt file in post 77 above:
Waiting for connection…
Waiting for connection…
Project loaded in 0 milliseconds
G0
Smoothie
ok
ok
Homing
$X
G28.2 XY
ok
Starting stream
G00 G17 G40 G21 G54
G90
G0 X0 Y250
G91
M3
M106
G0 X0Y0
Layer Test only
G1 Y2S0.4F1200
On the 15th line of the file we see G0 X0 Y250
With the advice I’ve offered and the maximum travel we’ve assumed from your engraver, 250mm shouldn’t have been commanded.
Please confirm the following and retest.
The origin is front left per C3D documentation.
The Y axis is set to 220mm in the LightBurn workspace.
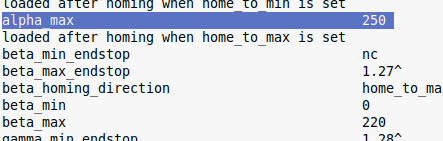
beta_max is set to 220 in the config.txt file on the card in the C3D controller.

From Post 72 above:

I look forward to seeing your test results. ![]()
The origin is front left per C3D documentation.
Config file
Gen. observations prior to staring:-
On start up of LB S/W the head will home OK…
Head Won’t travel to Origin…
Pic of cut and finish location…

Great,
You didn’t say which changes (if any) were made.
Please zoom out to show the LightBurn workspace with the Move window and the Laser window.
Great! That’s a welcome relief. It sounds like the Y-axis crash is remedied.
This is possible but should be confirmed.
With the Power off…
Please measure the distance from where the Y maximum limit switch touches the gantry when homing and the same point where the gantry would be when the switch is depressed.
This number should be 220mm + the pullback as we’ve defined it.
The Laser will show us in the Move window where it understands that it is.
This should be what the engraver calls the Origin.
It should have arrived at what we’ve defined as the origin.
If it doesn’t arrive at the distance from the switch that we’ve defined then other Lost Motion has happened.
If the engrave head arrived at the Y=0 that we’ve specified and If the head has more available room to travel toward the front of the engraver, the Y-axis values can be increased in the workspace and in the Config file up to a point.
With the measurement in mind, after homing, you can pull the laser head forward and see how much motion remains in the mechanism.
If you find 10 or 20mm of travel available please don’t add the full amount back to the Y max. It’s wise to under report the maximums by a small amount.
The Y-axis values must be small enough to allow the switch to pull-off at Y max, and to never allow the hardware to ever touch the Y min (front) edge of the engraver chassis.
When contact (touch or collision) occurs, the laser controller continues to count steps when the steps aren’t moving the laser head. The position of the engrave head becomes unknown to the controller and worse, it doesn’t know that it doesn’t know. Because the engraver is holding the incorrect count, the engraver proceeds to put part of the engraving work in the wrong place after the collision. Holding the wrong count is called ‘Lost Motion’ and the collisions were certainly a contributing cause of the displaced lines.
Lost motion can also be caused by excessive acceleration, loose belts, loose drive sprockets and high speeds. None of these appear to be the issue here - but we’ll know with much more certainty after you measure the distance.
If the engrave head did not travel the beta_max_travel + switch pullback then we check the belts and sprockets and reduce speed and acceleration. Moving the engrave head along the Y-axis moves more mass (the head and the gantry) than moving the engrave head along the X-axis. The accelerations and speeds are usually similar in the defaults but what is possible is definitely different. The greater the mass the more time it takes to change direction with the same power given the same motor and the same motor driver.
Users can fine tune the X-axis acceleration and Y-axis acceleration by increasing them until Lost Motion occurs then reducing them back down enough to stop it. This is optional and can be done at your leisure.
This picture is intriguing. The laser should be sitting at 0,0 - as we’ve defined it. The X axis position looks very close to the edge of the bed. I can’t see the X limit switch to confirm that it’s pulled off properly but it hasn’t seemed problematic.
Adding distance back into the X-axis (alpha_max_travel) is similar to the Y-axis (beta_max_travel) except that after homing and after the pullback is complete, (with the power off) you measure how far you can move the engrave head to the right before it collides. Be sure to under-report that number slightly as alpha_max_travel in the Config file and the LightBurn workspace (at your leisure).
No changes were made.
Please zoom out to show the LightBurn workspace with the Move window and the Laser window:-
Re power off test, and Y positions etc:-
All the limit switch are optical devices, impossible to see when it touches the gantry, let alone when depressed…
X axis optical S/W shown below, (Y axis optical S/W too difficult for pic)…

After cut pic.

The rest of you instructions a bit beyond me…
I may have spoken too soon. Belt Chatter against the edge of the workspace should not be happening.
Please open a blank text document.
In LightBurn click Help, then click Generate Support Data, then go back to the text document and key ctrl-v to paste it. It will look messy - it should.
Please save the file as Support Data.txt
In LightBurn, click File, click Save GCode and save this file as Square Test.gc
In LightBurn, click File, click Export Prefs (toward the bottom) and type in today’s date.
This file may end up in your documents folder.
Please compose an email to Support@LightBurnSoftware.com and attach the three files:
Support data.txt
Square Test.gc
and the dated file with the extension .lbprefs ( mine landed in Documents )
For the Subject include: ATTN: John Re forum 77314-83
Email is safer for the Support Data, but if you feel that it’s a nuisance to email them, feel free to post them here and I’ll take them down as soon as I’ve downloaded them.
I’m hoping something will show up in those files.
When homing, it is an absolute necessity that the laser head backs up the amount that we have specified in line 293 and 294 of the config file:
5mm was selected for troubleshooting. It should be excessive and easy to see.
alpha_homing_retract_mm 5 # distance in mm
beta_homing_retract_mm 5 # "
Please perform the following test of the optical switches.
I will review the documentation at C3D’s site while waiting for your email or post.
I’m lost at:-
Type M119 into the Console command entry field exactly as it is written, with capital letter and no spaces. Press Enter to send the command.
No response from Console, two attemps (text from console attached)
Console Waiting for connection…txt (405 Bytes)