No perspiration ![]()
![]()
No perspiration ![]()
![]()
Dear David/Ron
Thank you for the quick reply. I will definitely try again this week.
Just to double confirm. Is it OK I apply 2 or 3 coats of Ti02 on the ceramic tile surface.
I also have a Neje A40630 7.5watt Diode Laser and may try to use this instead of N40640. Will definitely sent photos of my finish work and hope it’s what I want and also to make sure both you and Ron are happy and have not wasted your time for the recommendations.
Thank you. John.
Dear Ron
Thank you for your advice and quick reply. I’m working now and engraving is my hobby.
I will sent you information requested in your reply during the week when I have time.
Thank you again, very kind of you and David.
John
John you and any others that have followed this thread are more than welcome to my help, be it technically right or wrong, at least it has created some interest. When I first started out on this hobby there was little advice available and I learned by trial and error. I now see loads of people making a living by producing YouTube videos on the subject and many of them contain misleading inflammation. I personally enjoy trying to improve how we do things by the old “suck it and see” method. Hence the reason for starting this thread in the first place. I think it’s now known as experimenting. ![]()
Dear Ron / Jack
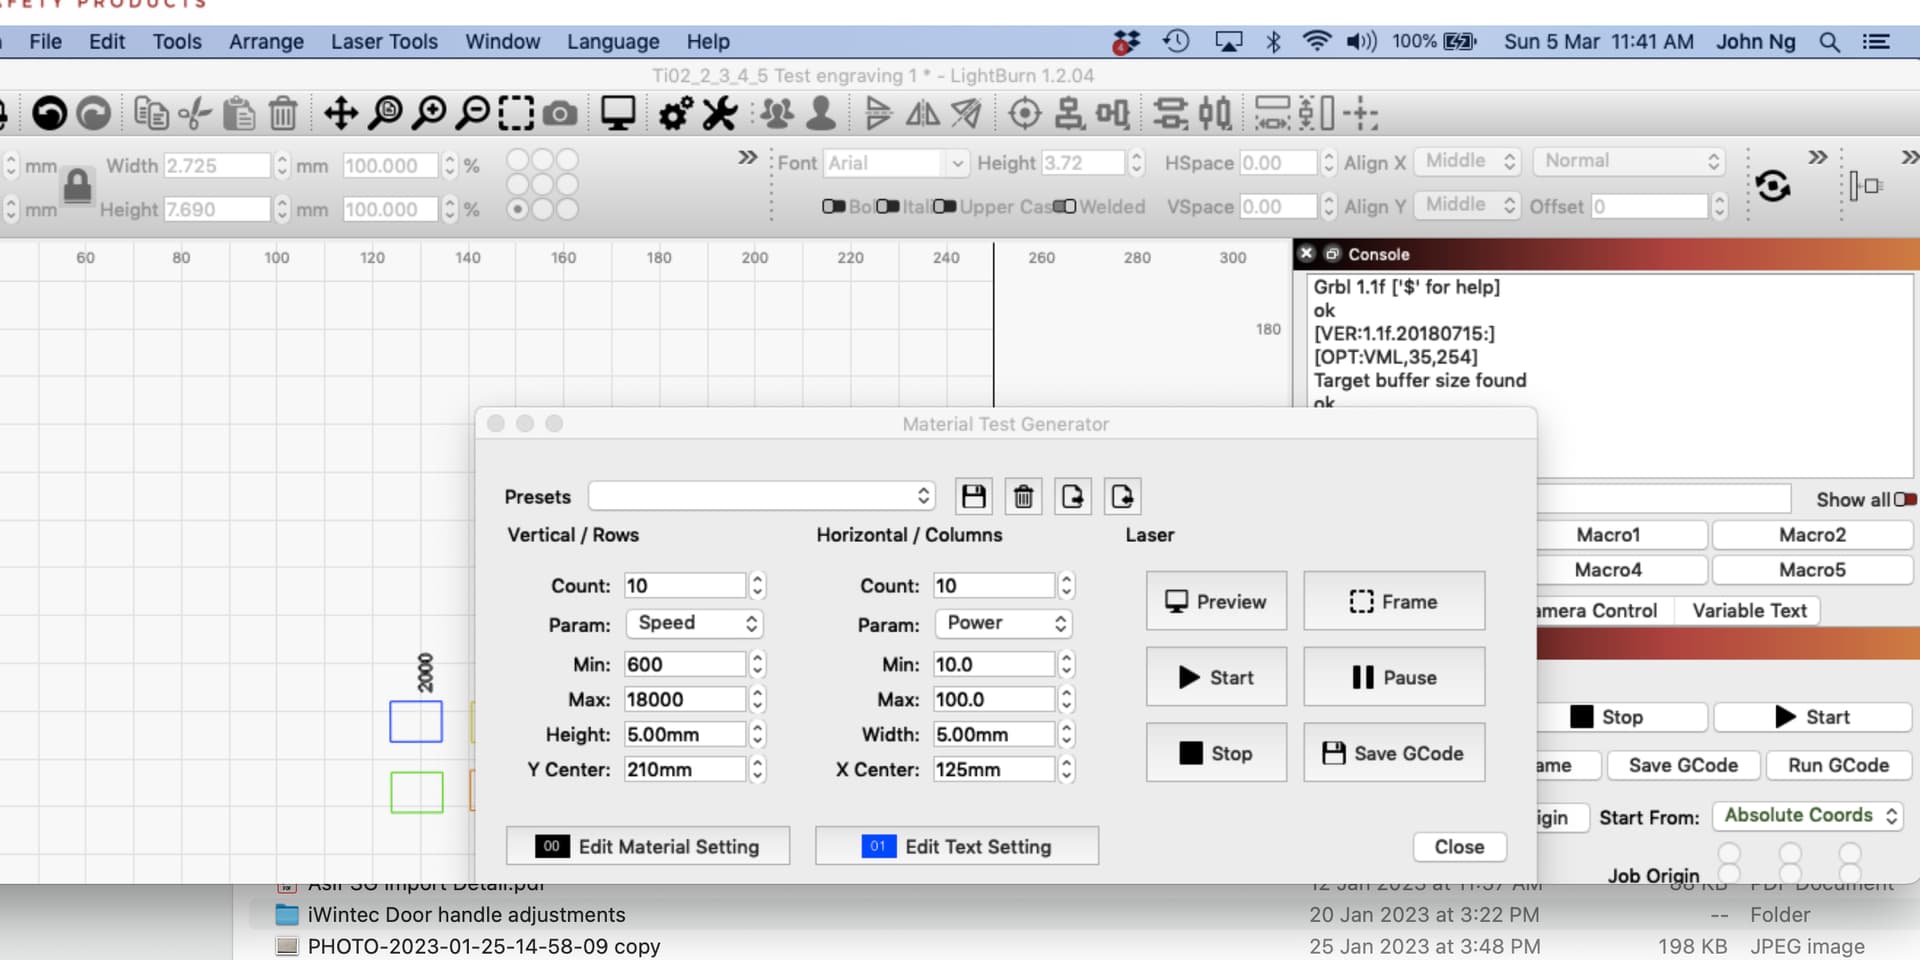
Hope you both are having a great weekend. I tried testing again and Ron as requested I have attached screen shots of Material Test Generator which I hope is what you want to see. I’ve also wash off the TiO2 done earlier and re paint one layer on fully dried ceramic tiles also.
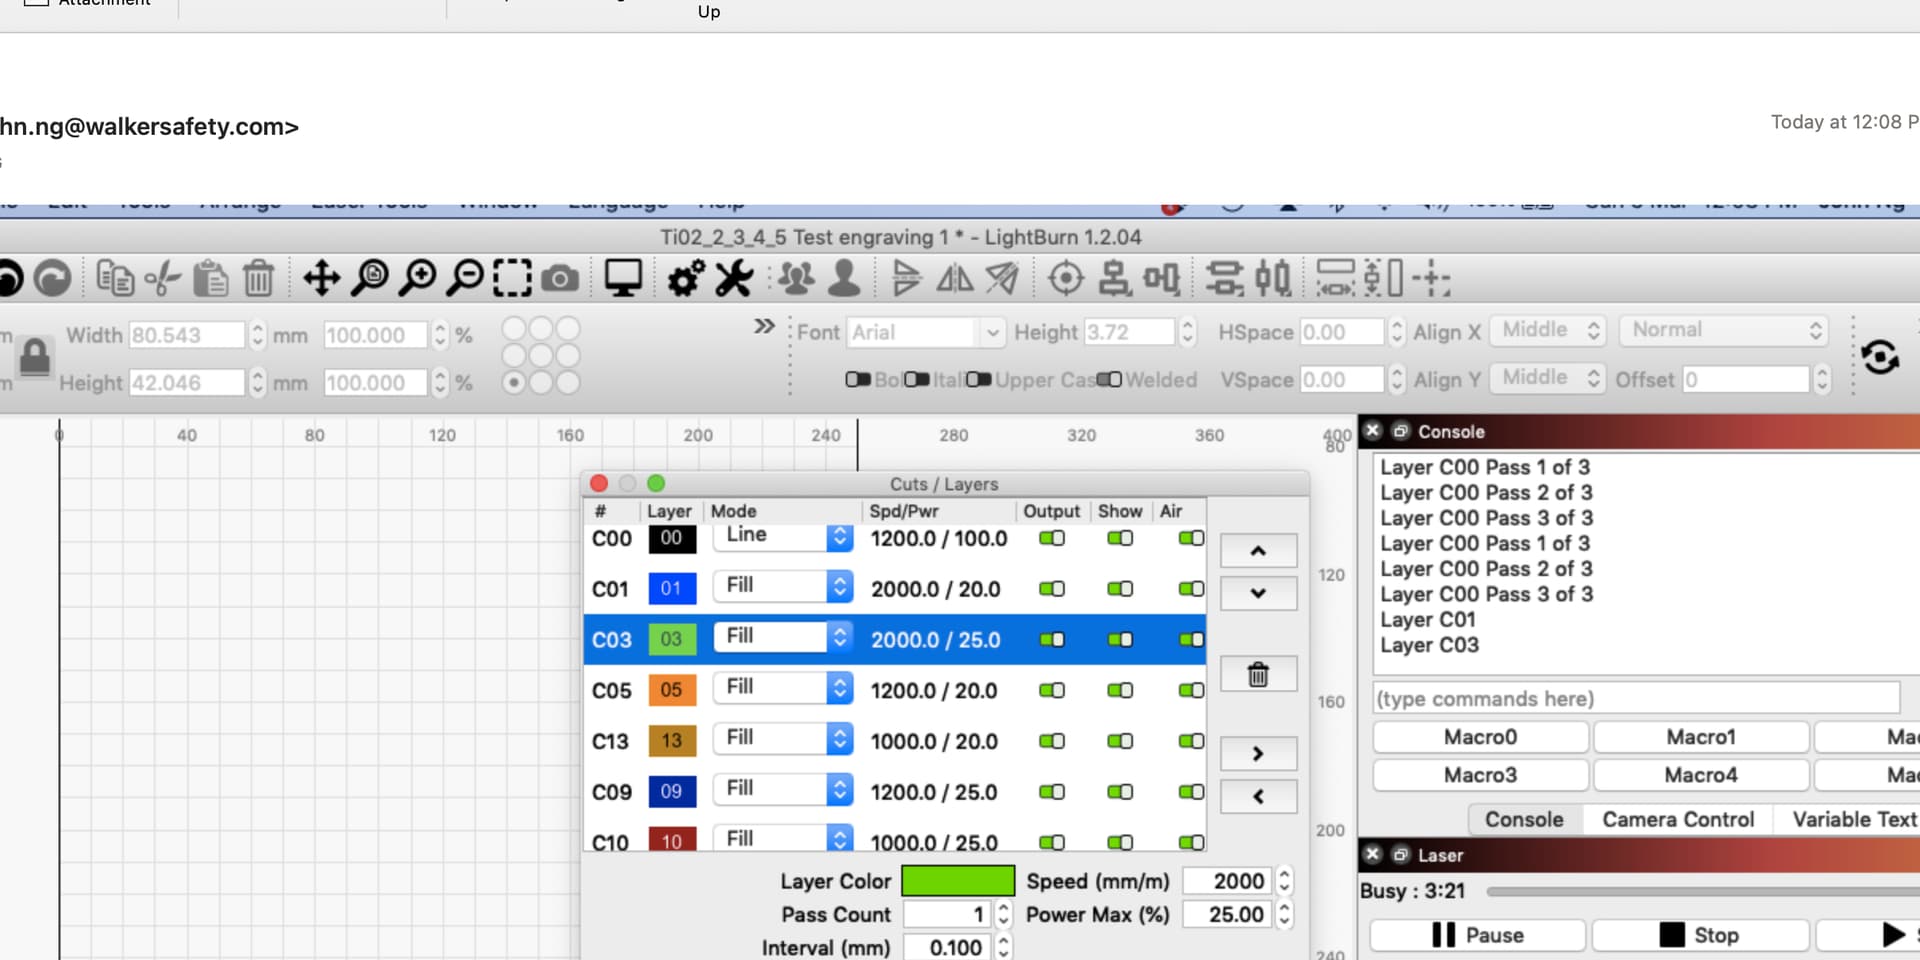
Using my Neje N40640 I’ve also attached my settings and photo of engraving result as recommended by Jack. I’ve not wash the tile yet because the end result is bad. I think my Lightburn setting is incorrect but cannot figure out what is it.
Hi David
Sorry I send email earlier to Ron and you but instead of putting your name. My sincere apologies. Jack is also one of the guys that have been helpful in the Forum.
Anyway I did follow you recommendation to change the speed and power to do laser engraving but the result is not good. See attached. Th photo showing engraving ceramic is not washed yet.
Thank you John
John have you tried this test grid that I use? Run it as is on your machine and let us see the results. I’m sue you will get something worth evaluating.
Material Test Grid.lbrn2 (137.6 KB)
Thank you Ron. I cannot open “Material Test Grid.lbn2” from my office computer. I should do it via the computer where I use LightBurn software correct. Thank you.
Hi Ron. It’s me again. Can you kindly confirm if the screenshot is correct section I have to go in to get what is required. Sorry I’m not very good with software usage and mainly use for operation when I’m in the correct place. Thank you.
John, just click on the file I sent. Then in the dropdown panel click open file. Close the forum and you should see the file already loaded into lightbruns work space. Place your material on the laser bed and press start. Don’t change any of the settings I need to see what result you get using the file as I have set it.
Material Test Grid.lbrn2 (137.6 KB)
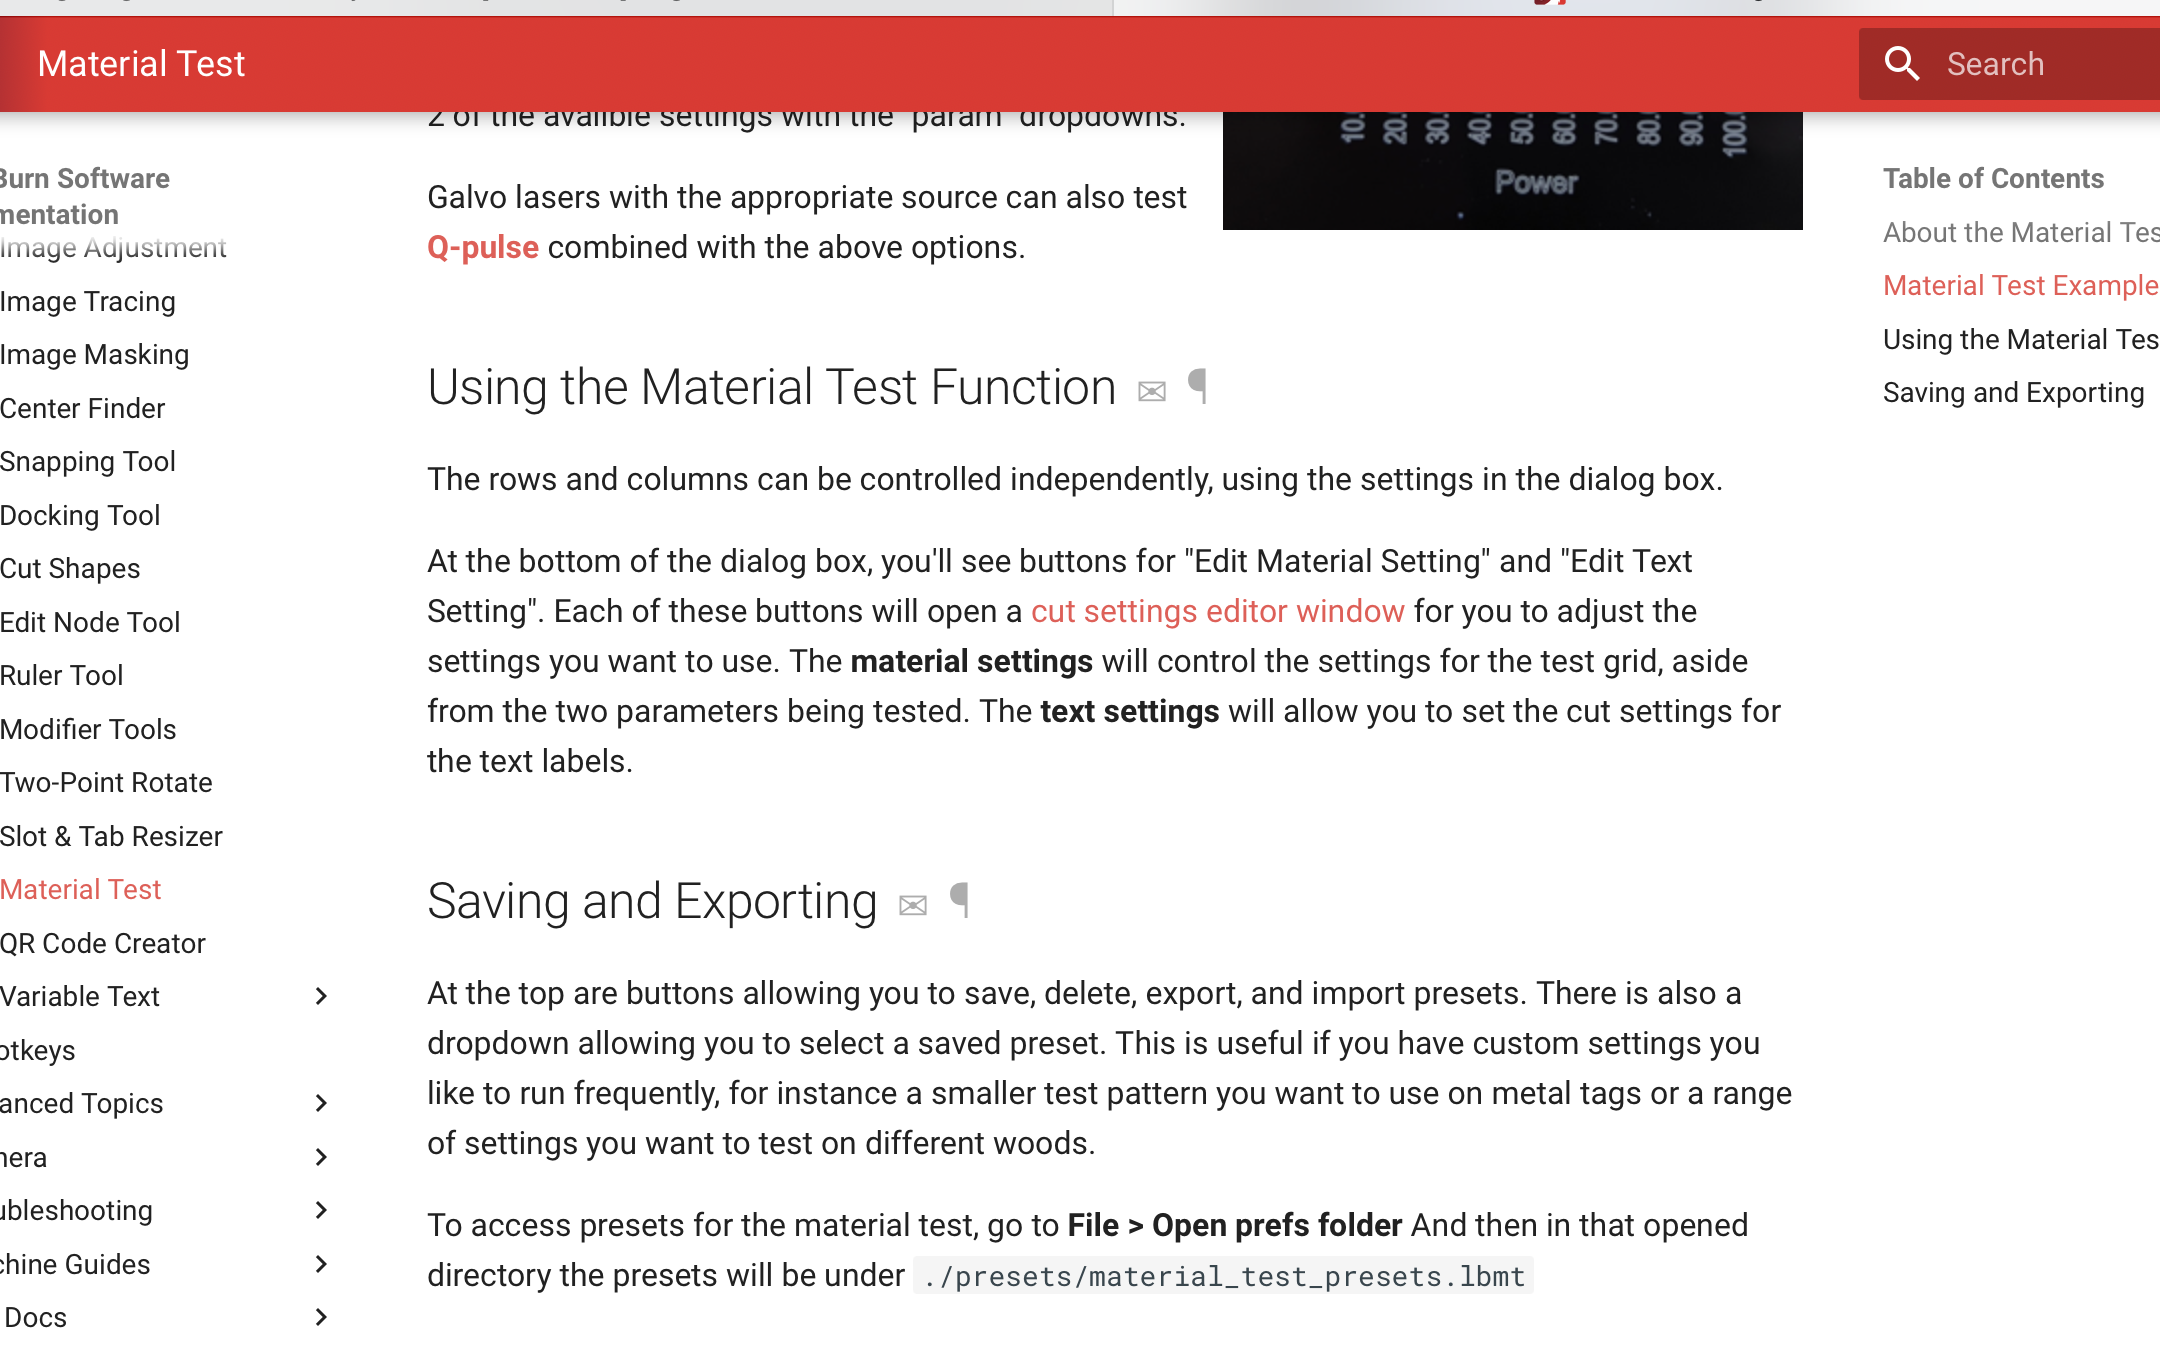
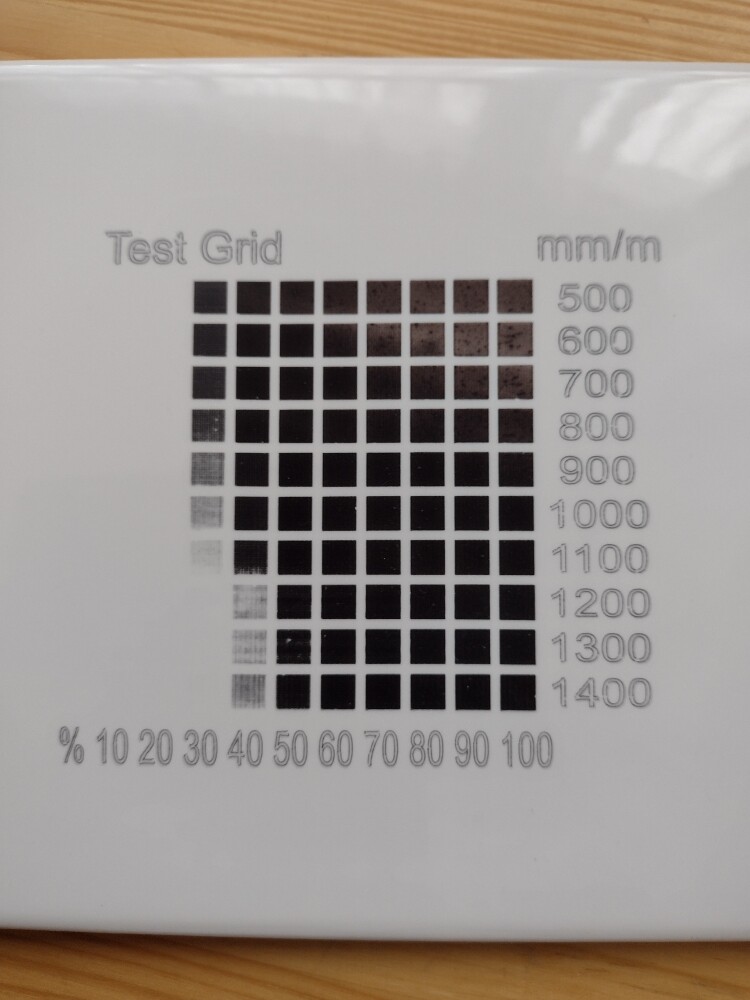
This is what you should get. NOTE high power and low speed can give the reverse of what you would expect. So select the square to your requirements and read off the speed and power settings that produced it.
Dear Ron
Thank you. So it’s following your Speed and Power settings to do test. I’ll definitely try it when I have time or over the weekend.
Thank you
John
Yes just one coat of PVA mix and let dry. Run my test grid with my settings and lets see the results. No air assist. Two pictures please. One before wash and one after,
Dear Ron. I took half a day off and came home to do engraving using your suggestion. I managed to download your file and did everything according to your request without making any changes. See attached. It’s still not dark enough like your file which is really very impressive. I did one layer, dry it with hair dryer and started engraving. I’m quite happy it’s getting some results and I we can get it 2 or 3 times darker we have succeeded. Thank you
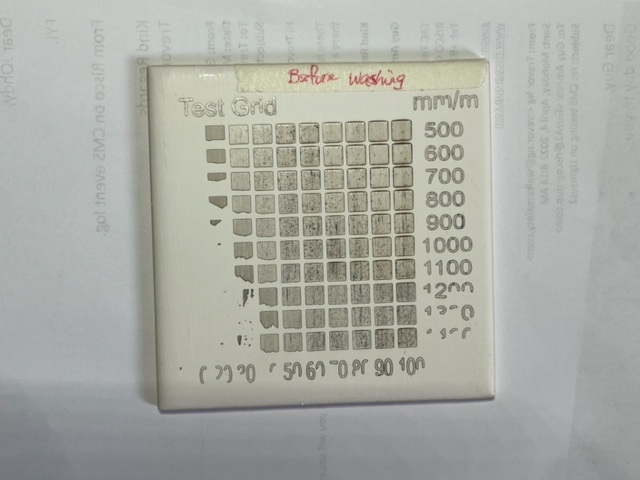
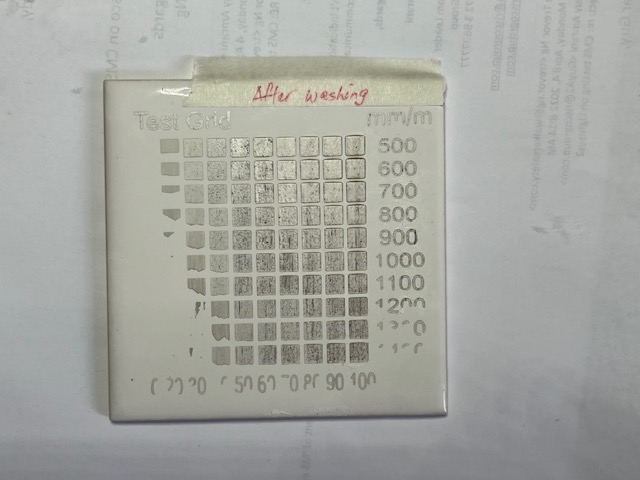
OK John we are making good progress. I can see that the 70% power and 1000mm/m setting is best on this test. What also shows up very clearly is that the type (speed and power) is not even.This is etched at the same speed so all of it should be reproduced the same density. To me this now points to a problem with your mix or application of the PVA to the tile. I had exactly the same problem last week with a tile I etched. My mix has stood unused in a jar for some time and I obviously did not stir it well enough and ended up with an uneven coat of PVA mix on the tile. Titanium dioxide will settle out and sink to the bottom of the Jar. I may have got a smooth covering of PVA but if it didn’t have an even mix of titanium then the result ends up similar to your test tile. So I’m now thinking you need to give your mix a very good stir and still just stick to one good coat on your tile. Maybe add a little more titanium to the mix but don’t apply two coats as this just reduces the power of the laser getting through to the tile. Stick at it my friend, it took me ages to crack this nut but it was worth it in the end.
Although I’m an outsider to tile engraving, a magnetic stirrer has become invaluable for mixing my daily cocoa dose:
A few minutes of stirring removes all the cocoa powder bombs that resist my most enthusiastic manual stirring.
It should work the same way for titanium dioxide in water/PVA, which is why I bought it in the first place: so many projects, so little time.
![]()
In my younger days when I worked for a scientific and medical company as a development design engineer, we used to use magnetic stirrers on a lot of our products. I currently use an electric whisk. Somewhere in my old tool box I still have a few bits. ![]()
Hi Ron. Thank you for your quick reply. Yes you are correct with the mixing since the last time I used my PVA & Ti02 mixture was last Saturday. Will re-mix again. I have actually also booked in the Online Cart a Coffee, Cocoa battery operated stirrer and waiting for your feed back before ordering. Now I can order. With your help and generous advice I will keep trying and not give up. Also I should start calling you Uncle Ron if you don’t mine since I’m 11 years younger and we have to give respect accordingly. John
That looks a nice bit of kit. Best thing is it will be easy to keep clean and if you don’t need the bar it can be safely left in the mixing jar ready for next time.
I always tell people “You can call me what you like, as long as it’s not late for dinner”. ![]()
Hello! I just wanted to share my experience with the old and the new method:
I used to apply Ron’s receipt with PVA glue mix painted on the tiles with a brush, but for me it wasn’t working the best, as the surface of the tiles were uneven.
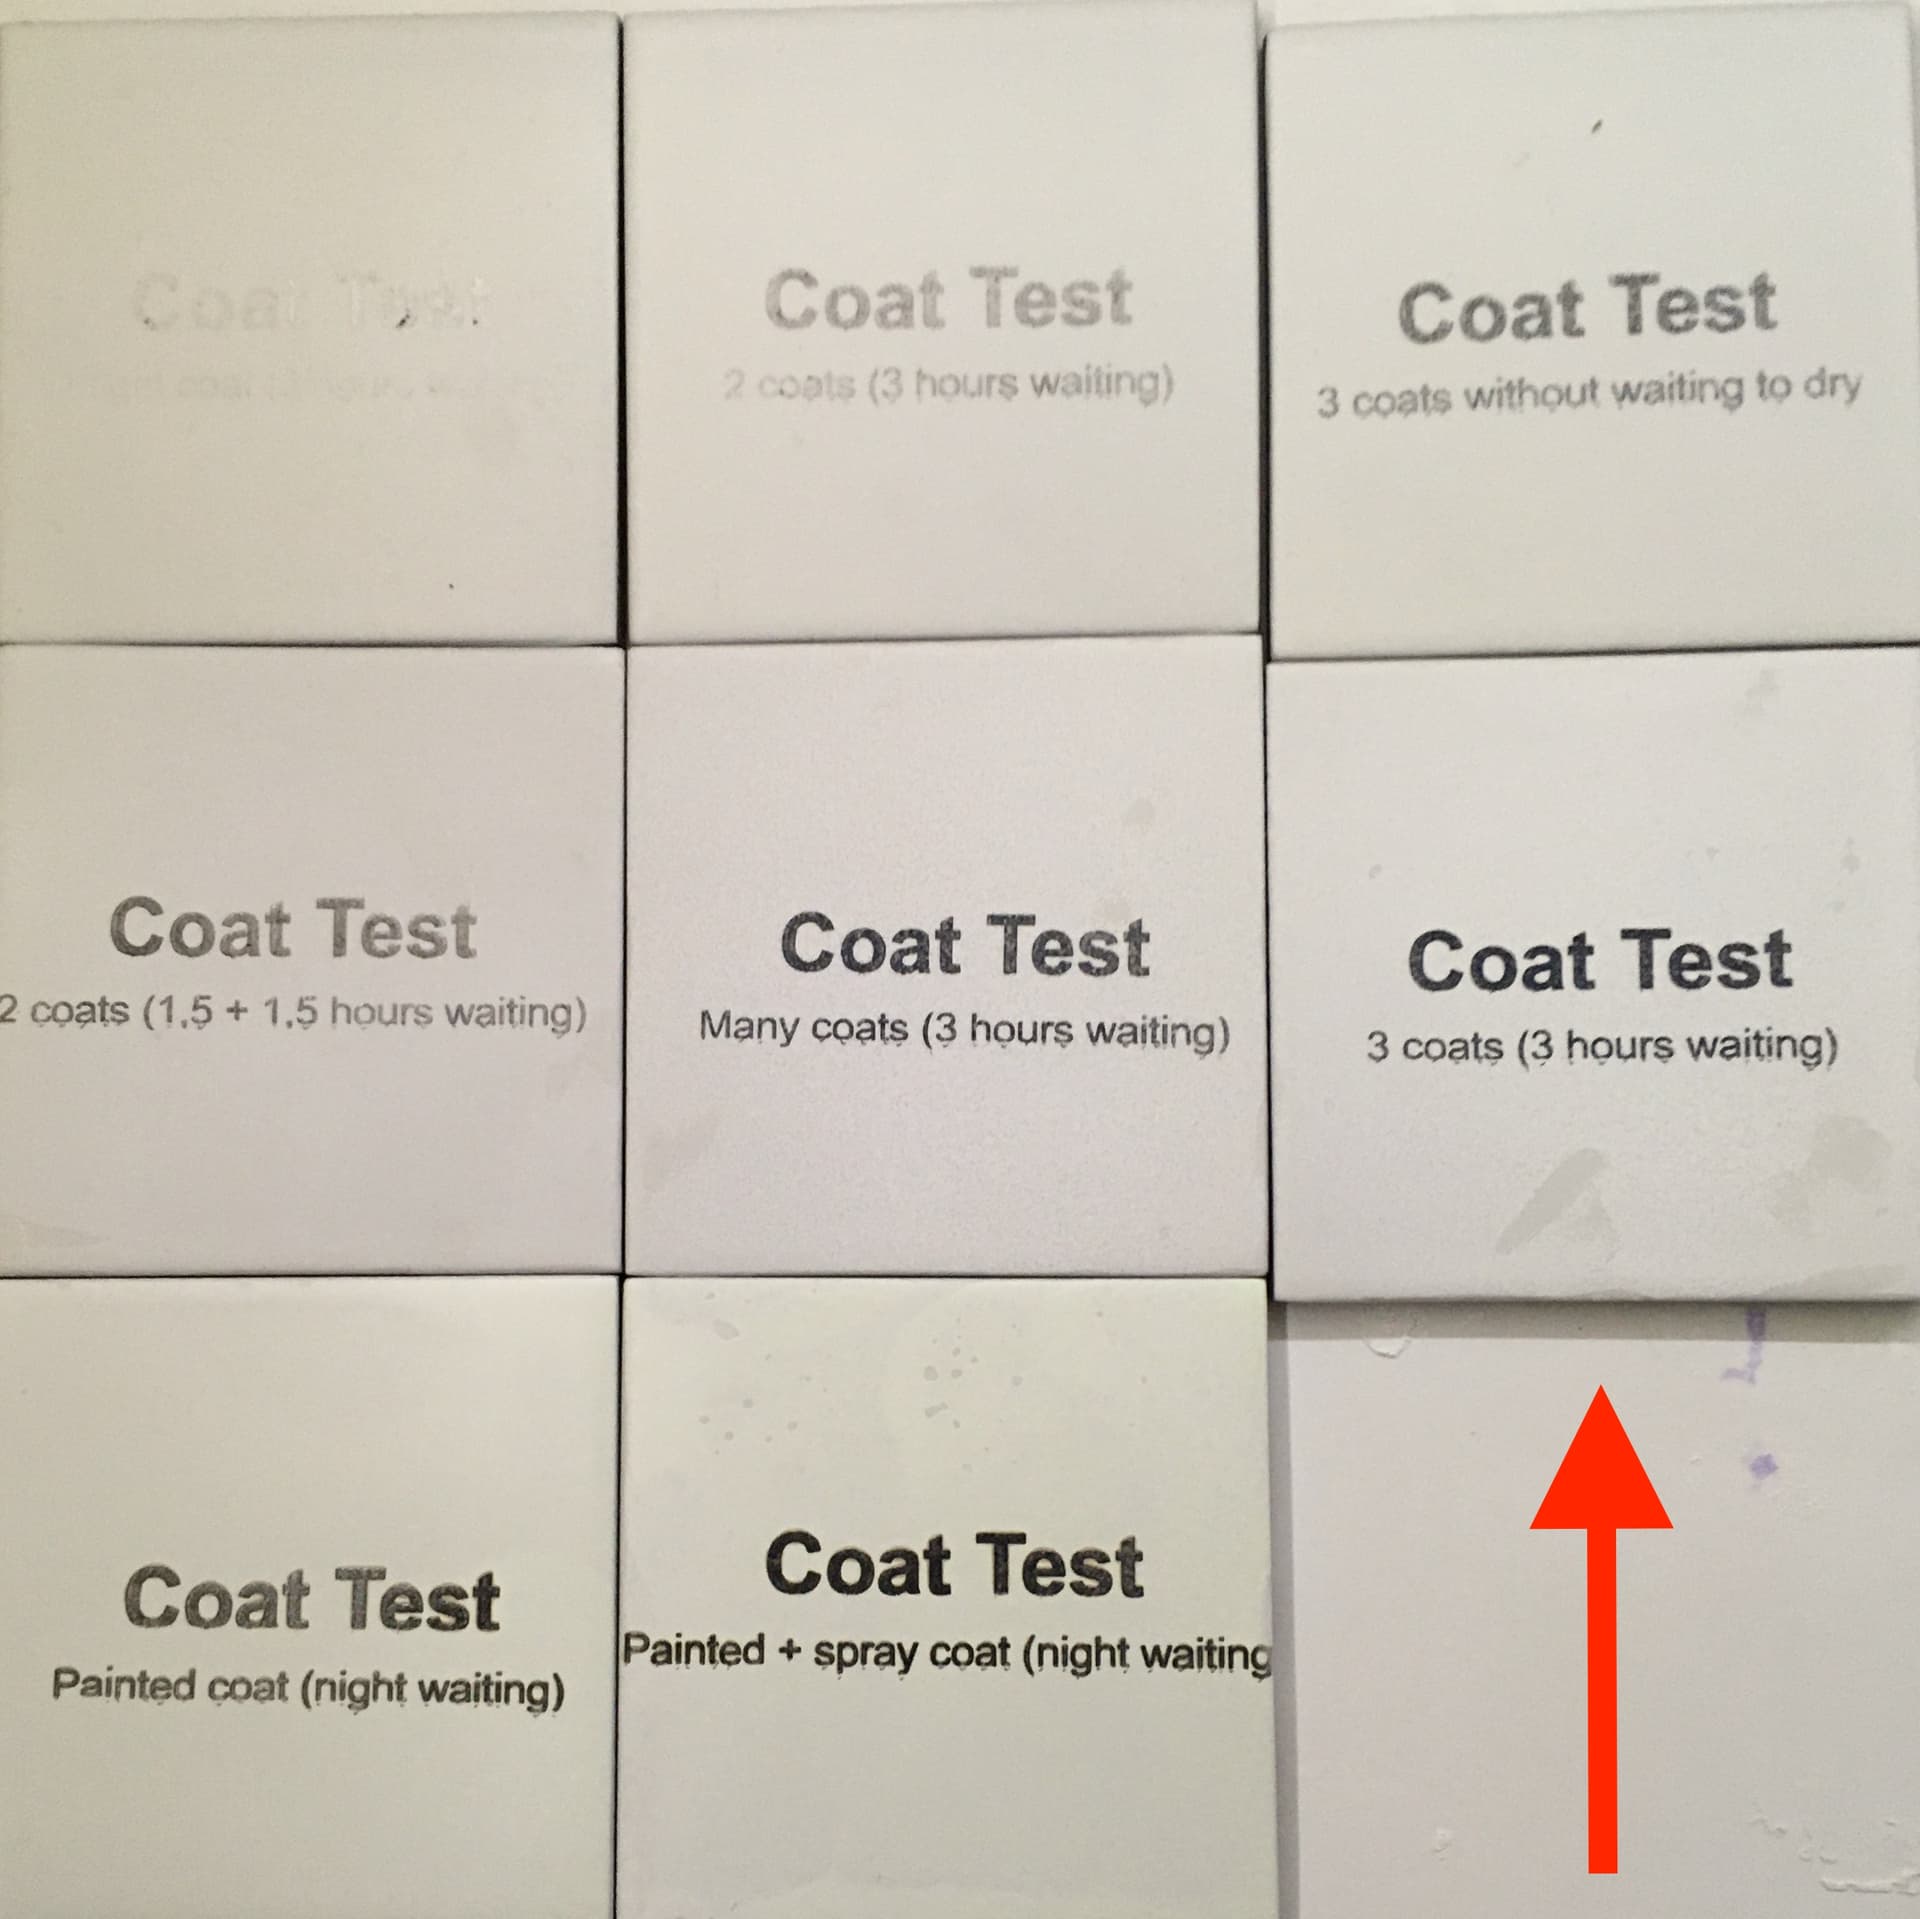
Next time, I tryed isopropyle alcohol mixed with TiO2 powder, and sprayed on the tiles with a simple spray bottle (reused from a perfume). I tried different count of coats, and here is the result:
As it seems, for me 3 coats (spray in 3 directions) were the most black. Intresting thing, is that the last two tiles (painted with a standard white spray) got based light yellow shade, even after cleaning with laque thinner.
Hi Erik. I’ve tried using from 1, 2 up to 5 coats for Ti02. Now I’m back to single coat and it’s engraving seems to be better. Only the Ti02 mixture have to be done properly. Ron have also been helpful and given very good suggestions.