Picture Engraving Help

oh crap… I did it wrong…thank you for the clarification… I’m sorry … will repeat.

Go to LB, choose File>New. Then File>Import and bring in that dot test. But don’t resize it at all. Just run it but make sure pass through is turned on.

The image below is on an 8 1/2 x 11 piece of card stock. Ignore the dog. Look in the upper left hand corner above the dog’s left ear and you’ll see three of the dot test images. That’s about the size they ought to be.

ok…got it…the real dot test… (not great dots)

PS…Your pic is beautiful…hope I can get there

Thinking maybe you have two images on top of each other??? There should only be 3 lines.

10th time is the charm

So let me explain why all this matters and where you should be headed with this.

Here are two of my dots tests below.


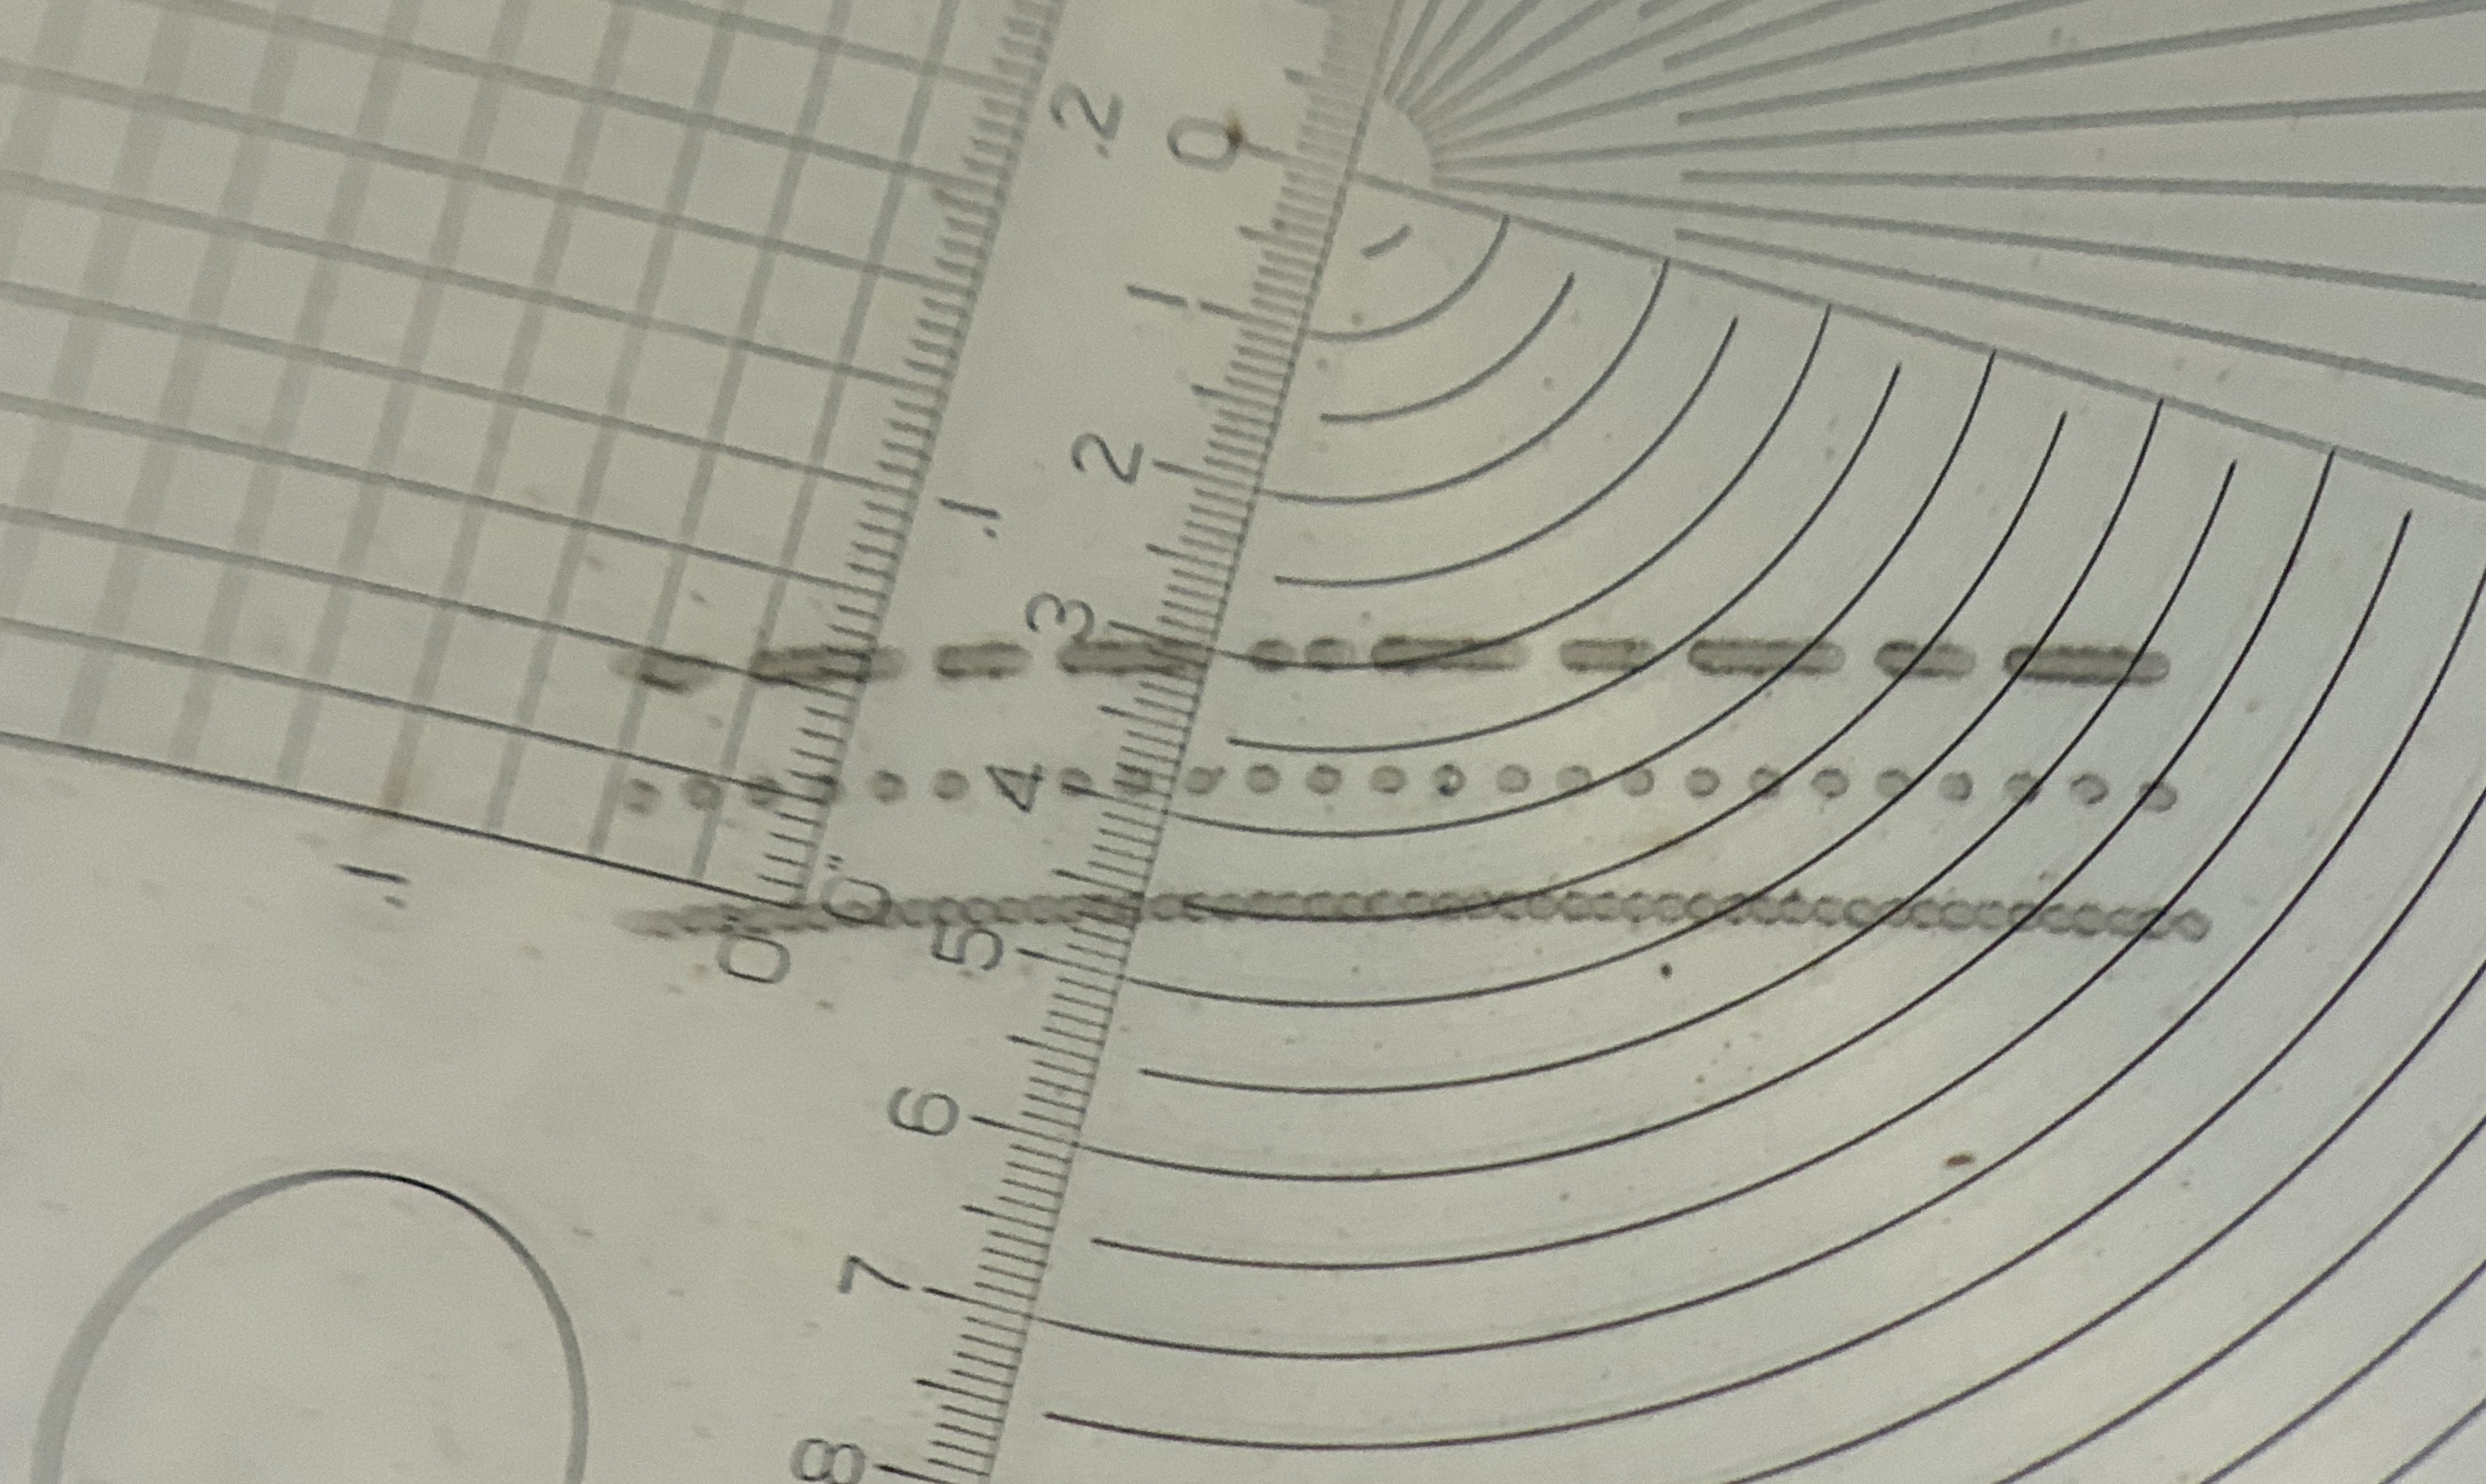
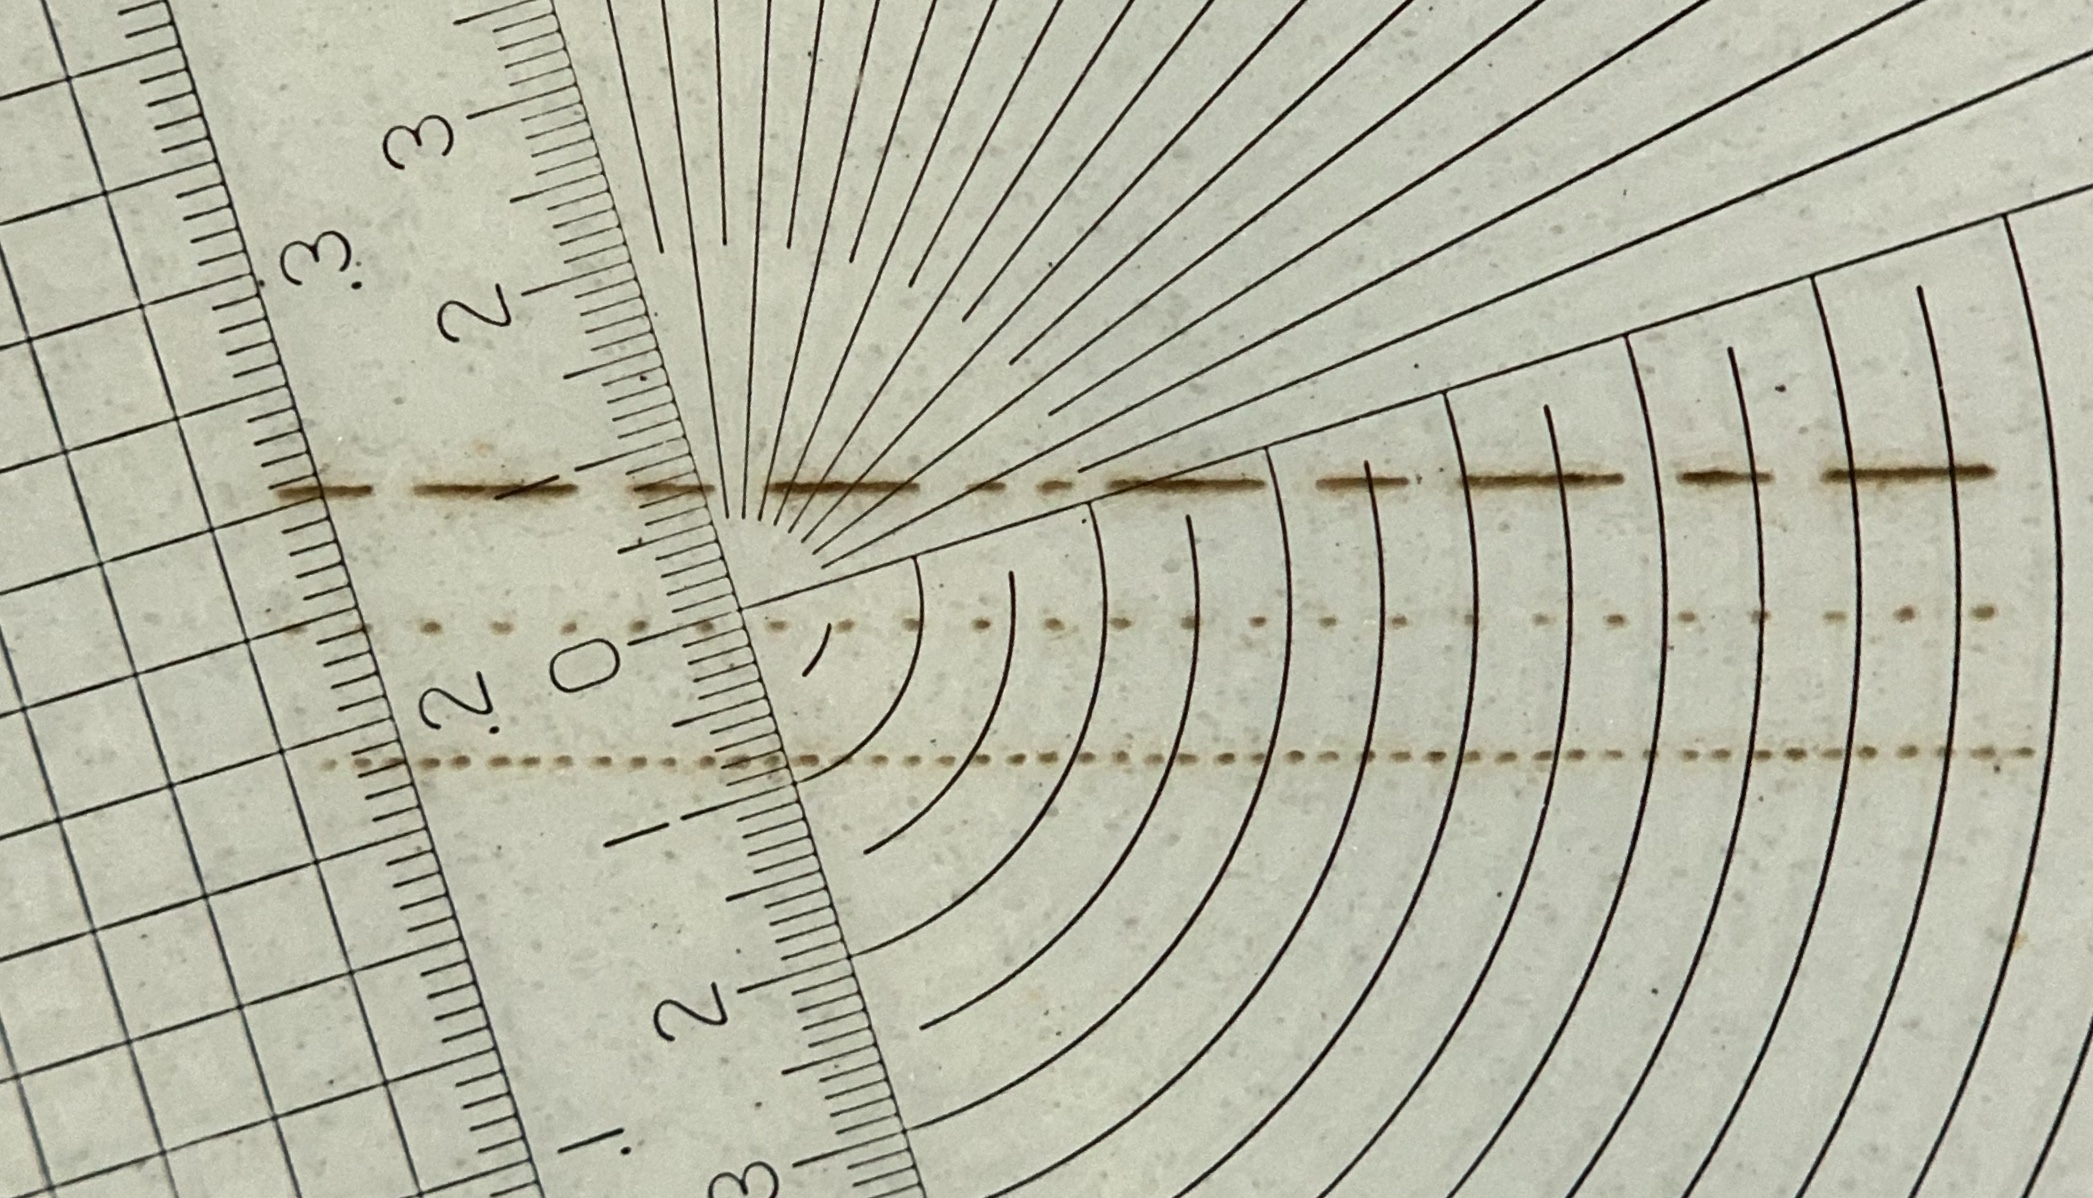
Look at the bottom row of dots in each image. In the first image, the bottom row of dots are touching each other. In the second, you could easily fit another dot in between each of the dots. These images were taken with my iphone just a few minutes ago through a 10x magnifier.

As I explained earlier, the bottom row of this pattern is made up of .1mm pixels/dots alternating white and black. What you’re trying to determine here is what dot size your laser is capable of making with the particular speed, power, material, and lens you are using.

So on the first image you can see the dots just touch each other. If you know you have alternating white and black pixels each .1mm apart and yet the dots are touching, then the laser is putting down dots that are .2mm in size. Make sense? I was actually able to get them a little smaller than .2mm but the photo I posted above was a dot pattern where the lens of the laser was very slightly out of focus. On the 2nd image, the dots look almost evenly spaced. Maybe even more white space between the dots than the size of the dots. I’d wager that the size of those dots in the second image is probably about .09mm.

Why do we care? When you go to engrave an image you are going to choose one of the dither patterns. I’m partial to stucki and jarvis for doing continuous tone photos. Load up the image of your dog, choose jarvis or stucki, go to the preview, and zoom in REAL close. Notice that you see no gray. All you’re seeing is a pattern of black dots and dashes in that preview. That’s what dithering does. It takes your continuous grayscale photo and converts it into a series of black dots and dashes. Why? Because that’s all the laser can do (if we’re not talking about actual 3d engraving here). The laser scans back and forth and turns the laser on where it needs a dot or a dash and turns it off where there is white space. Your eye is fooled into seeing the gray tones based on the density of the dots in a given area.

But here’s the important part. There are two settings, DPI and interval. They represent the same thing in different ways. Change one and the other changes. There are 25.4mm in an inch. The interval is the distance your laser head moves each time it goes to burn another row of dots/dashes. So if our interval is set to .1mm then the DPI is going to be 254 because 25.4/.1=254. Set your interval to .2mm and the DPI is going to be 127.

So, if you look at the first image I posted, I estimate the dots to be .2mm in diameter. If I go tell light burn to use .1mm interval or 254 DPI, then each time it lays down a line of dots/dashes they are .2mm tall but I’m only moving the laser head .1mm. So the top half of my first row is going to get overburned by the next row. If I have .2mm dots then theoretically the highest DPI I can use is 127 without getting overburn. If you want to use 254 DPI then you need to be capable of putting down dots that are .1mm in diameter.

You can guess at the DPI or interval to use or you can estimate your dot size and arrive at it empirically.

3 Likes

OK, now we’re getting somewhere. Your bottom line doesn’t look like dots at all. Looks like a continuous line. Couple of things I’d note about that image The second line is a .1mm dot followed by .3mm of white space. So dot to dot is .5mm. Your goal is to get your 3rd line looking like your second to the extent that it’s possible. I’d say currently your dots are something like .3mm. With .3mm dots the best DPI you could do is about 85.

Two observations about your image. 1) it looks like you have air assist on. Turn it off. 2) I don’t think you’ve got your focus as good as it can be.

Do you have z height controlled by LB?

1 Like

ok… I’ll turn off light assist.
I don’t think (can’t be sure) if Z height is controlled by LB…I’ve never messed with it. The guy from factory set things up… right now it’s on 3000.0

How do you currently adjust the height of your bed? What kind of controller do you have? How are you determining your focus height?

I use this panel, but have only manually adjusted x and y
through this controller
IMG_4467

So how do you move your bed up and down? Press the Z/U button then press the right and left arrow buttons and see if your bed moves.

sorry my training on this has virtually been lacking… just bare basics

Right…that is how l move the bed

OK, so if you press Z/U then the left and right arrows your bed does move up and down?

yes, that is correct

Go to Edit>Device Settings

Make sure all the items under Z Axis Control are turned on/green.

After that go to your Move tab.

Click “Get Position” and make a note of what the value for Z is. In the distance field put in 1.00. Click the down arrow in the lower left of the grid. Did your Z move down 1mm?

Well that was interesting…like I said… a factory guy set this up remotely over the phone.
Here’s what it looked like…
IMG_4468
here’s what it looks like now…
IMG_4469

See my last post above, 2nd portion, about trying to move the bed with LB.

I put the settings in…no movement…however, I notice in YOUR screenshot that your distance is mm…MINE says in.
IMG_4471

Hmmm… I’m not a LB expert here. My next step was to have you run a focus test that automatically moves the bed incrementally to figure out the best focus. But I’m puzzled that you’re able to move the Z height with the controller yet can’t move it in LB even though you’ve enabled the options to do so. And yes, odd that it’s in inches. I’m sure that’s set somewhere in the settings but I don’t know where.

How have you been setting your focus?