I am having problems with my Ruida controller on my Red Sail 80 watt CO2 laser. It had been working fine just a couple of weeks ago when I last used it. However this might be a big clue:
I was trying to set up my new chuck rotary and could never get it to work correctly as the “X” travel seemed to have a mind of its own and always travelled to the far left even though it was not programmed to do so.
A few details about my laser: It is a Chinese 80 watt CO2 with Ruida controller. My working area on the honeycomb bed measures out at 27 inches in “X” and 19 inches in “Y” .
The Ruida main board shows model RDC6442S-B (EC) all connections are tight and looks ok.
Lightburn shows my machine as follows: Ruida 644XS 380 MM X 300 MM
When I do a search in Lightburn to find my machine it finds exactly the same info.
Now to the problem: Whenever I turn on the laser the “X” servo motor winds up the belt to the far left and vibrates voilently as the motor cannot drive the “X” axis because it has ended up at the limits end.
If I remove the belt the motor turns more and eventually reverses very slowly, changes direction again very slowly for another short distance then locks up as it normally would to stay in place, which is exactly what it did when I had been trying to run the rotary with an object in the chuck which measured 12-13 inches in circumference
I have performed a few “SET DEFAULT PARA” which shows success for that operation but has not made any difference. At this point I reinstall the "X: travel belt to test further.
This is where I notice by pressing and holding the arrow keys for X and Y movement that the maximum travel is now only 15 inches in either direction., changing the direction again reveals only 15 inches in opposite directions.
380MM comes out to 14.972 inches
300MM comer out to 11.82 inches
thats pretty close to 15 inches which is the limit according what Lightburn finds on my laser info
however its been operating for the last two year at close to 29 X 19 inches
I did purchase this laser a couple of years ago as used.
I’ve looked on youtube and have seen at least one with the travel vibrating problem with numerous other youtubers admitting having the exact similar problem but no answers and no solution in the replies.
I originally thought this to be a Ruida controller problem but now I think it
could be a Lightburn problem It seems to think the rotary is still connected even though it is not connected and is disabled in the Lightburn software. The toggle switch is set to normal and not to rotary
So my question now is how do I correct the problem ? where do I go from here ?
Jack:
Originally I enabled the Rotary, entered the diameter of the chuck and diameter of a test piece which about 1 12-13 inch circumference, and did a test run to check the markings I wrote on the masking tape, tried and if you recall I did not have any success as the head moved to far left the X direction when not programmed to so I gave up on that and went back to normal use and cut some flat acrylic with no problem. I never backed up the machine settings as I was unaware I should have done that.
I can manually place the head in any position, whatever I do it alwayts ends up trying to move in the X direction even if started at the far right, same for the opposite direction. my homing or origin is set to far left. the homing switch for my machine is at the top right.
ok I have saved the settings for now. My machine is about three years old and I’m wondering if I should just purchase and install the latest Ruida controller which would be 6445. I’ve never been able to get the rotary working correctly and I’ve spent so much time on it only seems to be getting worse the more I try to fix it.
What usually happens is you add another gremlin to the mix…
Have you set your rotary up for the U axes? I hope not… I don’t think the 6442 will support the rotary on that axes… but I’m not 100% sure… it doesn’t seem to work on my 6442.
Take it slow and lets diagnose this properly…
Make sense?
I doubt it just broke, there is probably a configuration issue… I hate spending money if I don’t have too…
Remember that you must then configure that controller to match your machine, because it doesn’t come loaded with any particular configuration.
If you’re willing to go through that with a new controller, you may as well do it with the controller already in your laser and save a couple hundred bucks.
I’d start by concentrating on one axis at a time: get the X axis homing correctly, get the step length set correctly, set the travel distance, then repeat with the Y axis.
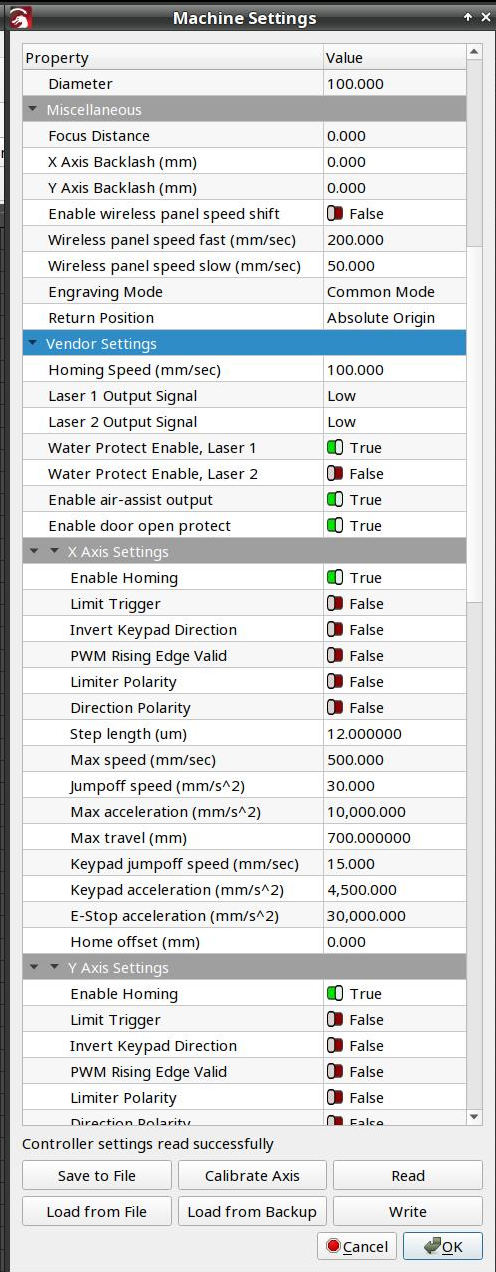
Post some screenshots of the current Device Settings (including the Vendor Settings) and maybe we can provide some pointers.
Jack:
I am running version 1.2.04 of Lightburn I had chosen the “Y” axis for the rotary operation, there was no option showing for the “U” as you mentioned, I also chose the chuck option had entered 1200 steps per rotation then later I tried again thinking I had the steps incorrect so I chose 360 steps (this is what is entered now even though the rotary is disabled and not connected. I hate the thought of purchasing the updated controller since I dont have the funds anyway. I appreciate your help so much
Ednisley:
I dont have a manual to tell me how to do what you are suggesting. I see where I can reload the data which I saved but I have not changed any data or parameters to send back to the machine for reconfiguration. I have never heard of correctly setting the step length or setting the “X” axis homing correctly other than selecting the top left as home. I am willing to try anything and I appreciate your help
The downside of living in the future is being awash in chaff.
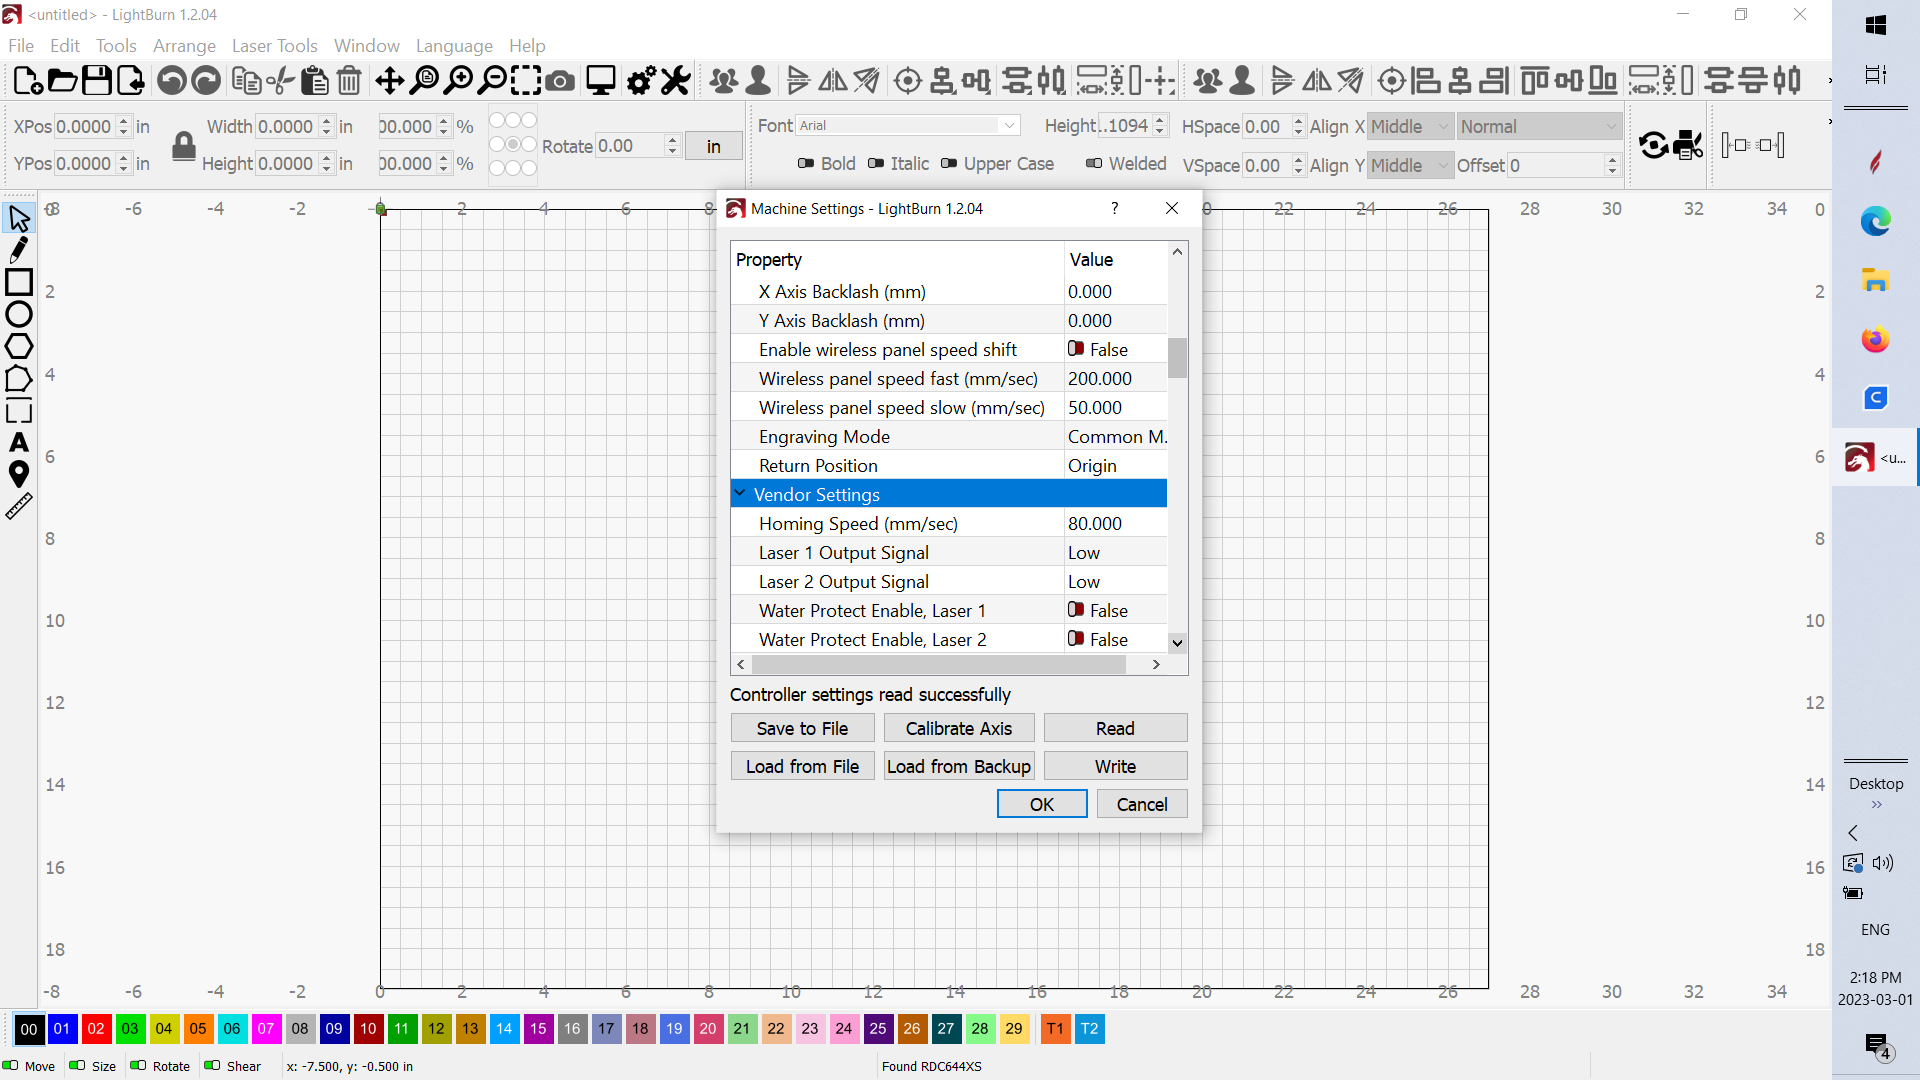
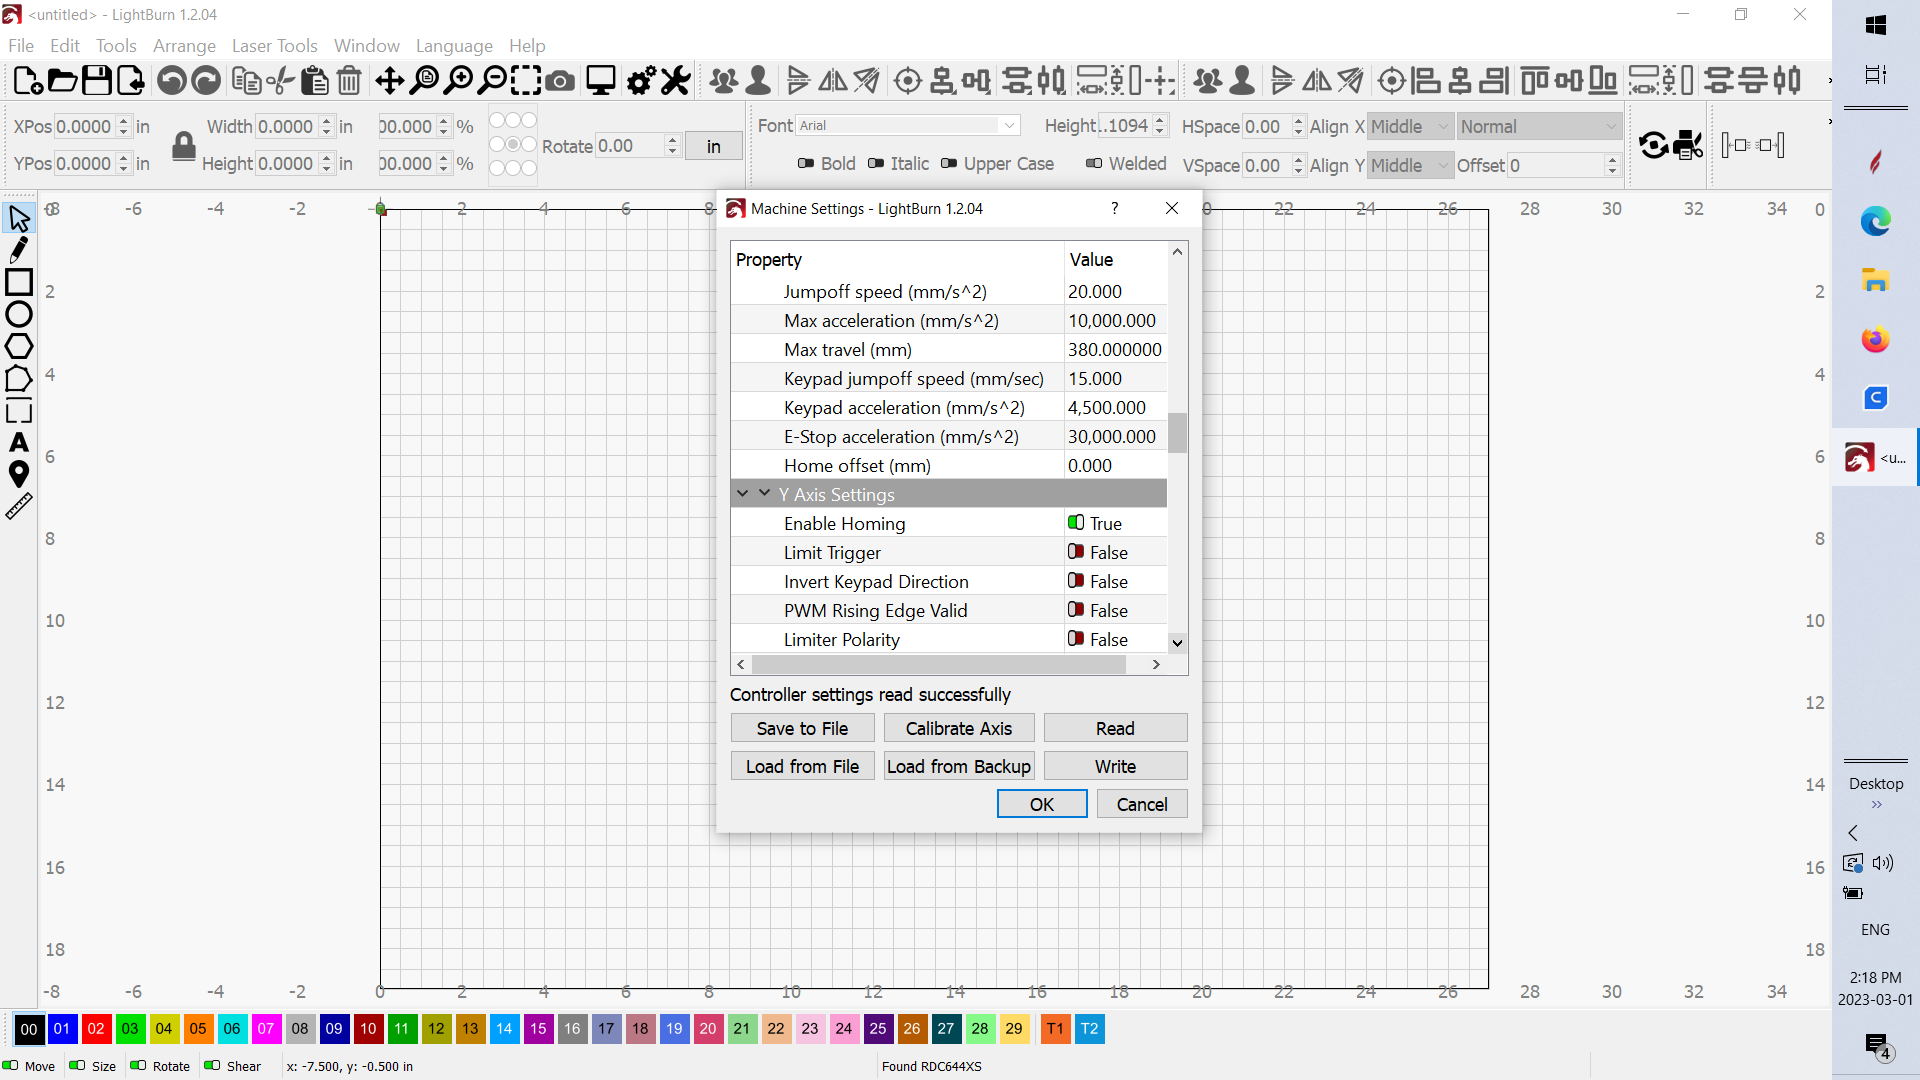
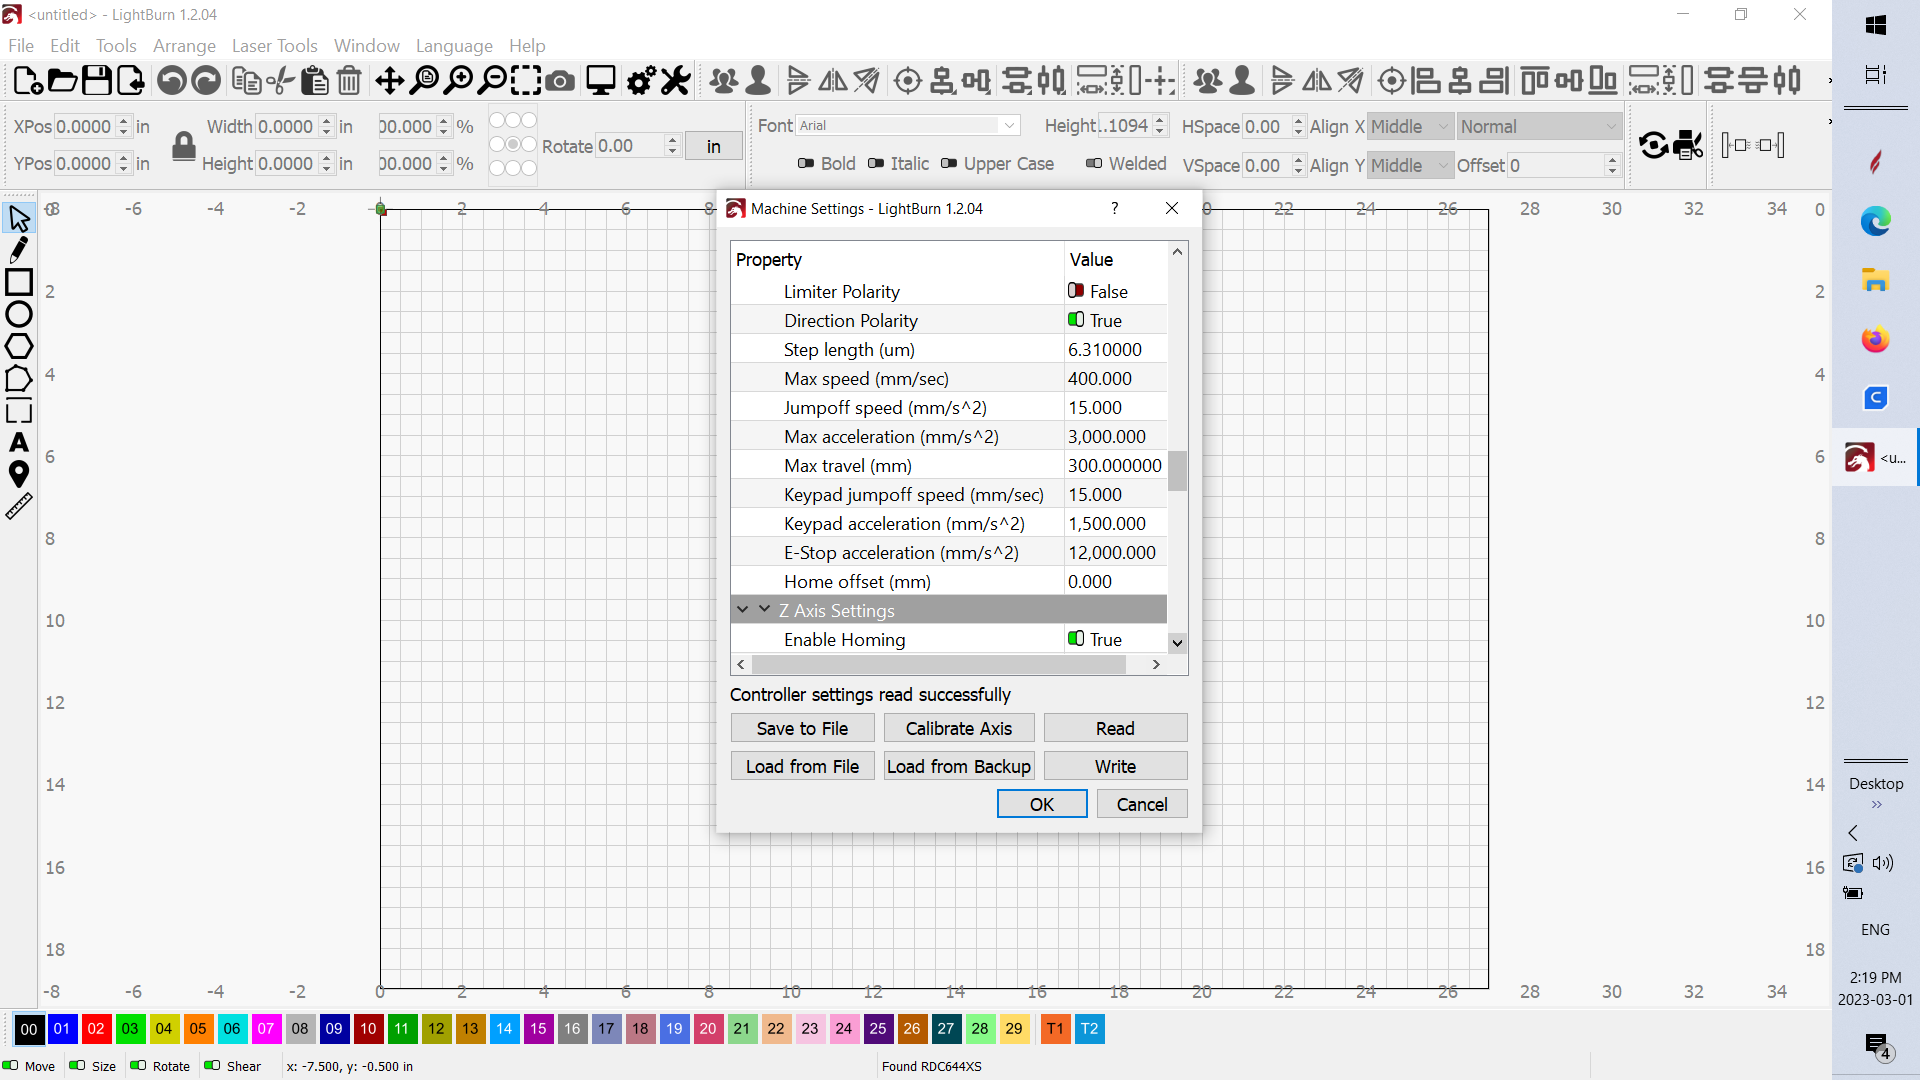
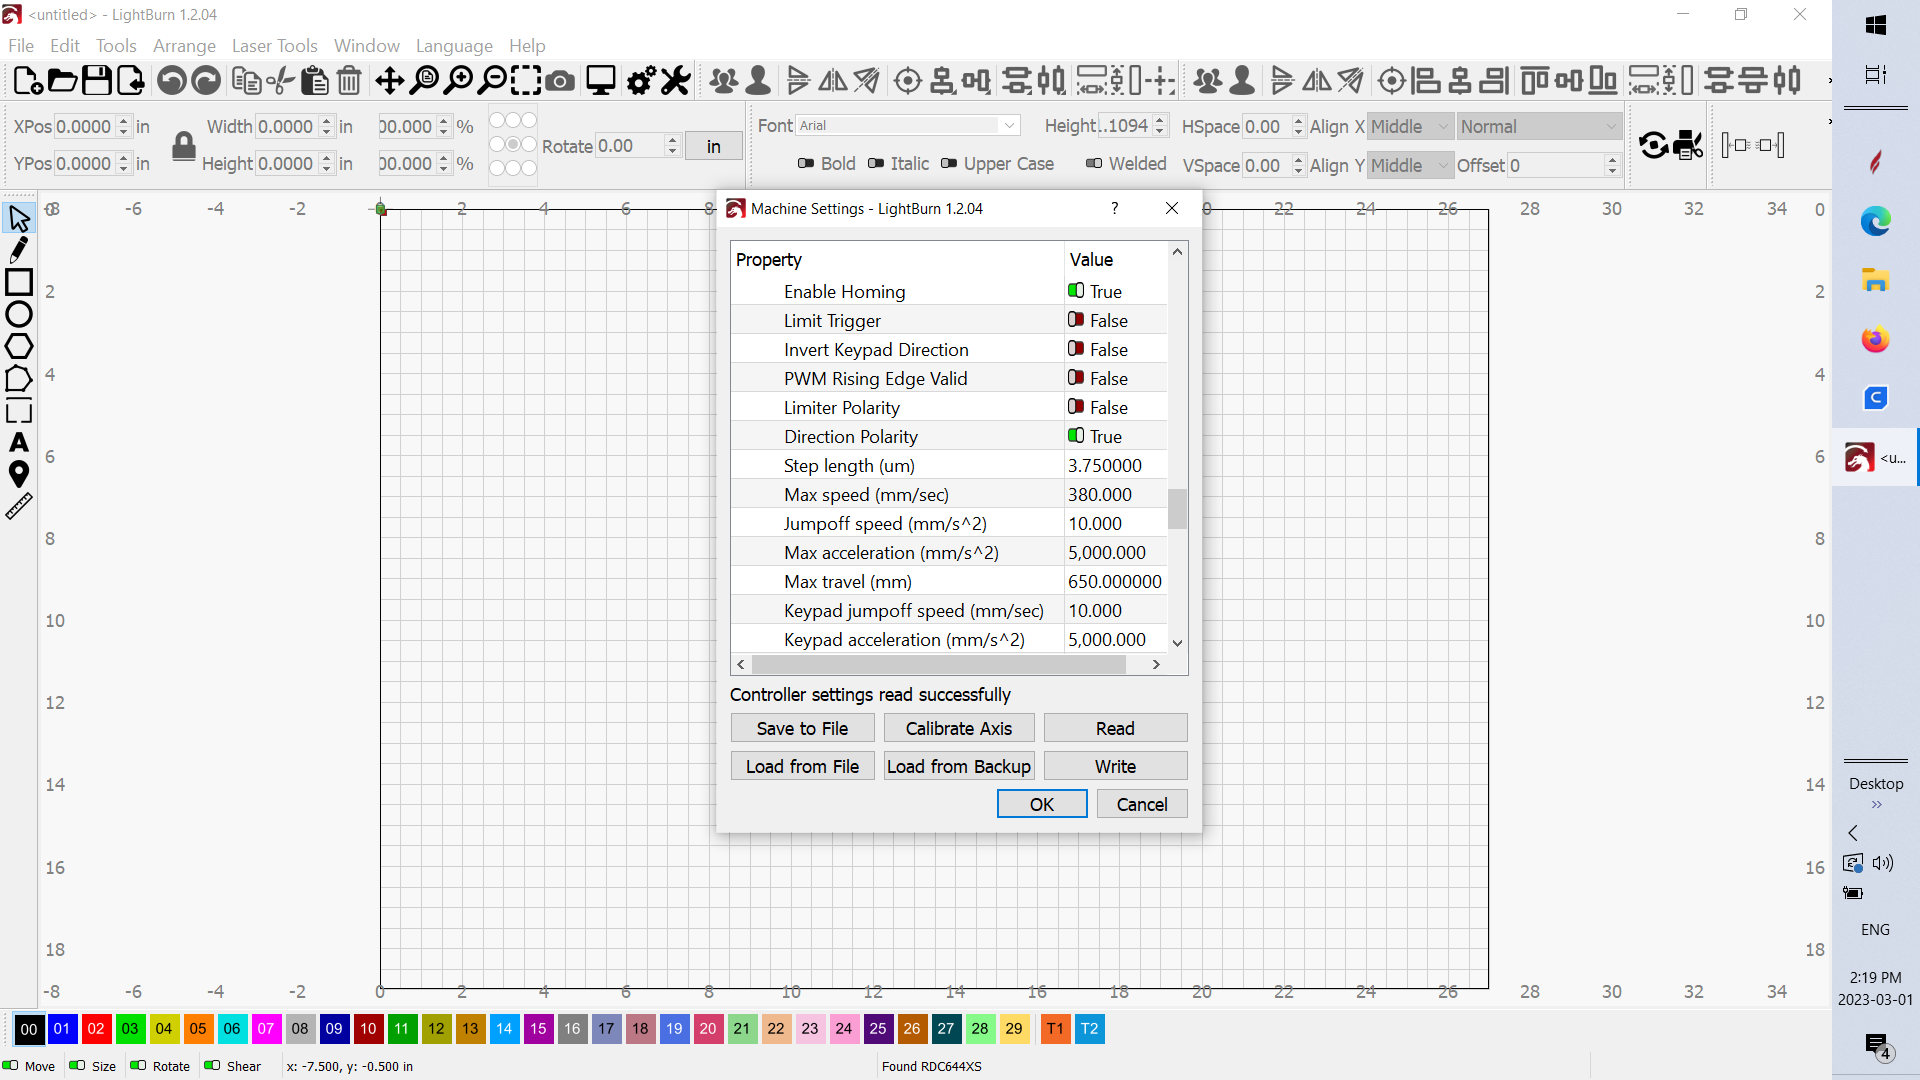
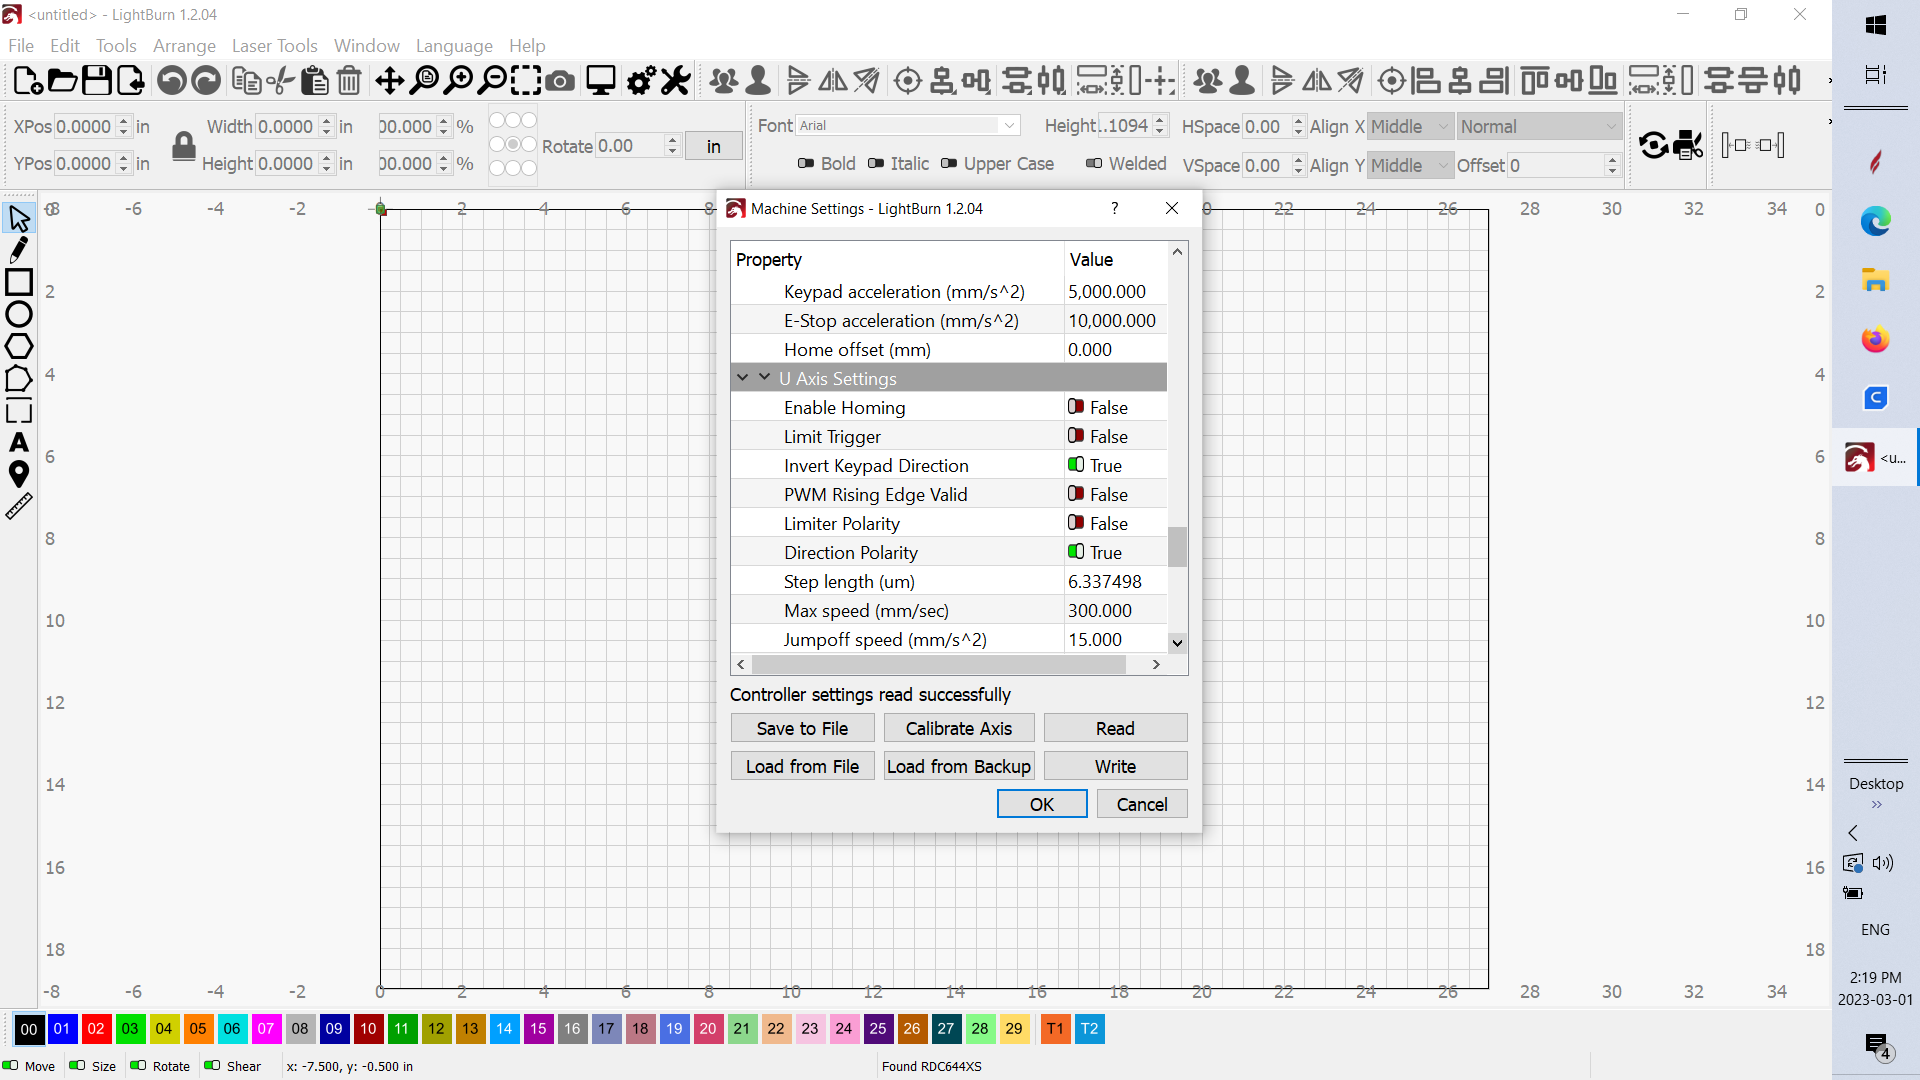
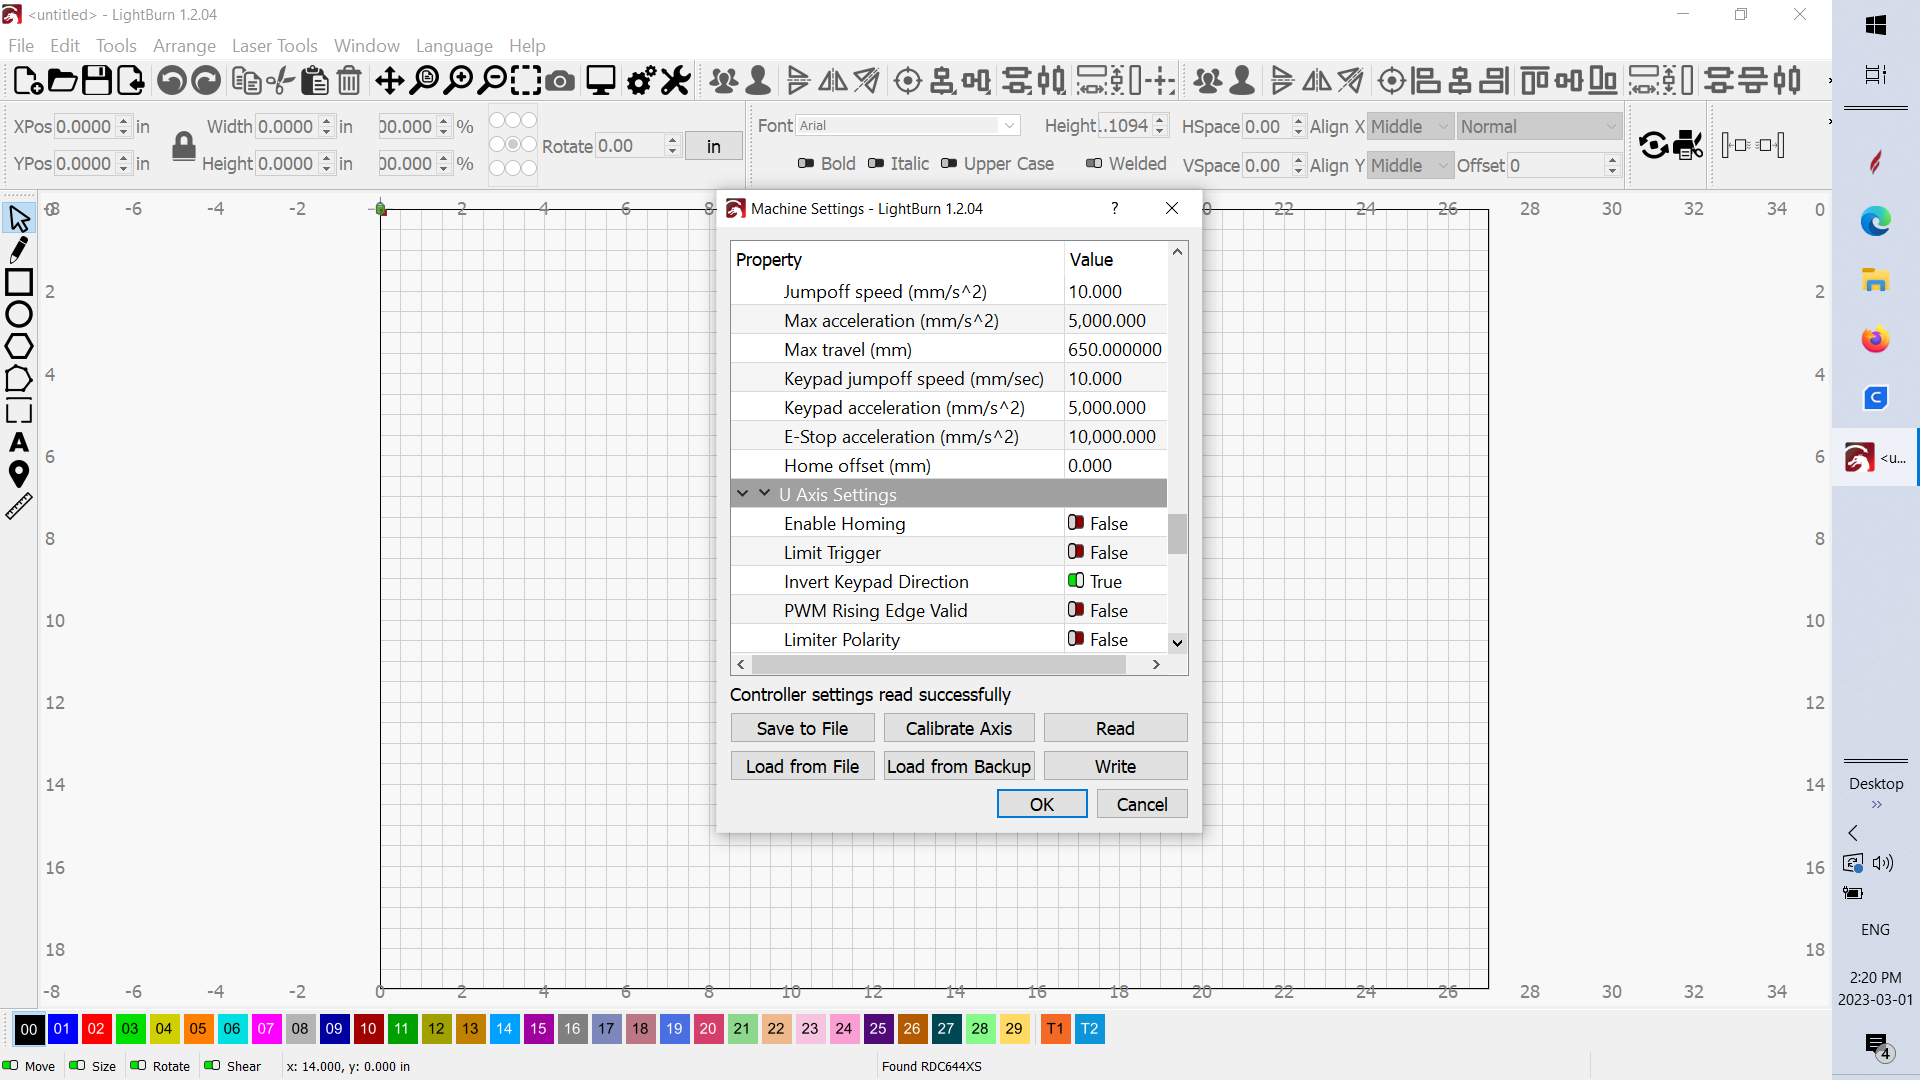
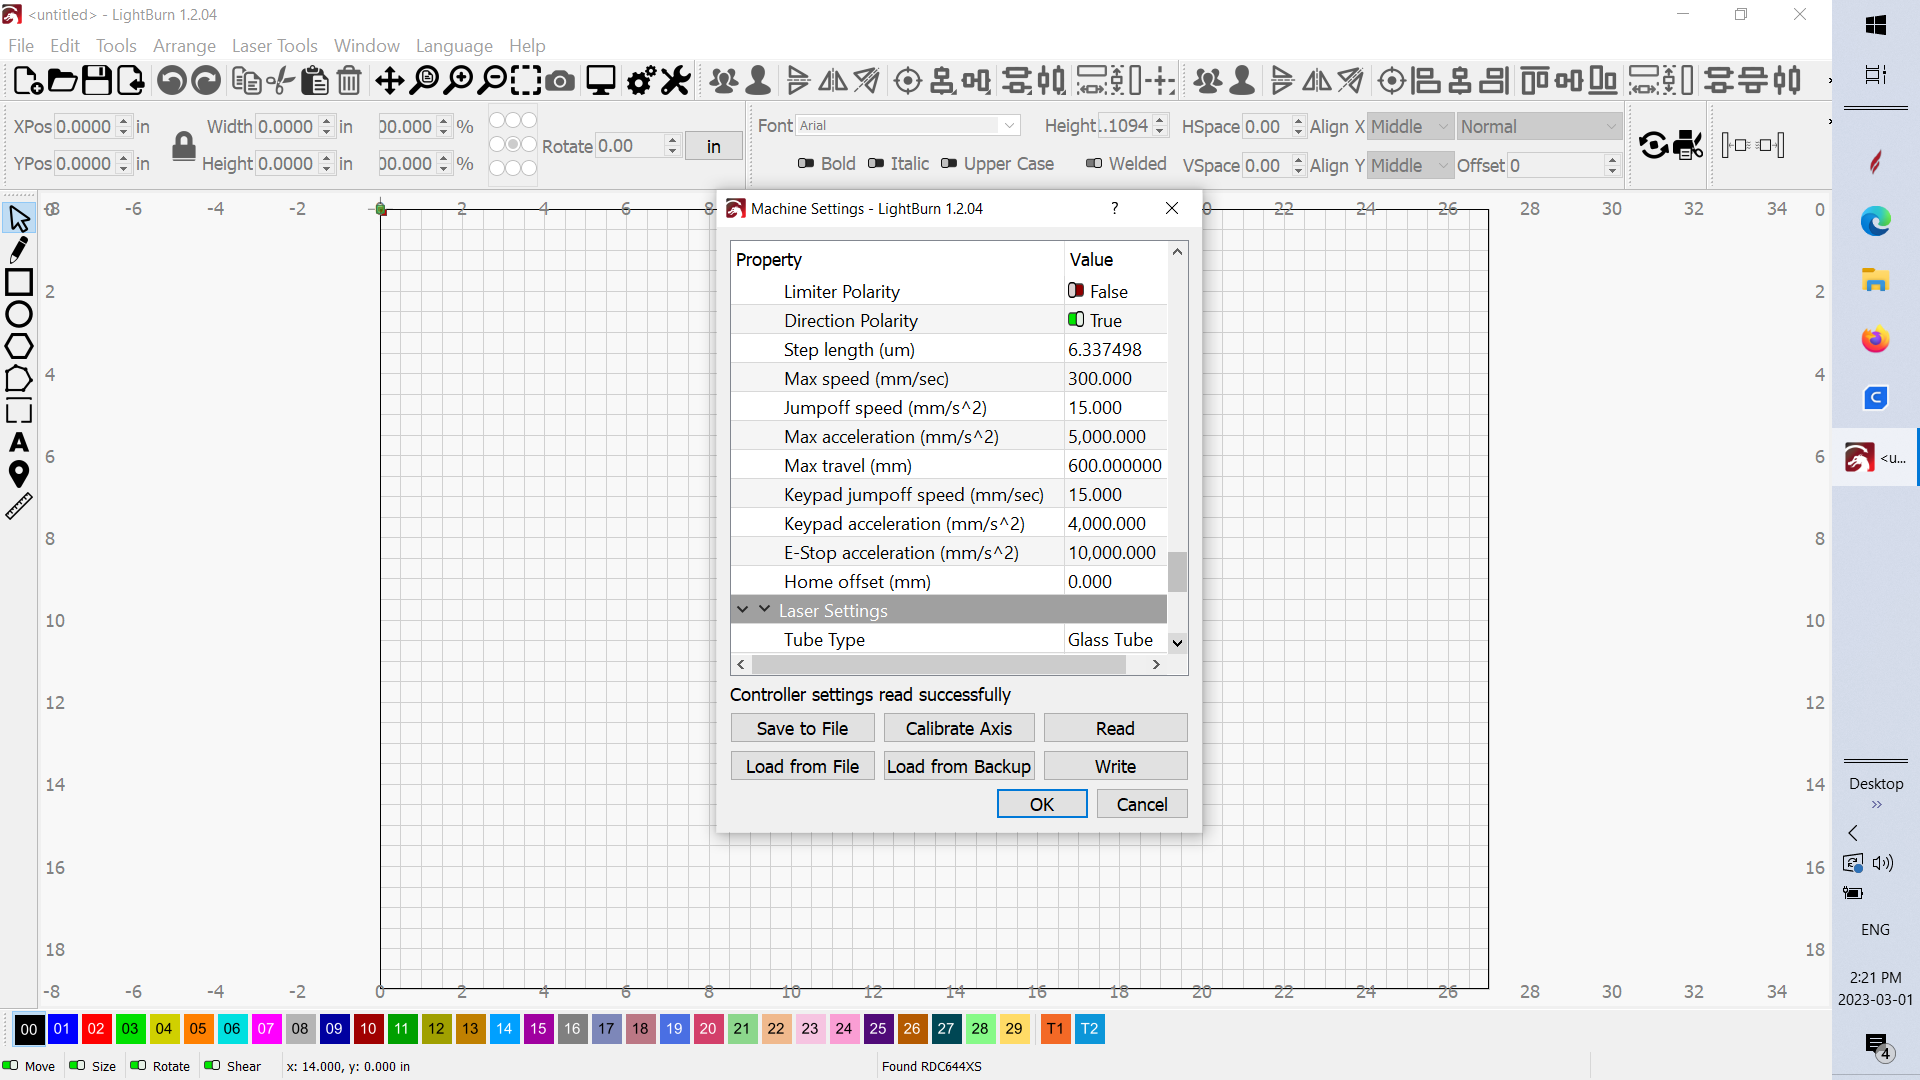
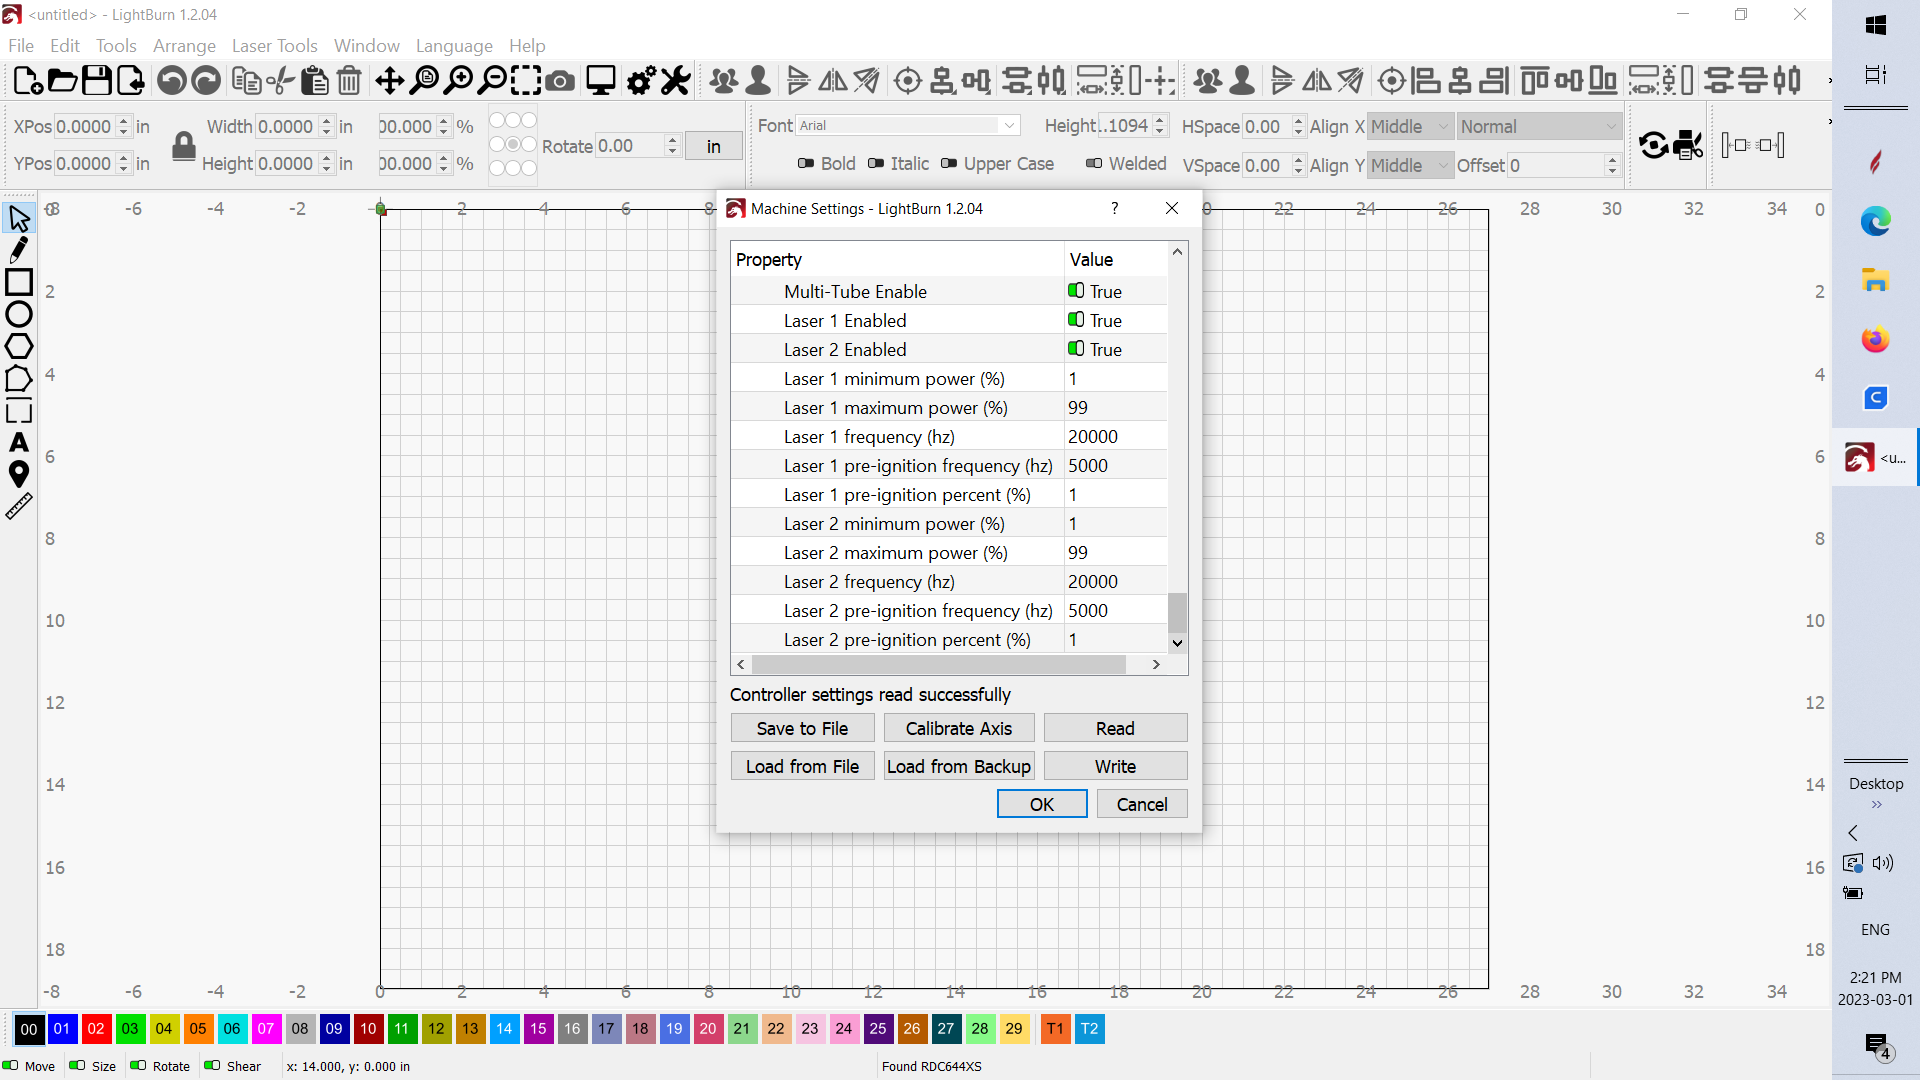
LightBurn shows the controller’s settings through the Edit → Machine Settings. Down at the bottom of that list is the Vendor Settings entry unfolding to reveal all the fundamental configuration settings required to match the controller to the laser hardware:
Your controller is different than mine, but the entries will be similar.
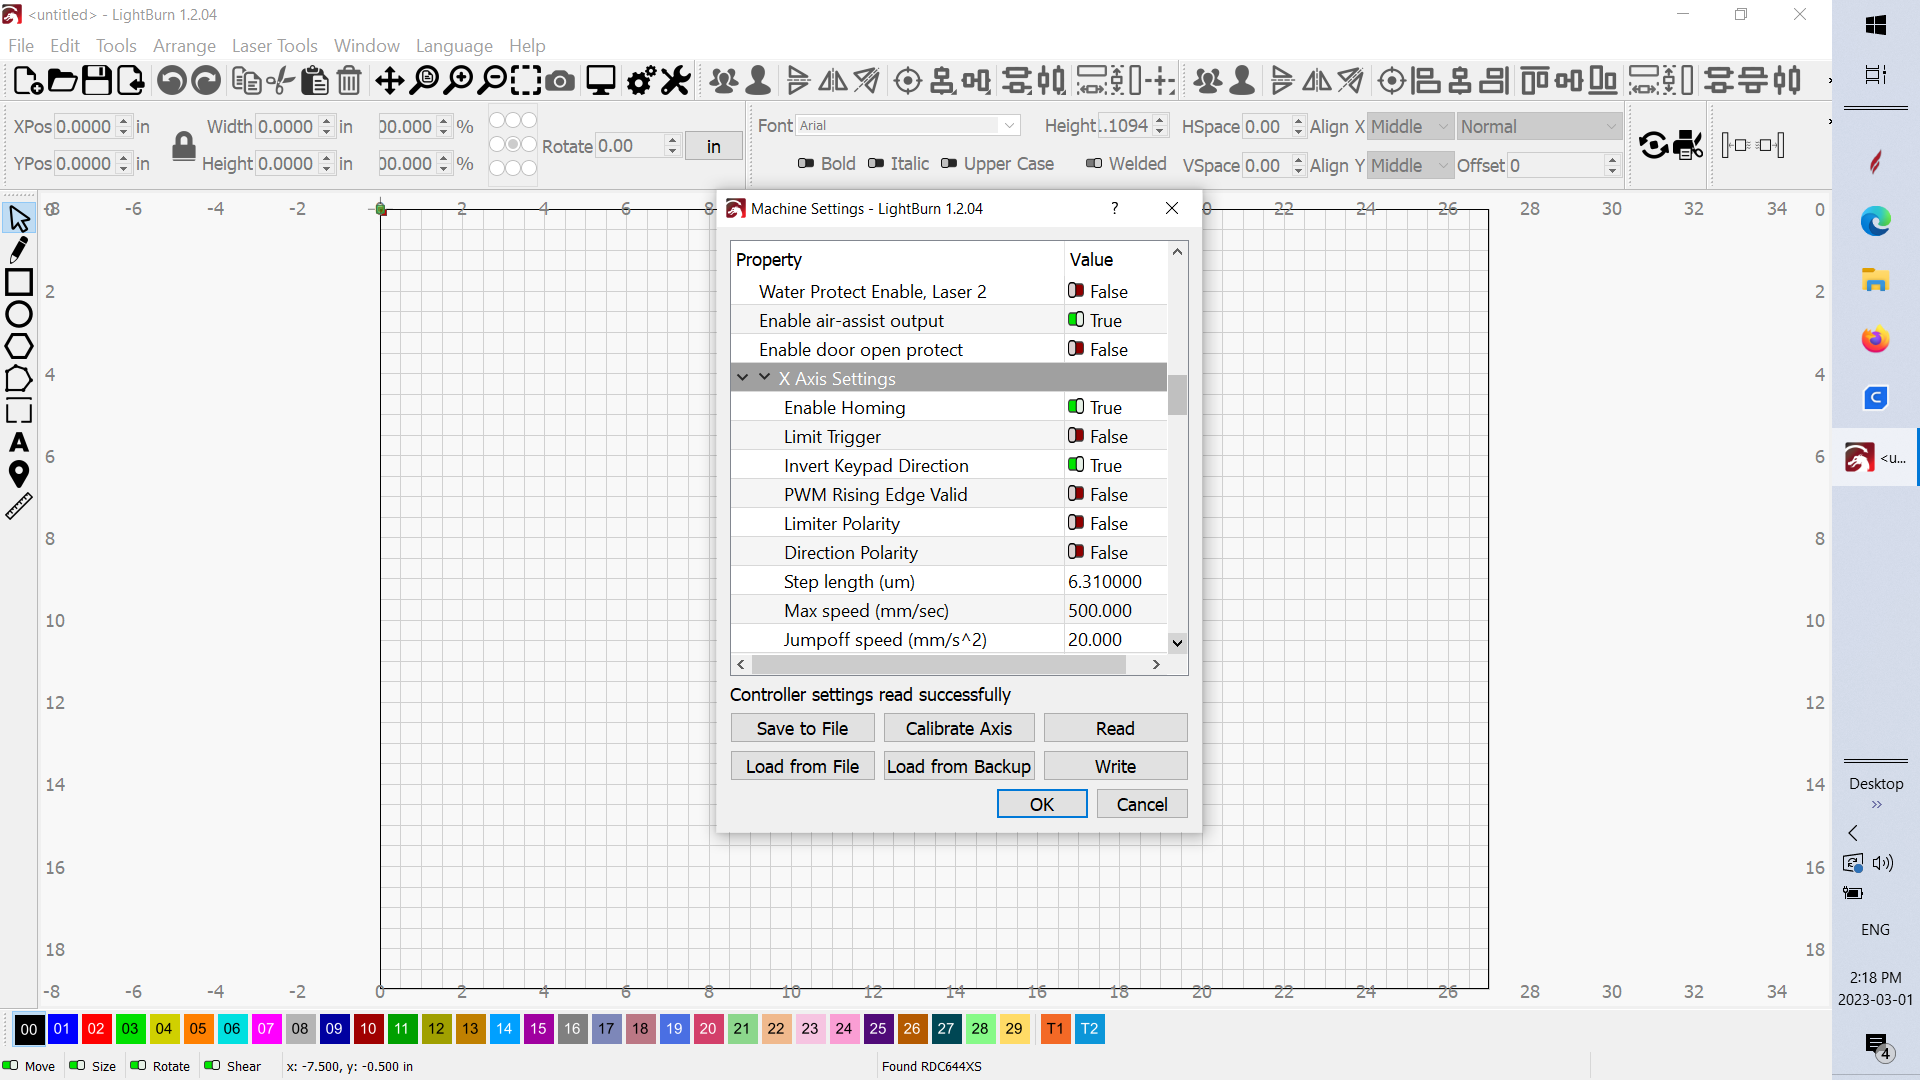
Start with the X axis:
Set Enable Homing to False
Do the same thing for the Y Z U axes.
Click the Write button to send the new values to the controller.
Disabling homing will (uh, should) stop all the thrashing around when you turn the machine on, which will make life easier on everybody.
With the machine off, drag the gantry forward to the middle of the platform and move the laser head to the middle. In that position, you should be able to see the X and Y limit switches:
Turn the machine on, then lay a steel blade (knife, ruler, whatever) on the target atop the X home switch and verify that the transparent base lights up. The base in that picture is not lighted, because I ran out of hands, but it glows bright red when the switch is triggered.
ednisley
I had a busy day at work then had to clean up after a big snowfall, havent had a chance to read any responses since last evening, I will take the time in the morning and go back through your suggestions along with read the manual sent.
I look forward to reading the machine data that is stored and should have no problem following you directions. too tired to continue this evening
Tom
Now to the problem: Whenever I turn on the laser the “X” servo motor winds up the belt to the far left and vibrates voilently as the motor cannot drive the “X” axis because it has ended up at the limits end.
After you turned off your rotary setting in Lightburn, did you reboot the laser? The only time I had the jarring noise was due to the rotary being de-selected in Lightburn but not updating settings to the machine. I had that same discussion in another thread earlier and shutting the machine off (or doing a hard reset) after turning off the rotary on Lightburn seems to have done the trick for size discrepancies and for me, the end of travel vibration.
Assuming the machine no longer homes at power-on with homing disabled (which is not necessarily a valid assumption, which is why I want to verify that), do the next steps with the power off.
The controller must know how far the laser moves for each stepper motor pulse, which you find out by measuring a few things and applying math.
Measure the belt tooth pitch, ideally with a metric ruler:
Mark a tooth on the belt
Starting from zero at the marked tooth, count 30 teeth
Mark that tooth!
Measure the distance between the centers of those teeth
Convert to millimeters if you didn’t use a metric ruler
Divide by 30 to get the belt pitch in millimeters
On mine, 30 teeth span 90 mm, so the tooth pitch is 90 / 30 = 3 mm.
Count the number of teeth around the motor pulley, which is easier if you mark a tooth and move the belt slowly by hand.
On mine, the pulley has 20 teeth.
So one turn of the motor will move the head 20 teeth × 3 mm/tooth = 60 mm
It’s almost certain the X and Y axes have identical belts and motor pulleys, but give that assumption a quick check.
Next, we must find out how many steps the controller sends to make the motor turn one revolution. But, first, report back so we all know what’s going on.
I hate to have him do a lot of unnecessary work. The machine was working before and when he used the rotary. It had problems when he removed the rotary.
The chances of these settings being wrong are low… There is something we are missing to put a solution together…
I wouldn’t want to change anything unless I had good reason… When you put a rotary into a working machine, use it then remove it and it doesn’t work… that smells of some thing in the configuration to me…
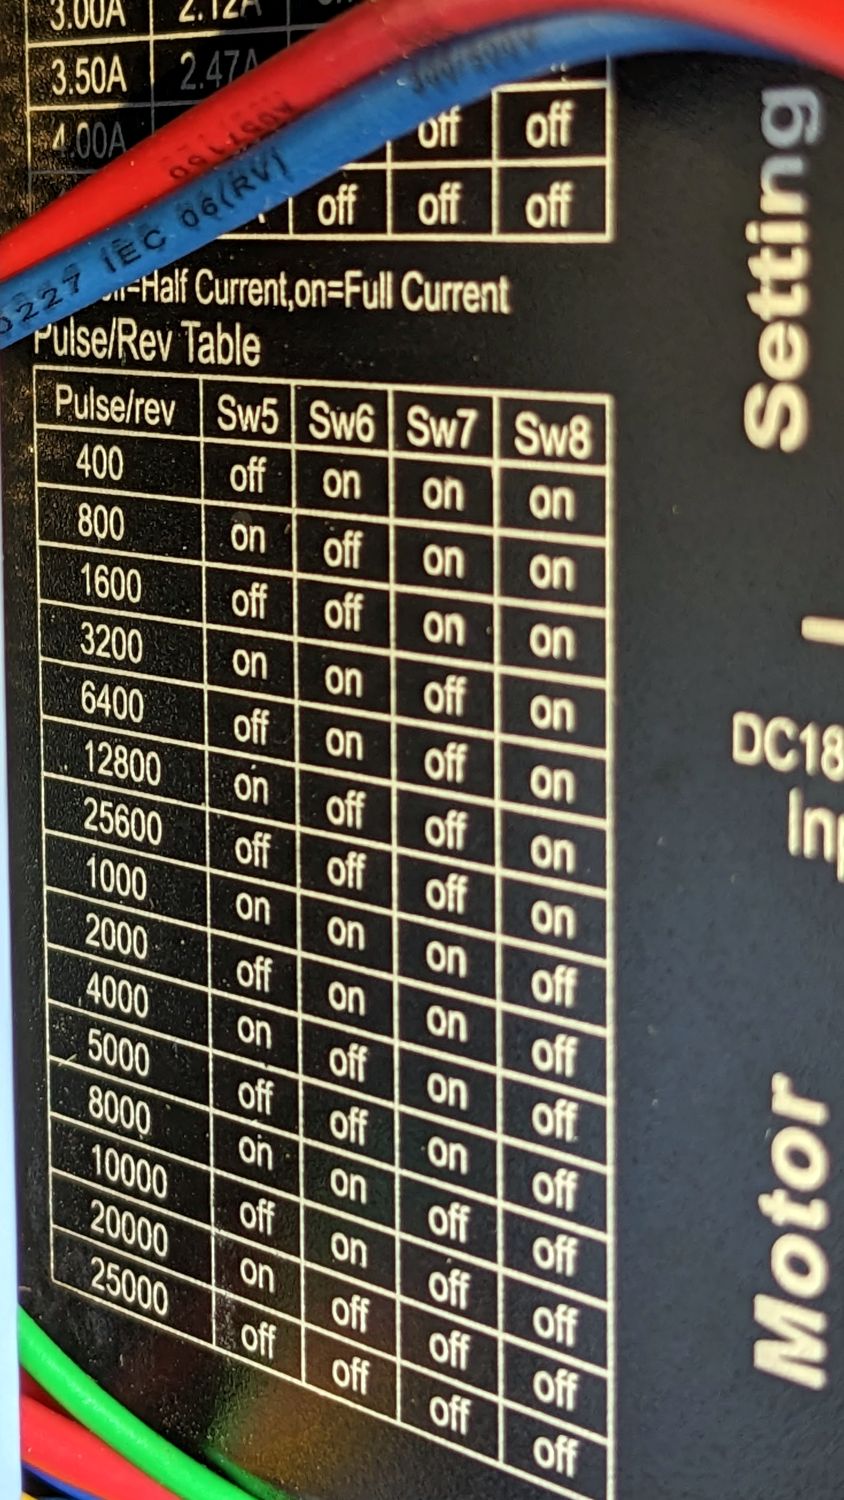
The screenshots show the controller expects to take 6.13 µm per step for both axes, so the steppers should be set for (40 mm/rev) / (6.13 um/step) = 6525 step/rev.
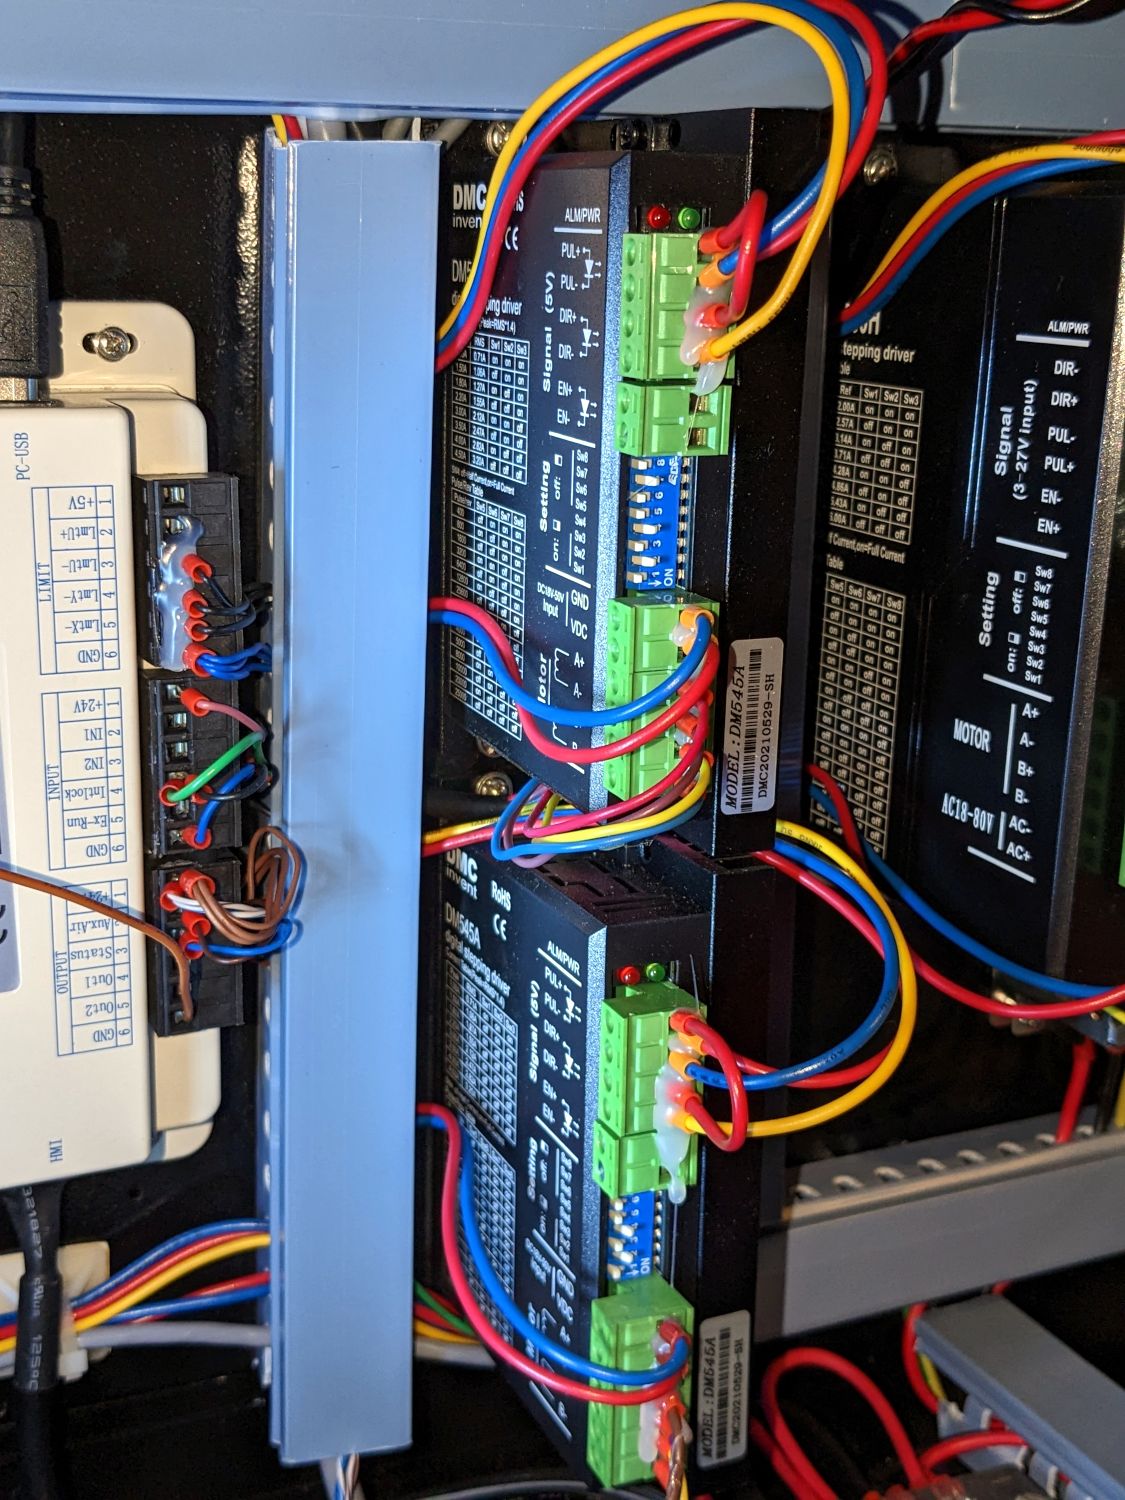
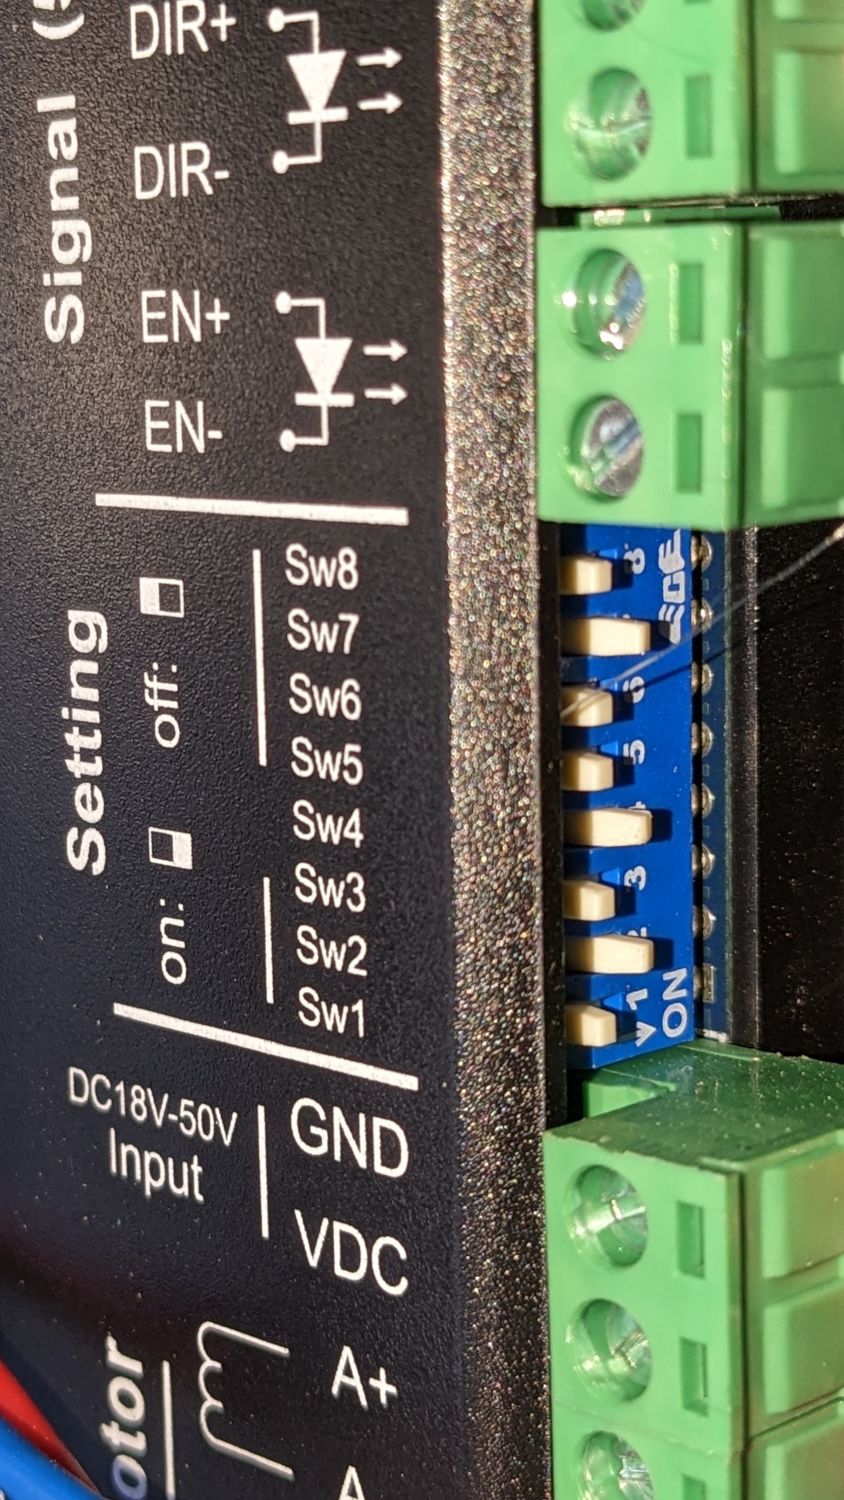
To verify that, find the stepper drivers inside the electronics bay, which should look like this:
Look down the first column to find 6525, then note the switch positions. My drivers do not have that number, but yours should; if not, there’s a problem.
In this case, switches SW5 through SW8 are OFF OFF ON OFF, which corresponds to the table entry giving 5000 steps/rev.
Stand on your head, peer inside, and see what you come up with.
Protip: Taking pictures as you go definitely helps!
I must piece your screenshots together and pore over them, which will take some time. Today was my long-delayed eye exam: my pupils are vast dark pools and the screeen is really bright.