Rotary attachment Help!

Hey all,
First off wanted to say I am loving LB and its capabilities! Most solid purchase I have made thus far on my lasering venture.
I am trying to set up a rotary and after searching the forums all night am seeing a LOT of people having relevant issues.

One thing I really need to figure out:
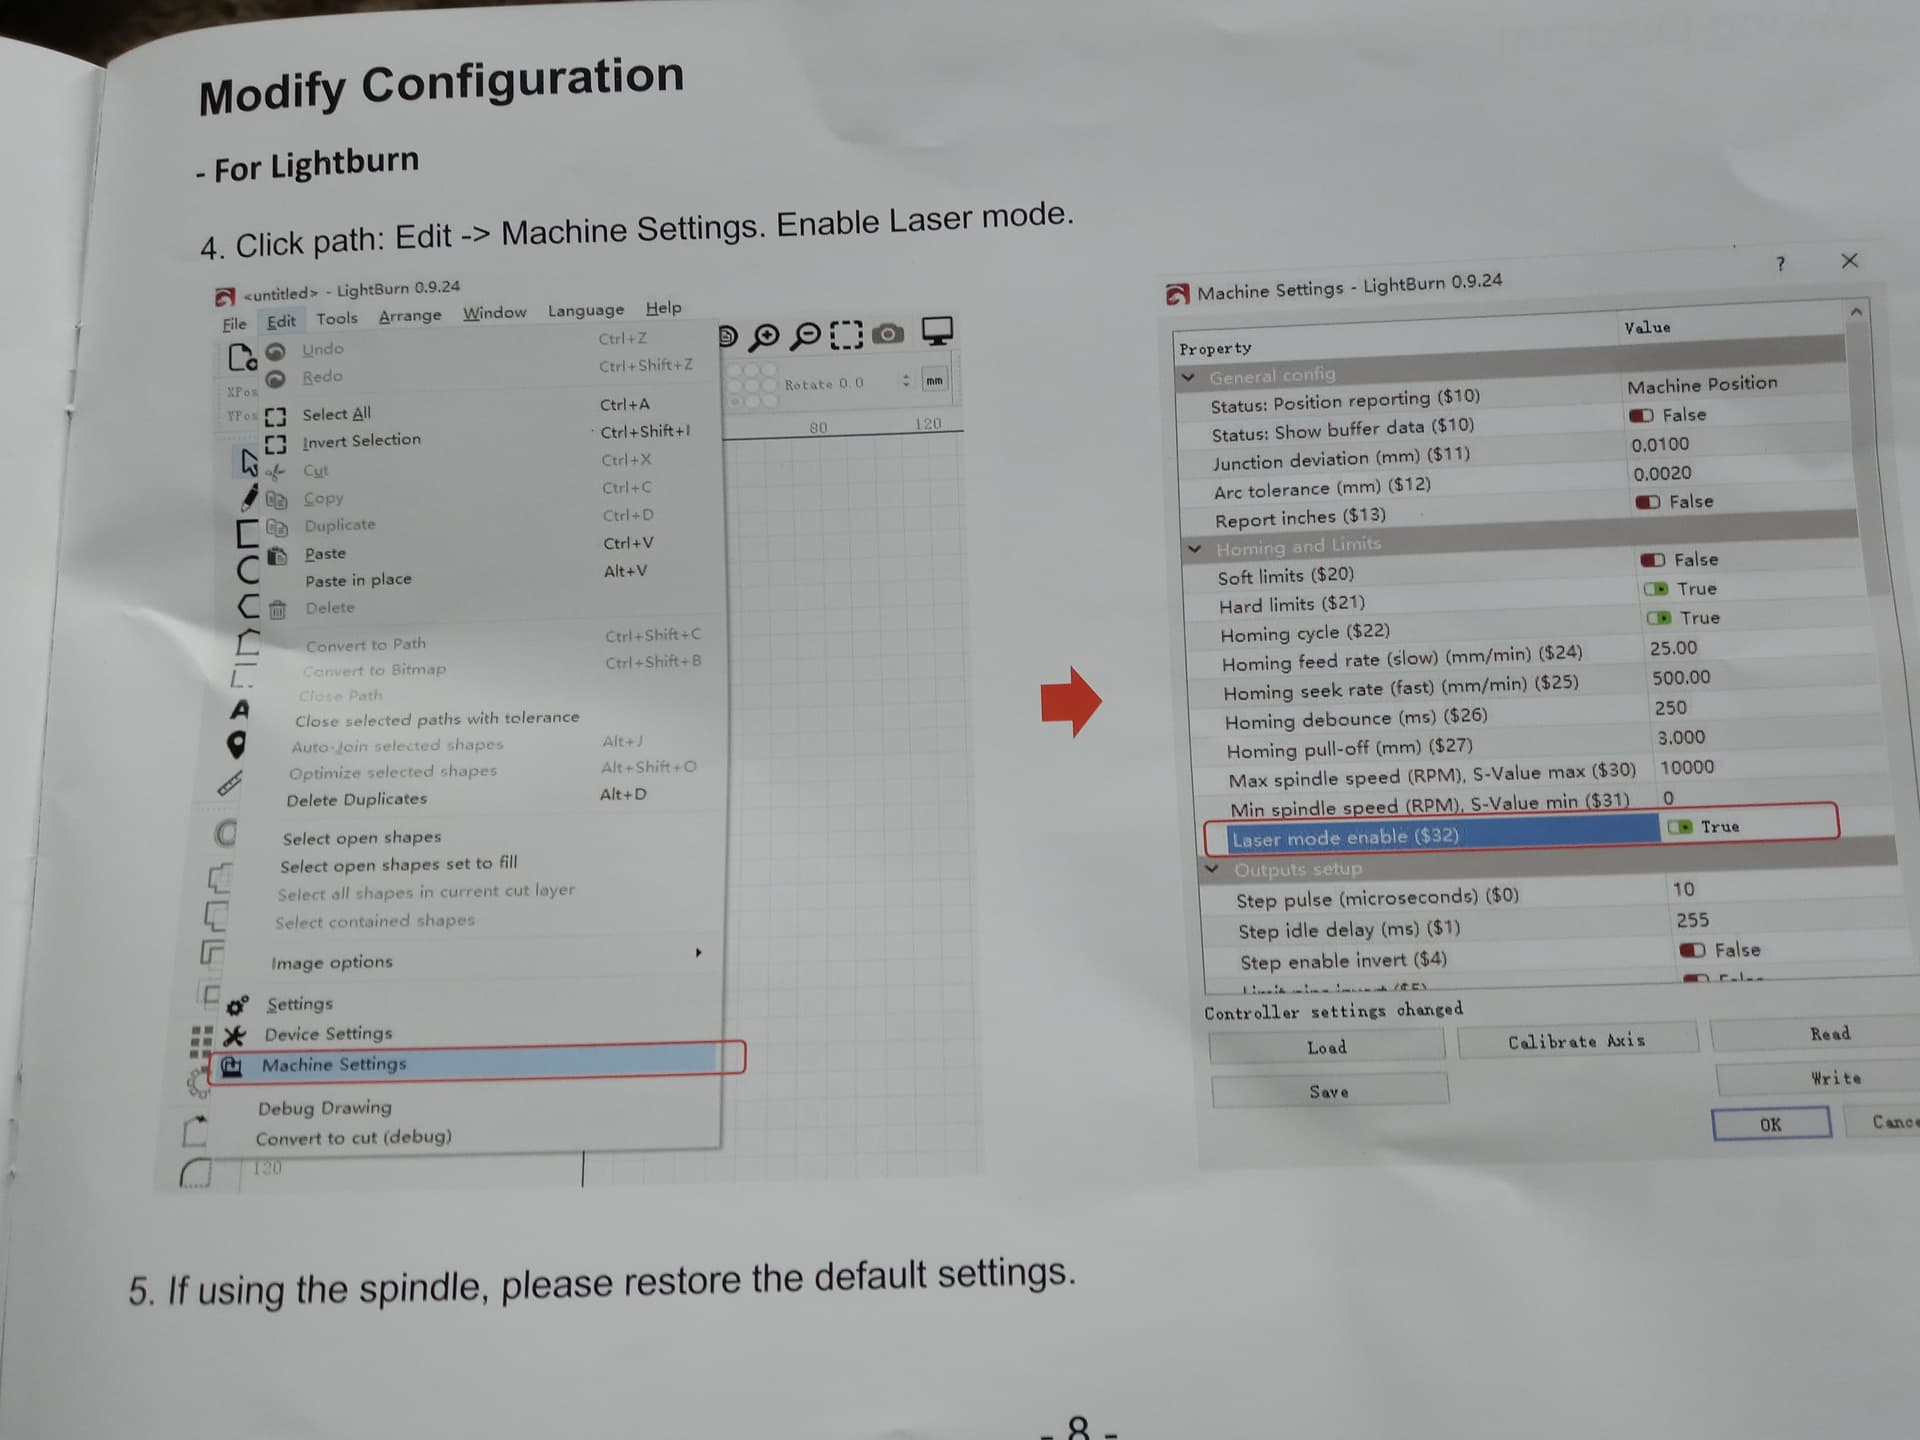
Lets pretend I am a dummy and during my trial setup of the rotary I changed the idle speeds on my machine settings without writing down the original settings… Rotary still not working but how can I get my original settings back if they are unknown?

Chinese Red & Black / OMTech 100w
Ruida RDC6442G-B(EC)
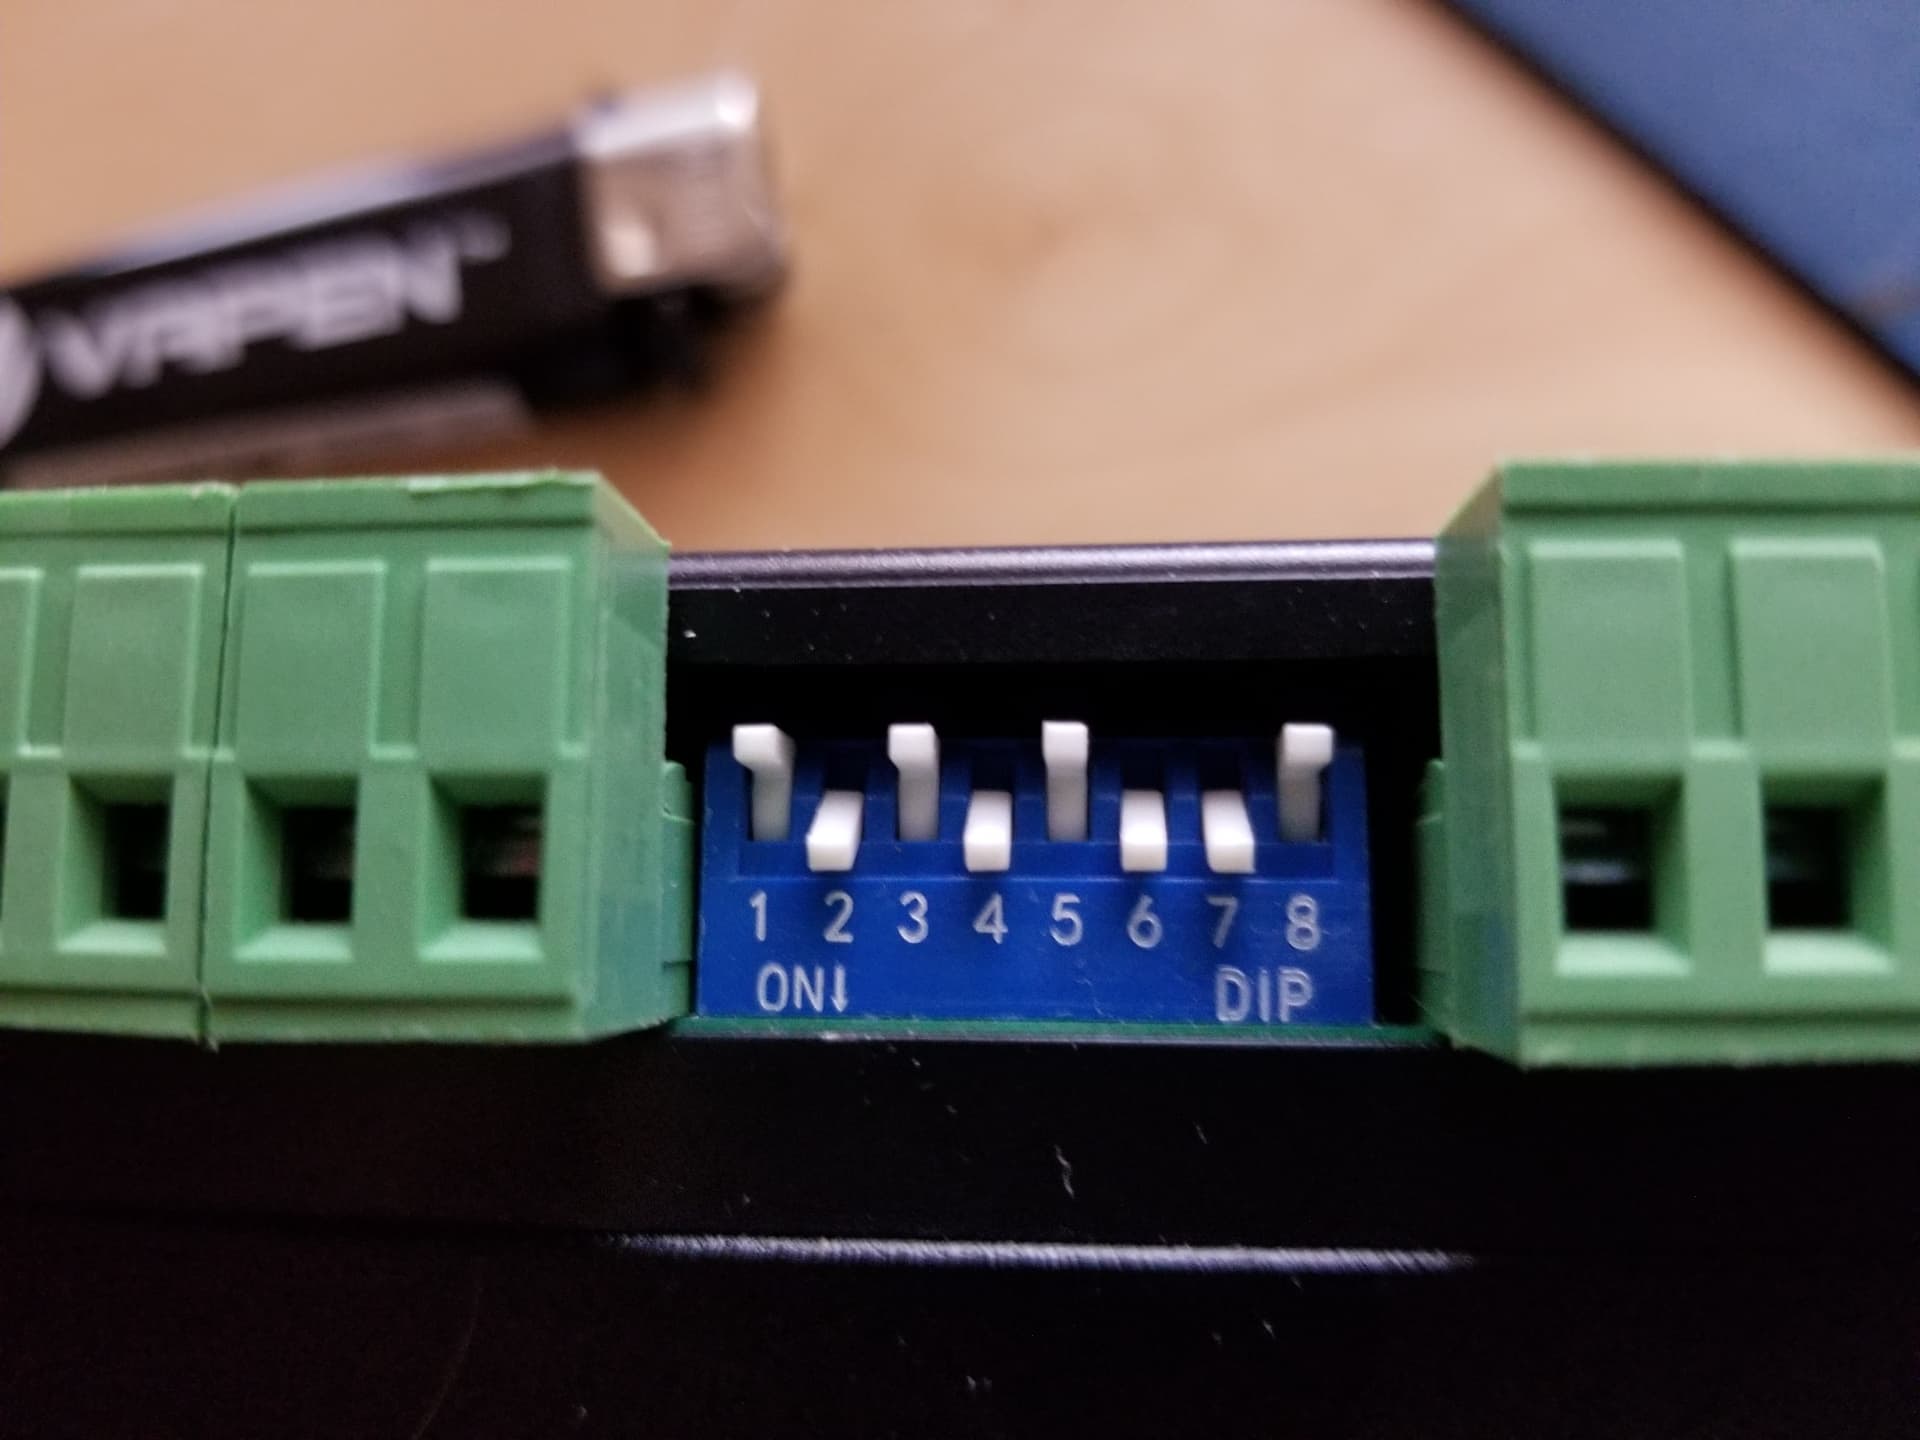
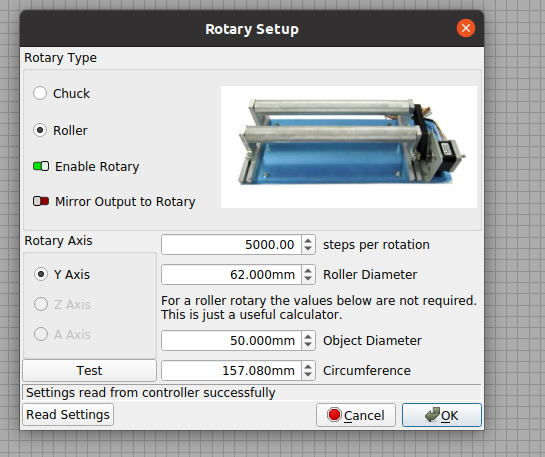
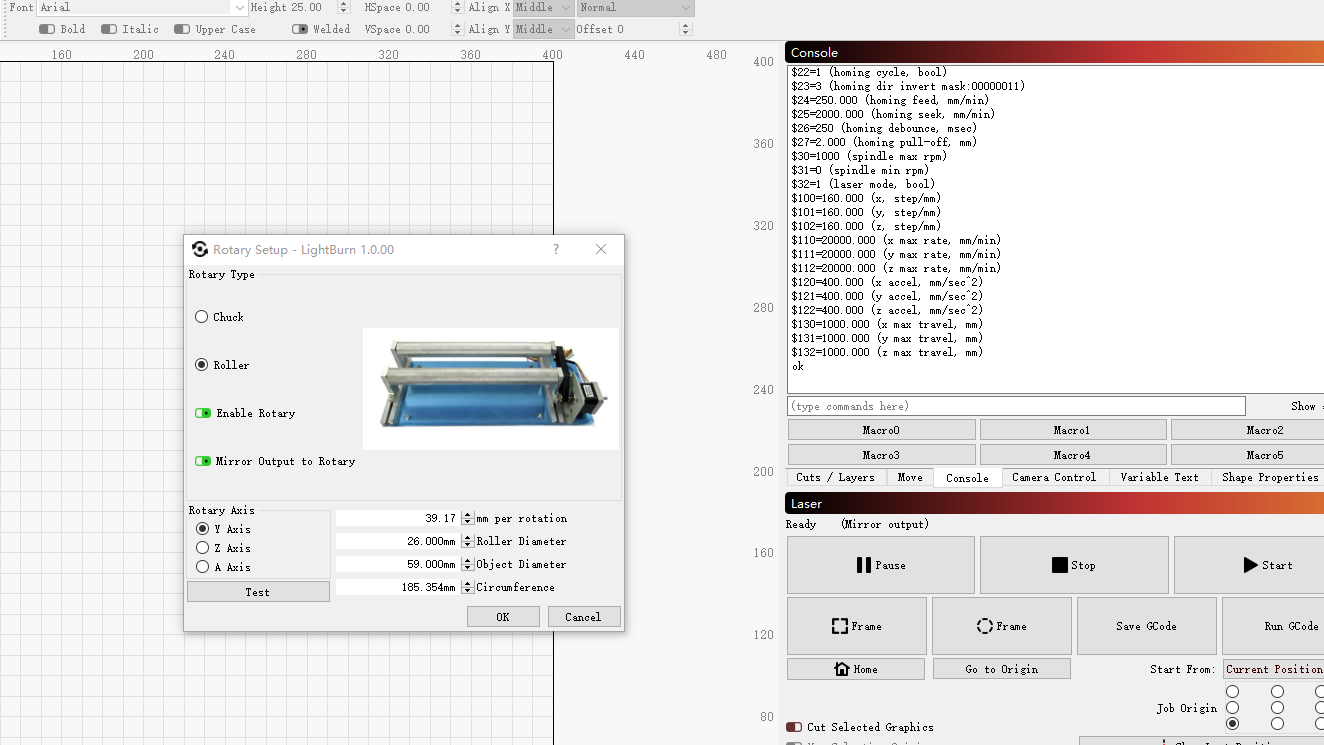
FoxAlien Roller Rotary (Their setup instructions for LightBurn were not options in the current version / could not find some of them as per their instructions). Their instructions mention 40mm per rotation but all i can find is “steps” per rotation. Regardless I tried setting it to 40 “steps” instead of mm and it keeps going back to the default 10,000 (read from controller?).

Steps per rotation- every time I changed it and did a test, no matter if I set it to 2500 or 10000 it rotated about 1.25 times and went back to normal position.

Thought I would give it a whirl and do a test run, hit Start and the rotary went flying around upon startup - flung the test tumbler right off of it. This is why I read the setup info from LB And per the note towards the end, changed the idle speeds. (Although I was frustrated at this point and didn’t make note of original settings).
I think I burned up the stepper motor trying this out so I am awaiting a new one. I had the machine on and while I was playing with setup, the motor started making a beeping noise and got very hot. Now it does absolutely Nothing, cannot get it to spin.
Unplugged it and hooked Y-axis back up, turned machine on and got a horrible growling noise when it tried to Home.
So I hit escape, tried manually moving the axes and they both slammed past the limits. I think i have fixed this part though but am taking a break from it right now.

Happy Mother’s Day to all! Going out for a bit then will check back, hopefully one of you genius LightBurners can help… Thanks in advance!

I am, by no means, an expert on the subject but I noticed that the FoxAlien rotaries appear to come in two flavors. One has a NEMA 17 stepper motor and the other has a NEMA 23. I believe the OMTECH lasers usually have NEMA 23’s. I’m curious as to which one you have. I am going through the same process of adding a rotary designed for a diode laser onto my OMTECH 50W. I know this doesn’t directly answer your question, but it might.

This is a very good place to start …
I’m looking to buy a roller And im looking at… OMTech Rotary Axis Attachment for Laser Engraver Cutter (Upgraded 2020 Model), And looking for some help to set it up becoues I am a dumby on seting a roller attachment lol…I have a China black n red running win 10 … In the device setup in lightburn Ruida KT332N any help at all will help before I buy this ?.

The setup for a rotary is relatively simple. There is a slight difference between a chuck and a wheel (roller) type rotary.

You need to determine steps/rotation. This is found on the motor driver.

Check the switch settings on the motor driver.

Find the ‘chart’ that tells you how it’s configured…

Determine the steps/rotation… mine is 2000 steps/rotation.

For a wheel rotary, there is also a ratio between how many times the motor rotates to a single rotation of the ‘driving’ wheel.

In my case (PiBurn) the ratio is 2.5, so 2000 x 2.5 = 5,000. That’s the steps/rotation for the rotary setup.
The only thing needed now is the driving wheel diameter, which is 62mm.

rotary-controller-settings

Since the driving wheel moves the object the same amount as the Y axes would, the setup is done.

With a chuck type you have enter the diameter of the object every time it changes so the software can compute the ‘surface speed’ of the object.

Make sense?

:smile_cat:

2 Likes

Pretty sure it’s to calculate the equivalent distance of the Y axis travel based on the circumference. Think of it as if you were unrolling a thin sheet of paper flat out to engrave on. That object diameter of course determines the circumference which equates to distance traveled. Speed has nothing to do with it in this case. :wink:

1 Like

Yeah, I made the mistake of buying a NEMA17 rotary before this one (Genmitsu brand) which did not work at all (was for diode lasers / not wired correctly for my 4-pin aviation connection). I rewired it and added the aviation connector, which still did not work. I think the NEMA17 Was the problem, but it’s sitting in my tool box if anyone wants it - passed up my 30 day return date as this is mostly just a side-hustle for me right now and I only get to mess with it about once a week with a newborn.
I have the OMT 100W 500x700 Red & Black, driven by Nema23 steppers all around.

Blockquote
1OldMan[Claude Gilbert]
This is a very good place to start …
I’m looking to buy a roller And im looking at… OMTech Rotary Axis Attachment for Laser Engraver Cutter (Upgraded 2020 Model), And looking for some help to set it up becoues I am a dumby on seting a roller attachment lol…I have a China black n red running win 10 … In the device setup in lightburn Ruida KT332N any help at all will help before I buy this ?.

I have a friend who has the OMTech 100W red & black, along with the rotary you mentioned, and for whatever reason their setup went much smoother than mine is going (although they also have unlimited time to mess with theirs). They highly recommend the OMT rotary.

So let’s “pretend” I am not following at all… you mean the motor driver that’s inside the machine?? Every other thing I’ve seen on rotary setups (YouTube videos, forums, etc) seems to mention that if your specific rotary doesn’t provide the steps per rotation, you pretty much have to guess at it until it spins 1 full turn, pauses, then returns to original position (when hitting Test on rotary setup).
If that’s not the case - and my machine/driver already has it listed, how is that possible for the machine / driver to “know” the steps per rotation of any random rotary you hook up to it? I DO understand the part about reading the chart etc, but it just doesn’t make sense that those settings would work for just any-old rotary.

How would you find this ratio if not provided? PiBurn looks much nicer than this FoxAlien, and the ultra-cheap genmitsu I tried to start with… maybe there is a possibility that the upper-scale rotaries have easier setups. I’ll take some photos of the FoxAlien setup instructions and upload them to see if anyone knows where I can find some of the settings they’re referencing - they don’t seem to be in the same part of “Edit” as the old version of LB that FoxAlien is saying to change.

It does make sense, but the speed issue is that the rotary literally spun probably about 20,000rpm when I pressed Frame or Start, for about .5sec, then started going at what looked like a normal speed to me, and then at the end of the Frame / Run it did it again… I think this played a role in burning up the motor (I have seen another Post where Oz said it’s normal for the rotary motors to run hot, but this thing got so hot it started making a high-pitched ringing noise (and there’s no speaker on it…lol…).

equals ‘surface speed’… This is your computed head speed for the specified diameter…

:smile_cat:

Do you have a link to the rotary and the manual?


How the motors are handled, is configured in the motor drivers and propagates back to the controller. Using the current settings will avoid having to make changes all the time when you switch back and forth.

Most of these use very similar motors. You can get incompatible motors for your motor drivers but I don’t see it very often.

This is how I set up mine and have helped a number of others get theirs to work. Pick whatever method you choose.

That’s what happens when the configuration is ‘guessed’…


When I run the rotary, I have all the acceleration speeds lowered.

That’s a bummer, probably won’t do that again…

Anytime you change configurations, keep a copy ‘just in case’. Use Lightburn ‘Edit → Machine settings’ to ‘save’ the factory (or your modified) configuration files. I have a large number of them… At minimum one for the rotary and one for no rotary…

Most of these machines have ‘vendor’ settings that vary by manufacturer. You can reset to factory, but the factory that built the controller is not the same one that built the machine. You always need to backup anything you can break

Might ask around, clueless on what mine are currently set…

Good luck

:smile_cat:

Look on this page. Lightburn now saves backups automatically.

This is the rotary:
https://www.amazon.com/Engraving-Cylindrical-Objects-Surface-FoxAlien/dp/B09D95WGXH?th=1

Attaching photos of the manual.
On the one- it says to set LB to 40 “mm” per rotation, but LB only gives me option of “steps” per rotation. Then, manual says to go Edit>Device Settings> change value of S-Value Max to 10000 - I do not see this option in the current LB version (the manual photos appear to have used LB 0.9.24). Manual also says to go Edit>Machine Settins> Homing and Limits> Laser mode enable ($32)>True… I also do not see the “Homing and Limits” settings in LB. This may have all played a role in the rotary burning up, idk.


Incredible!! A Lightburn unexpected but much appreciated feature saves me once again! Thank you.

1 Like

Your information and text identifies your controller as a Ruida.

Looking at the link, that rotary is designed for a grbl machine so the setup is logically for grbl, not the Ruida. The origination of your frustration is now perfectly clear…

Dump the instruction manual you have, it’s for a different controller… :frowning:


Might want to contact the vendor and see if they can give you the gear ratio you need for the Ruida configuration.

Lightburn will only allow you to modify things that are available for your hardware.


I’d recommend…

Configure it as I suggested, using only the steps/rotation from the motor driver and the wheel diameter. This will exclude the ‘ratio’ but the machines motor should make one turn forward and back when ‘test’ is clicked.

Once the motor has one rotation, you can put something on it and compute the ratio. Might be easier to rotate the motor by hand and see how many motor rotations it takes to rotate the drive wheel one rotation. That will give you the ratio… and all the information you need to get it up…

It looks to me like all the pulleys are the same diameter with the same number of teeth. It might be a simple 1:1 gear ratio… That would simplify it greatly… use the steps/rotation as specified on the driver, you know the wheel diameter.


Good luck…

:smile_cat:

Thank you again,
Ordered a replacement since this motor burned up.
I will get back to this when the new one comes in.

I don’t think you should be having this issue. Might want to double check that the current rating is OK on the driver…

Good luck

:smile_cat:

New one is in already!
I don’t know 100% for sure that it burned up, but it was hot enough to leave a blister and started making a high pitched ringing noise, almost like a smoke detector (but constant rather than beeping). With the minimal info that the rotary manufacturer provides (that setup manual I posted was literally all that came with it)… kinda hard to figure all that out. Regardless, it stopped spinning altogether after that final high-speed spin.
As far as “rotate the motor by hand and count the turns to make the roller turn 1 time”… I turned the motor 50 “steps?” and the roller spun 1 time. The gears are all 0.5" with 20 teeth on them. 1 full spin on the motor = 1 full spin on the rollers, so I take that as being the 1:1 you’re referring to.

FWIW - The last test run, Lightburn warned me that running it may exceed the boundaries of my machine, and I pressed run anyways… should I not do this? I just assumed it was due to the rotary being hooked up / Y axis not homed. I would like to avoid burning this one up if at all possible.

My driver module also lists 2000 steps/rotation. But since my rotary seems to have a 1:1 ratio I will enter 2000, and 26mm (1.024in) for roller diameter.
Any idea as to the part about changing the S-Value in Device Settings > Basic Settings> S-Value: 1000 ? This doesn’t show up on my version of LB.
Also Do not see Machine Settings> Homing and Limits> Laser Mode Enable ($32) Enable Laser Mode. The manual mentions that $32 setting for both Lightburn and GRBL so I would assume it’s necessary…
For LaserGRBL Setup it says:

  1. Click Path: Grbl> GRBL Configuration
  2. Change the value of $32 to 1. Also change the value of $101 to 19.59
    (The formula is 200*8/26/3. 1415=19.59 (Pulse = stepper motor pulse * subdivision/diameter/pi)
  3. Click “Write” to modify. Seeing “2 config written successfully!” means the modification is successful.
  1. If not using the rotary, change these two values back to 0 and 40. (For laser, set $32=1; For spindle, set $32=0)

^I have zero idea what any of that means, I just didn’t know if it’d be helpful to your helping with this, which I am eternally grateful for.

Also- would there be any issue if I changed the dip switches for the output current to set it lower (in hopes of not overheating the new motor/ maybe that’s what made it so hot)?
Getting ready to plug 'er in and see what happens.

I just got a reply from FoxAlien- this is what they said to do:
Hello,

This is Albee from FoxAlien Team.

Please set the rotary rotation in Lightburn directly.Please do not revise the configuration setting.

Feel free to let us know if you have any question about this.

Thank you.

Update:
It is working flawlessly with that setup! Thanks for all your help!!
I marked the solution post.

Thank you again, I owe you.

Your manual is for a Honda Civic and you own a Porsche. Need more clarification?

Did you advise them you have a Ruida controller? I think not. That’s the Honda factory trying to help you with your Porsche, unknown to them it’s a Porsche…

Because you did the proper configuration. Congrats :crazy_face:

That makes it much more simple and probably why it’s not noted somewhere. Had to ‘see’ it to really make any good suggestions… After the visual, I was suspicious it was 1:1.

Remember that the rotary is the ‘Y’ axes. If the design exceeds the size of either axes, it will warn you.

I usually make a rectangle with a tool layer to ‘outline’ the available area of engraving on the mug. I work with it normally but you have to rotate it 90 deg before you can ship it to the laser.

I do this when I setup for a ‘mug’… like this one…

Once the machine is up with the rotary connected, I rotate the rotary 1/2 way through the Y axes range based on the Ruida console. This places the Y position in the center of it’s range.

You only have to rotate it 1/2 the distance of the engraving if it’s setup like this…

Screenshot from 2022-05-11 07-47-36

I pick the Job Origin here because it allows me to easily ‘center’ the mugs engraving over the manufacturers logo.

Press Origin, so where ever the head is will be where the center of the image will be.

Check focus, check framing … run the job.

I’d recommend against doing this, unless you know the issue and the results. If you see these messages then there is an error somewhere, either your drawing or maybe something with how you are configured. There should be no warnings.

The Ruida console will display messages also and give you the option to continue or abort (esc). The machine is telling you there’s a problem, but as operator you are allowed to override some functionality. Not recommended.

IMHO pitch that manual you keep referencing… and when you speak with support you must advise them of your hardware or else…

Good luck…

:smile_cat:

Turn your laser on as if your about to use it. Go to the top to edit, click on that. a screen will come up. Scroll down to machine settings and click on that. A screen will come up with all your settings, look for homing cycle. If it is a dark color turn it on by clicking it and it will turn green. When it’s green go down to the bottom of the scerrn and you will write, click on that it will ret it back to normal.Go to edit again scroll down to divice setings it will bring up a screen look for auto home on startup an make sure it’s green that should get you back on line to work your laser.

Rich on youtube is awesome to watch on anything LB and lasers.
Click here