Snapmaker Artisan not working properly with Lightburn

I’ve read a couple of threads about the Artisan and other Snapmaker machines having problems with Lightburn, but those were all a couple of months ago. Have there been any updates? Mine either doesn’t connect at all or you can only move the motors manually.

I’m new to Lightburn, but I’ve tried the following: different protocols (Snapmaker Marlin, GRBL and GRBL-M3 1.1e) and could only get some movement out of the Artisan with GRBL-M3 1.1e, and it seemed to either split the movement into two with a small pause in between or do the full movement twice, but I didn’t measure the movements it actually did. I used the buttons in Lightburn to move it. The other protocols did nothing as far as I could tell.
I didn’t try to see if the laser would turn on or not, as most of the features didn’t work anyway (like homing). Also didn’t try to see if I could send a job to the device (I assume not, as it refused to do anything with most of the buttons).

I’m using a MacBook Pro 2017 with Ventura 13.7, I also installed the proper drivers which seem to work since I could move it.
Lightburn should be the lastest version with 1.7.00.

I’m using the 10w module and can’t find much information about it. Snapmaker’s own wiki entry doesn’t seem to work anymore, as it tells you to use the Snapmaker preset in Lightburn, and they don’t provide any presets like the 2/20/40w ones.
My Artisan also uses the latest firmware version 2.7.3, would a downgrade help/be a temporary workaround? As I’m not planning on getting the 2/20/40w lasers any time soon, I wouldn’t care if support for them was gone.

Thanks in advance!
There’s several foibles in each method. The cleanest and fastest code is generated via GRBL. While the Artisan is Marlin, it should still run fine. I don’t have an Artisan to test, but I have several 2.0 and have zero issues. I’ve run the 1.6W, 10W, 40W, and IR with the same profile, just modifying the header gcode for my repeatable origin.

The problem with using GRBL setup; while the code runs fine, all the control buttons in Lightburn are broken. Any movement you want will have to be hand-typed in the console, or assign your own macros.

Snapmaker Profile; I’ve never used it, but it should work fine, the biggest problem is if you generate the code and try to run it in Lightburn, it’ll hang. The reason for this is the thumbnail code is too long to send over USB buffered. Try connecting with synchronous to solve this, or generate your code in Lightburn, then use Luban to run it on the machine.

Vanilla Marlin; people seem to use this more often, though I can’t say much about it, I haven’t tried it as I’ve had a working solution for years now and I don’t feel like changing up.

While it’s for the 2.0 series, I assume it should be very similar, feel free to give my guide a go. It was originally made for the 40W/IR, but the only difference is finding your focal height.

A few deviations; in the setup image, since I don’t use USB, the connection info is wrong, it should be baudrate 115,200 and if you use the snapmaker profile, synchronous instead of buffered.

To get your focus height to subtract for the header with the 10W it’s this method;

Since the 10W doesn’t have the focus bar. Keep in mind; the header setups and all are if you plan to use a repeatable origin in the lower left. If you use the manual origin method, it’s not required at all.

Thank you so much for your answer! I’ll try your guide as soon as I can and see if it works :smiley:

By the way, I also have the rotary module. Is it possible to use that/tell Lightburn that such a tool is being used? I suppose its a whole new mess.

I had a guide for that as well, but it’s a bit involved and dated. I haven’t done anything recent to see if anything has changed.

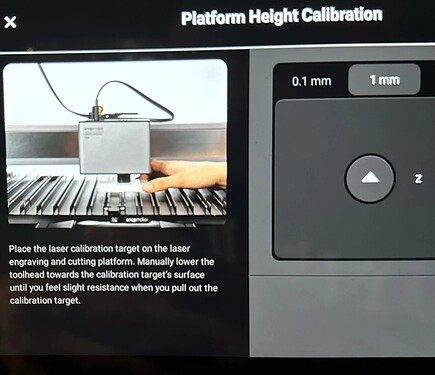
I’m currently trying to get the 10W z-height and you wrote to do the height calibration. But if I do that in the display, following the instructions including the little calibration block you have to put on the platform I can’t move the laser far enough down in the manual thickness selection. I assume I have to do the height calibration without the white block ?

On the 10W, it’s easiest to start a job, manual focus and touch the bed, then after it moves back up, back all the way back out and look at the control screen for your machine height.

I did a mock job but it didn’t let me touch the platform with the laser module. It stopped at 1.3 cm and it also doesn’t move back up when it asks for the origin. Maybe the Artisan does it differently to the 2.0 ?

Seems odd you couldn’t lower it to the platform, as that’s also part of the calibration process.

I do not know what the actual process for the 2.0 is to calibrate the platform height. But for the Artisan the laser module never directly touches the platform, its always with an extra little plastic calibration block. And the firmware won’t let you go down any further doesn’t matter what. In the picture you can see how that would look like.

Also seems like most of the issues inside Lightburn came from a broken driver install on my Macbook. Not sure why but after I reinstalled the driver from Snapmakers Wiki for the third time it works just fine. Console finally works as it should. I can send the jobs via USB etc. The Snapmaker Marlin profile still doesn’t work for some reason but the GRBL does so thats good enough.

For the focus, this is what I did now:
Start a mock job and selected the mode where you input the material thickness.
Told it my material is 3.5mm thick and it moved up a little. I exited out of that job and checked the position. The lowest the Artisan will go with the 10W laser is 13mm and the mock job was sitting at 17.8mm. So I assume my focus height is 14.3mm.
I did some test cuts with 3.5mm and 6.23mm corrugated cardboard and it seemed to work fine with that as my Z origin.
One big issues I have now is: If I ever have a material that would be thicker than 14.3mm I have to keep editing the start gcode since its first moving to that height and then adds the additional material thickness to it.
So basically: It goes to 14.3mm first. Thats Z 0 and then it will move up to whatever the thickness is. I’m just unsure how to fix that now.

Also in your guides start GCode, the very first line " M106 P0 S255".
I’m not sure why but it does nothing with my Artisan. I checked the Artisan G-Codes in Snapmakers wiki and its listed there but it seems like that is just for the 3D Print Module (they don’t specify what module it actually works with, I just assume its the 3D print one).
I ended up basically fully rewriting that start gcode to match the Artisan custom stuff. Seems to work now though. Its basically the same as yours just with Artisan gcodes. ^^

That’s interesting. For the 2.0, to measure the platform height, it lowers down and touches the bed directly. However; 14ish mm does sound about right.

The M106 I shove in there, simply because Luban did. In 3D printing, M106 controls the print fan, I assume it’s there for the laser fan, but not required, firmware should handle that.

Overall, as long as it works, that’s good to hear. For your Z height in the header, if 14.3 is the machine coords when focused on the bed, home the machine, then whatever the machine coords are on Z, subtract 14.3, and that should be your header height. Then you can use the material thickness in lightburn to set focus height.