Using rotary on Y-axis (swap) with RDC6445G

DSP Ruida RDC6445GZ (Firmware RDLC-V15.01.27)
My machine is setup for a y-axis swap (not driver for a U-axis). not looking to add that just yet.

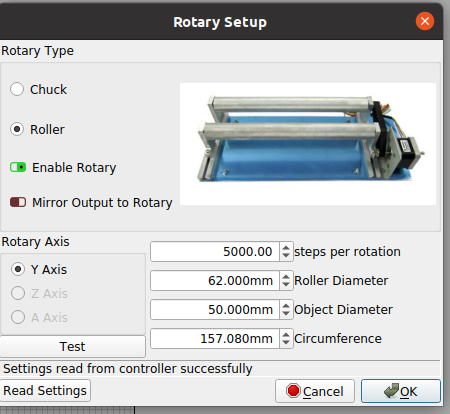
I would like to be able to use LightBurn Software with this 6445 control panel.
It is compatiable with LB, which is why I bought it but I cannot get the control panel to respond properly to tests with rotary enabled.

I have read this thread on how to use LB with a 6445 on /U/-axis. But I am trying to use it on the Y-axis.

I have both a chuck and a four-roller style rotary, and trying to setup the four-roller.
I am clueless on how to setup rotary attachments, or what I need to do to make it work.
If it were as easy as putting in the diameters, I think I could get it done, but it is not that easy.

When using rotary setup: enable rotary goes greenā€¦ read settings, that worksā€¦
ensure head is located and LB settings are set to ā€˜current positionā€™ (thats a check).

HERE is where it goes wrong:
I hit the ā€˜testā€™ on rotary setup screen, and it moves the X-axis just a bitā€¦ rotary axis does not move. WTH?

What are my options here guys and gals?

THANK YOU!

edit:
I was able to get by using a video for how to setup using a K40 laser using the Y-axis as a rotaryā€¦ I meanā€¦ sure it works technicallyā€¦ If you donā€™t mind calibrating it every timeā€¦ oh and shrinking the image in the Y-direction by the % needed, so it engraves correctlyā€¦ In one case it was a scale factor of 21.8% and in another case it was 22.2%.

So changing the settings via rotary setup does not seem to change anything with the laser. I hit ā€˜okā€™ after rotary setup, and then use move command in Y axis, and it does move the rotary. The issue may be that Lightburn must think my rotary is on the U-axis of this controller. but it is not, it is not, it is the Y axis. This theory is proven out by changing the number of steps per rotation in rotary setup, and verifying it does nothing to the scale of movement in the Y axis.

If I donā€™t setup the rotary, and just let the laser run the rotary as if it were the Y-axis stepper, it obviously accelerates and moves waay too fast for a four-roller setup and just throws off the cup/glass. So that is something else I had to learn ā€“ lower the idle movement speed and between line speed down to 20 mm/sec. save settings. then when done suing rotary, reload old settings.

but I paid alot of good $$ for this equipment to work right. Seems like I am missing something importantā€¦ would be great if I could just input the diameter of my workpiece and have lightburn engrave to the correct scaleā€¦

I have the 6442SB controller and have not investigated the use of the U-axis but I also had some issues with my rotary chuck device. What I read and gleaned from YouTube videos didnā€™t work very well. What I eventually did that works well was to find a number to input for the circumference, in my case 2.014 inches, and the correct number number of steps per rotation, (12,000) and it works fine. After making the any changes be sure to write them to the controller.
In the setup of Lightburn Version10.0.04 that Iā€™m using it wants the diameter of the object which I assume is the cup or bottle, etc. It also asks for the ā€œcircumferenceā€, which is where Iā€™ve put in 2.014". This is close to the diameter of the pully at the end of rotary head driven by the stepper motor. I donā€™t know if this is the measurement required in this space but it works for me. Also, there is direct relationship between the ā€œobject diameterā€ and the ā€œcircumferenceā€. If I change one, the other is calculated and filled in.
The entire setup has not made much sense to me but I reasoned that I need a number in there that will allow the rotary head to make one complete revolution, in my case 8.4" which is the circumference of the rotary head, and in my case that number is 2.014. So when setting up what I want to engrave on a bottle, I make a rectangle 8.4" by whatever height that I have on the bottle and keep all of the engraving within that rectangle. Then itā€™s all rotated 90 degrees for the actual engraving. Again, I reasoned that the diameter of the actual item being engraved was not critical as long as the entire area available for engraving was no larger than the one revolution of the rotary head.
Iā€™ve tried using the same setup with objects of various sizes from 1" diameter to 5" and itā€™s worked for all sizes. Iā€™d just like to know why it works because the numbers were found by trial and error rather than putting in actual measurements. Putting in actual numbers and having it work would be much preferable.
Also, rather than using the Test button, I use the frame option to make sure everything will go where I want.
Sorry if this is confusing - Iā€™m confused just rereading what Iā€™ve written. But as I said, it works for me and itā€™s possible Iā€™m totally off base as far as your original question. Good Luck with it.

You are not off base at all.

Unfortunately, the rotary setup for Lightburn does not work at all with my Ruida 6445 and firmware.
Enabling rotary and changing the settings doesnt do anything to the rotation amount (distance).

The only thing that works is for me to scale the Y direction down to ~22% of what it should be.

Now I have a secondary problemā€¦ when it engraves, what is supposed to be completely filled is now separate linesā€¦ Because it thinks it is moving say 0.1mm, it is actually rotating ~5X farther than that, leaving a gap between the laser etching linesā€¦

So basically ā€“ even the extreme work-around isnā€™t working for me. :frowning:

Given any thought to change the number of steps or whatever controls Y by that percentage?

:smiley_cat:

Move the connector on the controller from Y to U?

Yep, thats what I assume the rotary setup is supposed to do, right?
Reset the number of steps so that image is scaled to the diameter of the workpiece.

I could change Y control parameters if I actually understood what needed to be changedā€¦ but its a good thought, off to watch more videos.

Would rather it just work without rewiring everything. If were going to use the U output of the controller, iā€™d probably rather just install another driver. But after dropping $4k on something its a tough sell to tell the wife she has to open a panel with 20,000V DC and move a wire. also a tough sell to tell her I have spend even more $$ to make it do what I said it would doā€¦ but appreciate the thought nonetheless.

Check out PiBurns setup, even though itā€™s a different rotary it might help.

Chapter 2 starts the configuration and goes into the drivers, which you can probably skip and move on to the Lightburn configuration and explanation. That one document was very helpful.

Lightburn uses the information you set up to tell the controller how far to move and is computed from the information.

Generally, IMHO many of the concepts I had about how this works created more problems. These are so simple, yet configuration is so complex that one item off and it fails to perform. Donā€™t see yourself short. Take a few and relax. Weā€™ll help you all we can.

Sometimes itā€™s better to deal with a single problem and work it out and the others will follow.

:smiley_cat:

Yesterday I saw that MW Laser posted a YouTube video with the title ā€œRotary Stepper Driver Installation - Co2 Laser - RuiDa RDC6445GT5 TouchScreenā€
Have you seen it?

1 Like

Just trying to suggest a simple work around. Not a rewire just a connector move. Thatā€™s going to be my temp fix when I install my 6445 if it doesnā€™t run on the Y axis. I always have the machine powered off when I open that panel to do anything.

Checked out the video. He shows how to install a dedicated axis stepper driver for a rotary.

He has a nice machine looks like a 1290.

A bit sparse on his details for my liking but itā€™s enough to follow.
Good info if I were going to add another stepper driver for the rotary and control it via the 6445 as a separately wired U axis. Maybe that is what it is going to takeā€¦

Itā€™s a good thought ā€” I appreciate it, donā€™t get me wrong. I guess itā€™s no different than what sheā€™d have to do inside the working area. Switch cable connections.

Maybe the lesson learned here is donā€™t get a 6445 ( at least to run with light burn) unless you also install a dedicated U axis driver

I am going to try and get it working with RD works when I have a rotary order. Turned this work awayā€¦

Your system is hosed up somehow. Most of us run the rotary off the Y axes on Ruida and donā€™t add extra hardware and donā€™t have the issues you are having.

This is one of the most used controllers. Instead of bad mouthing the controller you need to isolate the issue. If you get a different controller and if you are lucky it may work, but in probability it wonā€™t work either. The game with rotaries are the configuration.

Iā€™m trying to take some time and re-read your posts to help you get it up and running, bringing a :grin: to your face along with some confidence in understanding and using the machine.

This indicates that the rotary is operating off the Y axes or it wouldnā€™t move at all.

It might help if we had some clue about your rotary type, a link to it is always nice.

Screenshot from 2021-10-12 09-16-43

How did you compute ā€˜steps per rotationā€™ and ā€˜roller diameterā€™? Those should be all you need.
My motor driver is set to 2000 steps/ revolution. Since the ratio of the motor to the wheels is 2.5 to 1 there are 5000 steps of the motor per rotation of the wheel on the rotary. It only needs to know the roller diameter to compute how far to move the stepper. Mine is 62mm.

These are in the controller and if changing them isnā€™t showing a difference thatā€™s probably your the root issue of the problem. Anything is possible with these things, from a cable, connector, controller and a multitude of other issues.

Take it easy and weā€™ll get you up, it just might take some detailsā€¦relax. :slight_smile:

:smiley_cat:

When my laser arrived it was wired with a the ruida 6445 and a disconnect in the Y axis wiring. After a couple weeks of trying different things I found that the 6445 sends the rotary signal to the U axis. I installed a third stepper driver and it now works great. It is not Lightburn that sends the signal to the U axis, I had the same problem with RDworks.

Do you mean where you can remove the Y motor and plug the rotary into it?

I think thatā€™s standard on all that Iā€™ve seen in this market.

This thread is about just from the other perspective and may be beneficial to read.

Rotary on U Axis Ruida. Quick Question

:smiley_cat:

Yes the disconnect works with the 6442 but it does not work with the 6445. The 6445 needs itā€™s own driver.

His question was

ā€œDoes the Rotary on U axis function only work with the 6445G or has anyone been able to get it to work with the 6442G?ā€

I see many places it works on both.

Good luck :slight_smile:

:smiley_cat:

I think this is what I am relegated to do. I had a stepper driver fail on me (green power light doesnā€™t come on, no pulses going to the motor. no movement, no magic smoke came out, no capacitors bulged or anything.

Iā€™m going to install a 3rd steppe driver and use it for the rotary. It will double as an ā€˜installed spareā€™ in case my X-axis goes out again. BTW, any reason why my X axis stepper driver would die after just 4 months? I only run the laser maybe every other night, an hour or so.

Did you crimp your own wiring to install the 3rd driver? any tips on that would be great, where to buy stuff to do that, etc. Thanks!

When this stuff fails, itā€™s had to tell what caused the failureā€¦ Anything from a bad component to a mechanical issue or even configuration of the driver.

The green light, I thought to be a power light. It wonā€™t send any signals with no powerā€¦

I havenā€™t ā€˜crimpedā€™ any of my wire, if I get your meaning. I do ā€˜tinā€™ them with solder so I donā€™t have a frayed wire Iā€™m attempting to put in a hole. And I think it adds something for it to ā€˜biteā€™ onā€¦

:smiley_cat:

ā€œThe green light, I thought to be a power light. It wonā€™t send any signals with no powerā€¦ā€
:rofl:
I did test it with a multi-meter and it had 24V at the power supply input, with continuity check back to the power supply.
Iā€™m not a complete idiot, there are a few things about this machine I understand now.

I was asking EPD210 about a source for new wiring for the 3rd stepper. awg, type, etc.