Hello,
This is how I have gotten LightBurn to control the original 20W WeCreat Vision laser directly without having to go through WeCreat’s recommended process of exporting gcode from LightBurn and importing it into WeCreat MakeIt.
Things to keep in mind, the WeCreat laser has to be connected directly to your computer via USB, the camera isn’t compatible, there is no autofocus (that I know of), the Home location on the laser bed isn’t obvious, and I don’t know anything about the rotary tool. In this guide I will be covering how to deal with the lack of autofocus, creating an offset jig so you always know where home is, and a couple other best practices.
“Cut” in WeCreat MakeIt is “Line” in LightBurn
Likewise “Engrave” translates to “Fill”
First step is to download the WeCreat config file from their website and import it into LightBurn.
Controlling Z Access
I don’t really care for the autofocus feature, it just takes extra time and sometimes fails, but manually focusing is easy enough once you know how.
First open Device Settings from the ToolBar

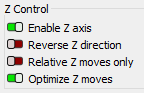
Under Z control Enable Z Axis and Optimize Z moves
Now we need to set the Z offset so LightBurn can tell the laser how far to travel on the Z-axis.
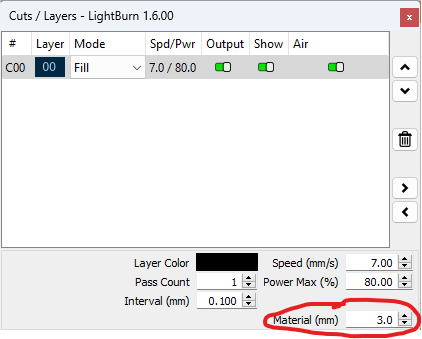
Open the window for your Layer under Cuts/Layers
Set the Z Offset (mm) to 100
It should say “In” next to the Offset, this means the laser will travel down.
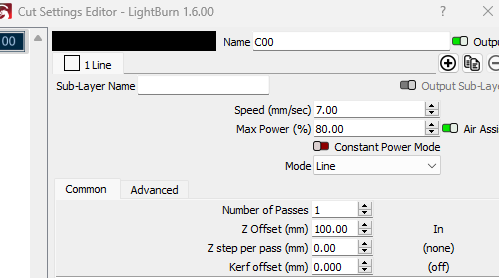
100 mm comes from that the laser has a 40mm focal point (written on the side of the laser) and the max height of the Z axis is 140mm (this came from the WeCreat website), so it has to travel 100mm to get above the laser bed.
You may have to manually set the Z offset for every different layer.
Back under the Cuts/Layers there should be an option for Material (mm) thickness. Set this accordingly. It will offset the laser Z movement by that amount.
WARNING
You should absolutely test this travel distance using the manual Move Controls LightBurn has to make sure you don’t crash your laser heard. There may be variations between WeCreat machines.
Making a Home Jig
The WeCreat laser I have doesn’t have any sort of physical hard stop rails inside to accurately line up materials for processing, so I made an offset jig. Pick a firm but thin material, cardboard or 3 mm basswood works fine. Place it snug in the upper left of the laser bed.
In the LightBurn software draw a vertical line the length of the material you are using. Set it’s XPos and YPos to 0. Repeat for a horizontal line. Set the appropriate Speed, Power, Thickness, and Z Offset for the material and Cut. You Should end up with a nice L shaped jig to align things.
WeCreat Power and Speed Settings
The MakeIt Software comes with presets for cutting and engraving various materials. I find the Cut settings are much higher power and slower speed than they need to be. I try to run power as low as possible for a given task to extend the life of the laser. If your settings are too low you risk wasting material, so always test before committing to a full project run.
Better Fill/Engrave
Whenever you do a fill layer, open the settings window for that layer and TURN OFF Bi-directional fill. Bi-directional fills look terrible on the materials I have tried. Lot of residual engraving outside the lines.
