I got it working. Doesn’t look like much aside from higher power output.

1 Like
cool and I think the only difference is that you can get better control at the lower power settings so your range has been increased… But I still see the speckles/dots.
ya, it’s a shot but since @Bklynghost already put AC line filters on his and it didn’t change things I’m not hopeful. Myself, I still think it is somehow associated with the 24V and how stepper motor drivers load the 24V on acceleration. Two things I would still try and that is to drop the current(amp) setting on your X axis stepper motor driver( when testing vertical lines ) and see what effect that has. Next, I would go in to the Vendor settings of the controller and cut the Acc(acceleration) parameter in half and see what effect that has on the dots/speckles.
1 Like
My Ruida is wired as the diagram…
L-On1 → L on the lps This is laser enable (Laser-On) and turns the lps on, in essence firing the laser
LPWM1 → IN power control of lps
Ground is common and P of the lps is strapped to ground. The Ruida handles the wp/door protection.
Pretty much exactly how the diagram is laid out. You can run L-AN1 (analog) into the lps IN instead of the digital (LPWM1).
The only way to really control the lps output current is via the internal adjustment. Using a pot across to IN only changes the internal pwm not the actual lps current.
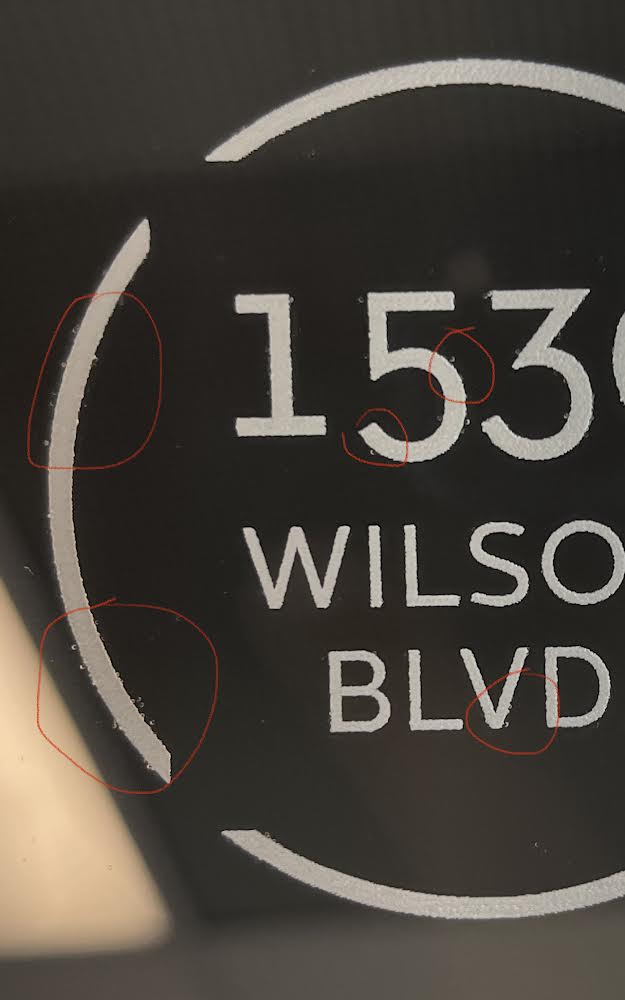
@kimmicks07 - If it’s only on the trailing side of the image (for the dots), that would indicate the lps is not ‘shutting’ down completely… IMHO…
![]()
1 Like
Yup, AC filters won’t solve it, at least they didn’t for me. I even used a fancy power conditioner. Acceleration will have an effect for sure, I remember other times when I was still convinced that this was a software issue, I lowered the acceleration and the dots tamed. Either the LPS can’t keep up with the pulse, or there are some type of stray currents that the tube is holding on to. Unfortunately it’s a slow season and I won’t be replacing those two any time soon.
@kimmicks07 Please keep us updated on what the tech comes up with and if the problem is fixed. This is my end of the road for now.
I’ve had the same issue when engraving clear acrylic. I process a lot of acrylic mostly clear but this happens on any color. I have a Boss Laser 20x14 with a 70watt tube. I reached out to them with pictures of the issue and they did basically asked me to tune the scan spacing. I got a feeling it’s got something to do with the air assist. I get different results with and without air and also varying the PSI on the compressor. I think these dots are engraving dust that sticks again to the material but I could be wrong. I’ve been having better results using the dish soap technique and engraving through it. Here’s some pics that I sent to Boss a while ago

2 Likes
@BeamLabs
Looks like the same thing as us. I doubt that it’s dust/air assist. If you scroll up a bit, you will see that we did scans with bidirectional setting turned off and only got the dots on the left side of the test lines. If it had to do with the dust, the pattern would remain pretty random. Secondly, I do engraving on forbon, it is a nasty material that liquifies and turns into black goop. It does not produce dust and has zero reflective properties.
Keep trying with Boss, read the whole thread and do the same exact tests that we’ve done to skip to the parts replacing process.
1 Like
What may also reduce the problem is multiple passes with lower power, or lowering acceleration. If your machine is still under warranty, keep pushing for replacement parts.
1 Like
@Bklynghost still no fix over here sadly. How bizarre is this issue hey!!
Thank for doing that, the test was just to simplify your issue and to try and force the dots to become more predictable. We can also rule out effect from acceleration/stepper noise, and LightBurn can also be exonerated, since RDworks does the same.
I have not personally come across this issue with the lasers I service, but it feels to me (as a layperson, not an electrical engineer) like there is unwanted noise from the high voltage circuit somehow looping/leaking back into the input/driving circuit. The heart of this issue I’m sure is the power supply but since it has been replaced I’m not sure if it is the primary actor and may be somehow receiving “help” in causing mischief by nearby players such as wiring, tube circuitry, poor insulation or poor grounding. Your technician might have some more ideas on diagnosing this and might be on the right track with noise suppression/filtering. What effect does increasing the power in the same test have on the noise? - If there is a reduction in the dots that would be interesting - and might suggest a power supply with more “gain” (sorry for simplistic terms - I work on a sound desk sometimes haha) is needed.
I also mentioned your dilemma to a colleague of mine who has more experience with these things and the first thing he said was to check the nozzle. I know you said the alignment was “bang on” but worth rechecking?
-Is it heating up during a job? carefully feel it after a job.
-Inspect the inside of it - are there any white scorch marks down near the end on the inside?
-Try completely removing the nozzle and see what results you get
@NicholasL thank you ![]()
We have tried without the nozzle completely and same issue unfortunately
Noise somewhere makes sense after all the advice on this thread, but where, and why is nothing fixing it wahhhh
It’s got the technician stumped too.
I’ll try more power tomorrow and see how that goes. It’s bizarre that it only just started happening. I’m buying a new machine next month and selling this one, perhaps it heard me!! I won’t be able to sell it for much at all sadly.
I really appreciate all your efforts!
I’m having the exact same problem. Machine is ruida based 900x600 80w.
The only solution for me to bypass this is to increase power. This phenomenon only appears in a certain small range of power setting, when under/over that it disappears. I usually engrave glass/slate so that is not an issue (too much). For solid/fill engravings just crank up the power, but may pose problems for fine photo work.
My range is about 18-20%, no matter the speed. Slower i go, closer the random shots get to actual work. Increase power for same speed - random disappears…
Did a bit of a test with circular pattern, it shows horizontal hourglass distribution of the random shots.
I did (most of) due diligence people speaking of here, short of replacing 24v psu and controller/drivers. LPS changed (ZYE myjg100w, blown the first one within 50h of operation, quality, eh?).
2 Likes
IMHO, this indicates an lps issue. If it’s lasing right to left, then the lps is not shutting off, as the aberration is afterwords. The only other option is the Ruida is commanding it to fire, which seems unlikely.
Do you have a mA meter.?
I’d suggest adjusting the lps internal current to the max tube limit to ensure you’re not shoving too much current through the tube when it lases. Mine had a 60 watt lps for a 50 watt tube and it was drawing way too much current.
If you don’t know how to do this, let us know… it’s a relatively simple procedure.
If you or the tech has the equipment available and if my assumptions are right about which side the ‘dots’ are on. I’d hook up a scope to trigger on L-On1 and see if I could catch it going low again ‘within’ the failing time frame. That would tell you the controller is commanding a laser on to the lps. These all appear to occur within the same period. I would find it doubtful that this is the controller.
Don’t know if this would effect it, but you could set the pwm period to 1mS (1kHz) and see if you can see any difference. I am just curious… Don’t forget to put it back up to where is was… mine is 50uS (20kHz)…
RFI is an issue, sometimes but rarely. Since you can’t see it and it’s not supposed to be there, it’s difficult to address and is usually the last thing people try. When it does find it’s way in, it’s a nasty item to deal with.
My machine has a ‘rats nest’ of wiring from the Chinese manufacturer, no rhyme or reason for the way they did it. Most of the room in the runs are taken up by wire that is too long and they just ‘stuffed’ it into the cable ways and few of these machines have rfi/emf issues. Most of the control line paths are a low impedance, so they are much less susceptible to noise or emi.
If I were a betting man, with the information I have, I’d put my money on the lps. One, it’s the most likely suspect to fail, considering how it works. Two, there is little quality control, especially with these. Three the testing is questionable. Four, lps uses high voltage with an associated higher failure rate than with low voltage equipment. Five, people are always ‘fixing’ their machine by changing out the lps… I’ll leave out they are ‘cheap’.
It’s easy to get bad replacement parts, especially if they are shipped around the world.
![]()
2 Likes
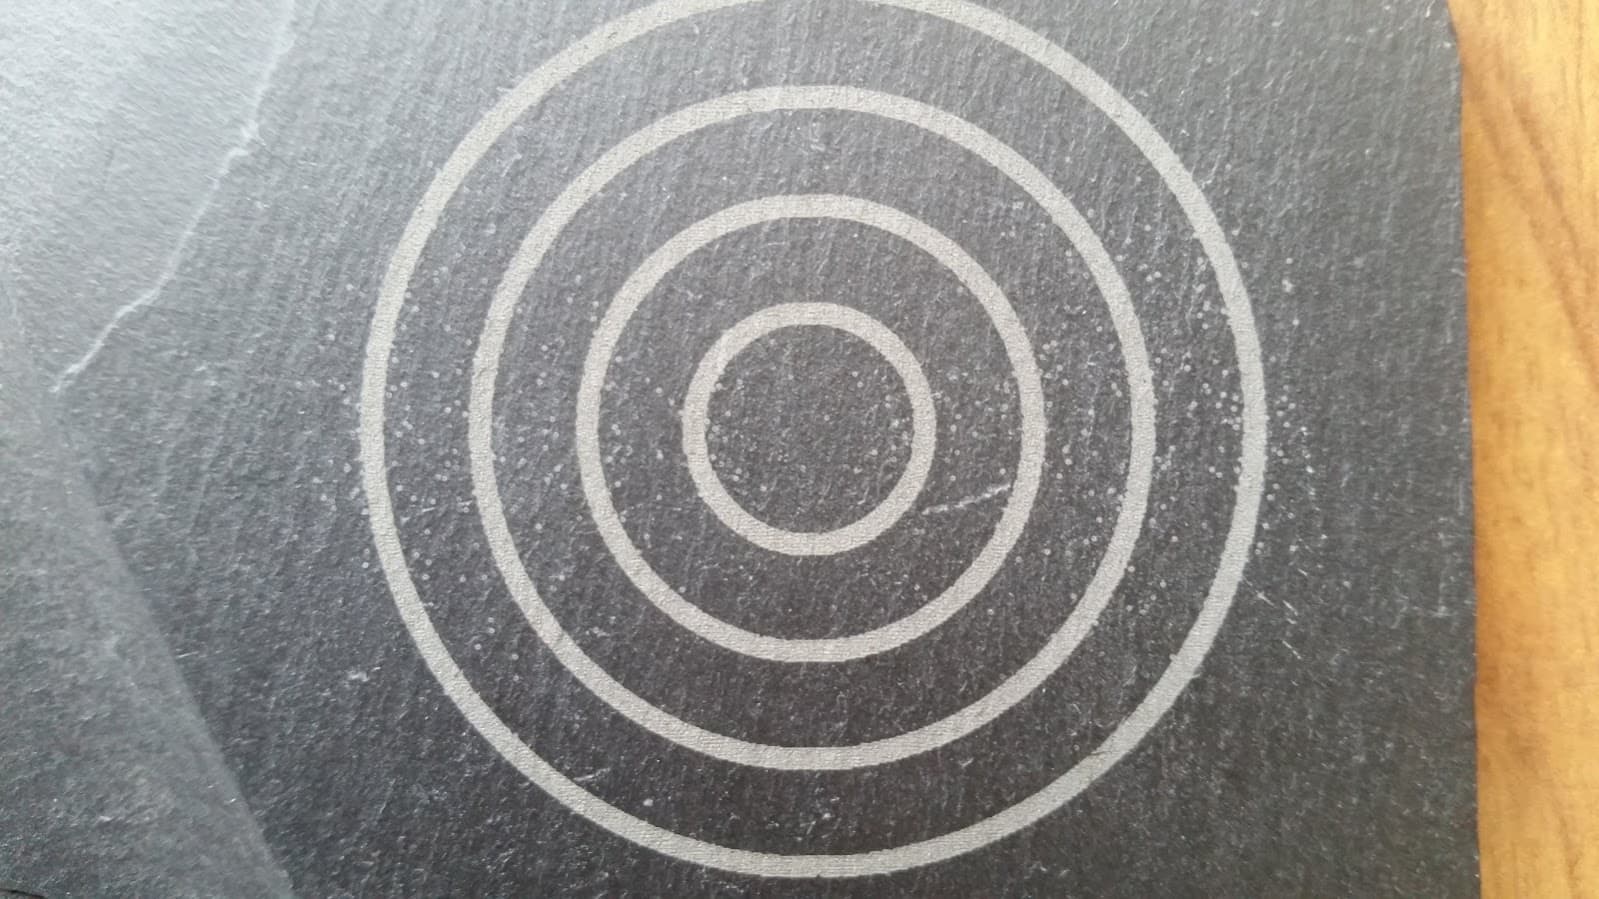
@BaronPork good information and interesting test(circles). WTH is up with the horizontal hour glass distribution. Wow, very interesting. The periods of firing, not firing and how long it’s firing is changing in the test so might be onto something internal to the LPS circuitry.
@jkwilborn great idea looking at the oscillator/PWM frequency. In my sonar system tech days I might wet a finger and touch a few signal lines to see if a little signal dampening effects the results but I’m with you on this being a quirk in the LPS.
It’s somehow related to length of ON signal - the shorter the ON, the more likely RANDOM will appear. Note in the circle test the distribution shows mostly on shortest on segments, as soon as ON becomes longer RANDOM decreases and then completely disappears.
No idea what it means or how to deal with, but it proves the “short ON = increase RANDOMS”. Just figured someone smarter than me can riddle this out.
And as i mentioned all this disappears as soon as i increase (or decrease) power away from the band it appears on. Go figure…
1 Like
@jkwilborn thank you. Sadly I have no techie type experience so would have no idea how to make those adjustments I’m afraid ![]()
@BaronPork wow interesting! I’m going to try this today!
Spot on for me too, more power reduces the dots a lot. Currently testing to see if I can eliminate them entirely with increasing power, for the short term anyhow so I can actually use this machine for engraving. Thank you so much for sharing.
So I wonder what causes this!
When you scan a circle, the start/end few lines are very short with less ‘on’ times than any other part of the circle.
I’d expect ‘dots’ at the start (bottom) and end (top) where the ‘on’ time is the shortest.
Electrically speaking all of these are very long times…
All of this still points us to the lps… ![]()
@kimmicks07 could you reiterate the speed and dpi with this…?
![]()
1 Like