I am trying to use my camera to engrave and cut. I have gone through all the setup several times. When I run a job the laser is always off by about 2 inches. This is my second camera and still the same issue. The camera is secure and stable. Any suggestions
Ralph
1 Like
Can you provide the following to help with any suggestions:
- What type of camera do you have?
- Full screenshot of LightBurn showing your overlay and design ready to burn
- Photo of burn showing the discrepancy
- Photo of your camera setup
50mm+ ??? it is wrong. Are you sure you have exactly the same height to the camera as when you adjusted it? If you have been lens calibration and calibrated your camera’s alignment through (the values below 0.3 and have hit the 4 crosses at the end, exactly, then this part is ok and the error should be found during operation.
For example, if you set your control marks to null in the height when aligning the camera during the installation process, and now process material with a given height, then your alignment will not fit.
It is possible to hit +/- 1mm (or better) accurately.
…you might be interested in this post
I have the same issue. I posted here
https://forum.lightburnsoftware.com/t/help-with-new-camera-not-burning-where-the-previw-shows/75421
but no one answered, so honestly, I gave up on the camera.
I am interested to see what comes of this thread
This is not the right way to go. Never give up ![]()
It takes a little patience to get the camera adjusted properly, believe me.
If your camera fits your machine bed and you have a “static” height every time, then it should work.
1 Like
My problem is, (well one of them anyway ![]() ) I have done the procedure 6-7 times, I always have the same result, and no one else seems to know how to fix it. By the lack of replies to to my thread and now this thread, I don’t know what else to do to try to fix it
) I have done the procedure 6-7 times, I always have the same result, and no one else seems to know how to fix it. By the lack of replies to to my thread and now this thread, I don’t know what else to do to try to fix it
The experience I have gathered is that the smallest “error” in repetition accuracy is multiplied many times which ends up with a bad result. In my K40, I struggled that time with a few mm of movement in the hinges, in the horizontal direction! It took me a long time to figure it out.
I have been working with my OMT with LightBurn camera today and I have noticed that different lighting situations also give slightly different results with the accuracy. However, the most important thing (in my opinion) is that the height of your material surface is the same as the height with which the camera is calibrated. The target print itself must not have been moved during calibration either, this is where people sometimes make mistakes, printing (engraving) the 4 target discs and marking afterwards is a process that must be carried out in one workflow.
You write that you have a 60x40 blue-white machine, how did you mount your camera? Also, do you still have the old version of LightBurn running or have you upgraded?
bernd.dk, Thank-you for helping.
I will try again on Friday. (my first day off) I will make sure the z-height is set before I start the camera setup. I 3d printed the camera nount with the file that was supplied by lightburn for thier camera. No, I have not updated light burn. I use Aspire for all my drawing, and only use Lightburn to run the laser.
Pay attention to the tolerance in the camera housing, in mine I put a little extra foam material in because the camera could move lengthwise 1-2mm. I’m crossing my fingers for you.
I will check that out as well, thank-you
I found with mine that if I added a lot more lighting. It solved my alignment issue when I did the camera calibration sequence again. Mine now is right on the money.
1 Like
When I first got the laser, I was having a lot of trouble cutting through ply, even 1/8". I would have to make many passes to get through it, causing a lot of charring and heat. I now know that it was the filler in the ply that I could not cut through, however, in one session, I ended up melting the LED bar at the back of the laser. I have not replaced it, but maybe this was the issue. I will work on that first.
Thank-you rlbrobst for the info
I spent a few hours at the laser yesterday. I put the light back in, added a couple of strips of thin cardboard behind the camera to stop it from moving.
I ran the setup, but could not get the third (left) pic to work. Either it was black (null number), or gave a number in the 1000’s. I ended up having to turn off the shop lights as they were shining through the top of the laser (plexi) and giving off wierd reflections.
Once I figured that out and got through the setup, then it was time for the “Calibrate Camera Alignment”. And, after using the trace, and then burning, once again, the alignment is way off. I spent a lot of time trying to use the “Xshift” to get it to move over. But no matter how much I moved it, it would always cut on the same line. It would not move over.
In the end, I found that I had to make a move (xshift) then close the program, open it again and it would move. Also, I found the trace is still off the same amount, but if I draw on top of the image, then it would move. So, it was a very long day, and I think it is working. Later today I plan to actually use the process on a project and we will see…
Just thought I’d give an update
It is disappointing reading. Still, I think you should try again. Cover your entire work area with white paper or cardboard, switch off honeycom control and start over.
How clearly do you see that test print after lens calibration? I have to zoom in as much as possible to see the intersection clearly and to get a good result. …and remember, you must not move the test print at all. You’ve heard it many times, but still, be 100% sure your height from camera to your paper/cardboard is the same throughout the process. (for paper, I enter 0mm in height in the chart)
Good luck
So, another 4 hours at it again today.
I covered the bed with packing paper, and re-did all the calibrations. I did get better numbers, but the end result is the same. The pics on the laptop throughout the calibration are clear. I do zoom to the max into the test points to mark them.
After all that I am still off in the X and Y axis. I spent a lot of time (as I have to shut off the program after each change and re-start) and I got to where I could draw a circle or square over a burned circle or square and burn on it exactly.
So, I tried to do the program that I bought the camera for in the first place…
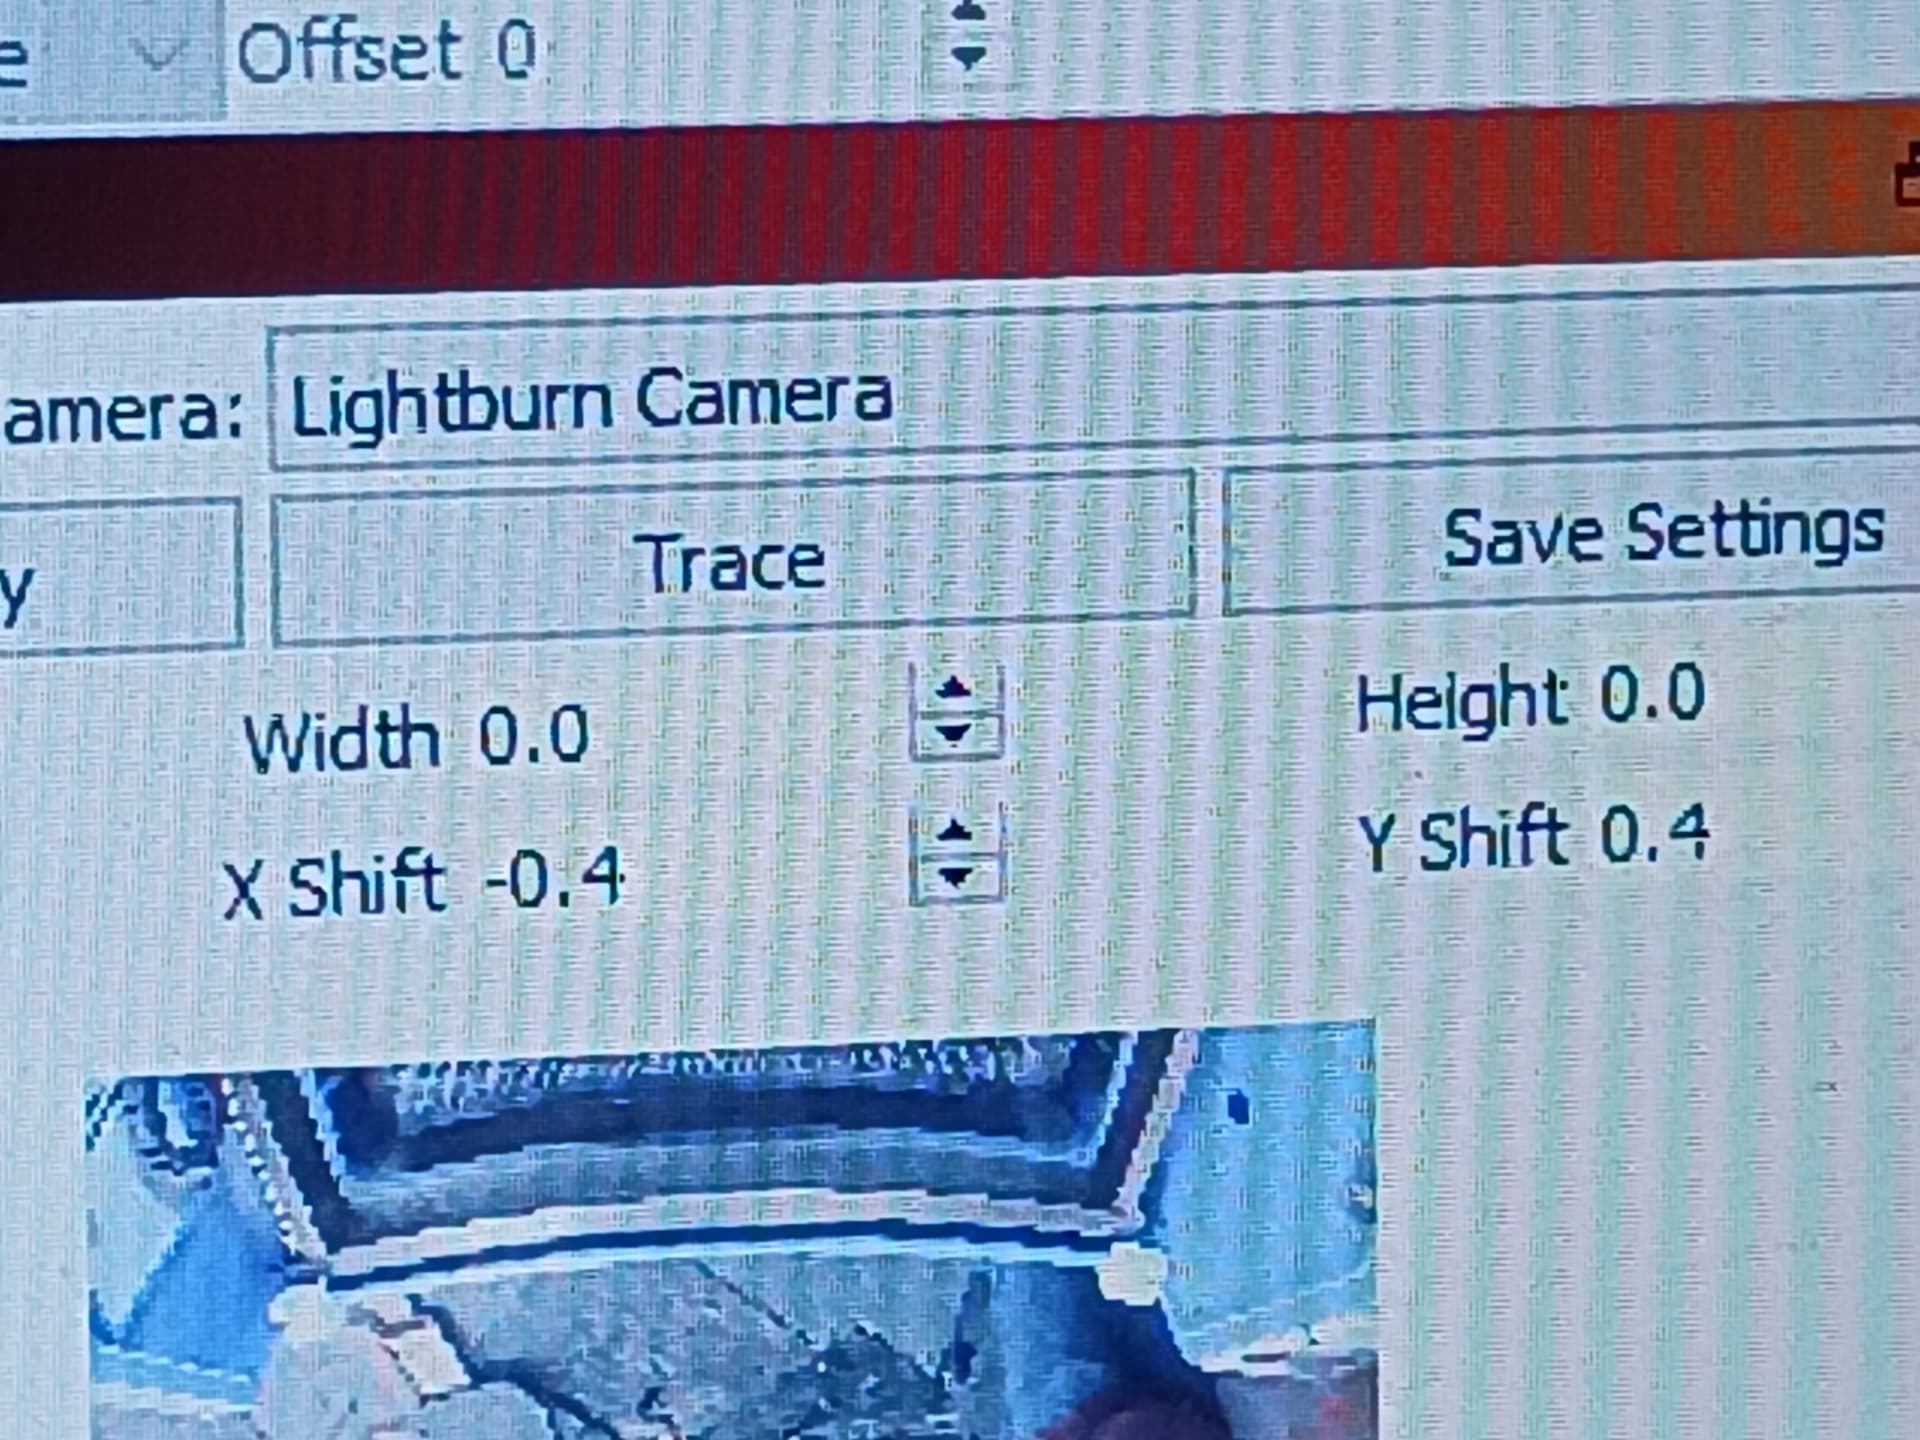
First my offsets for the camera
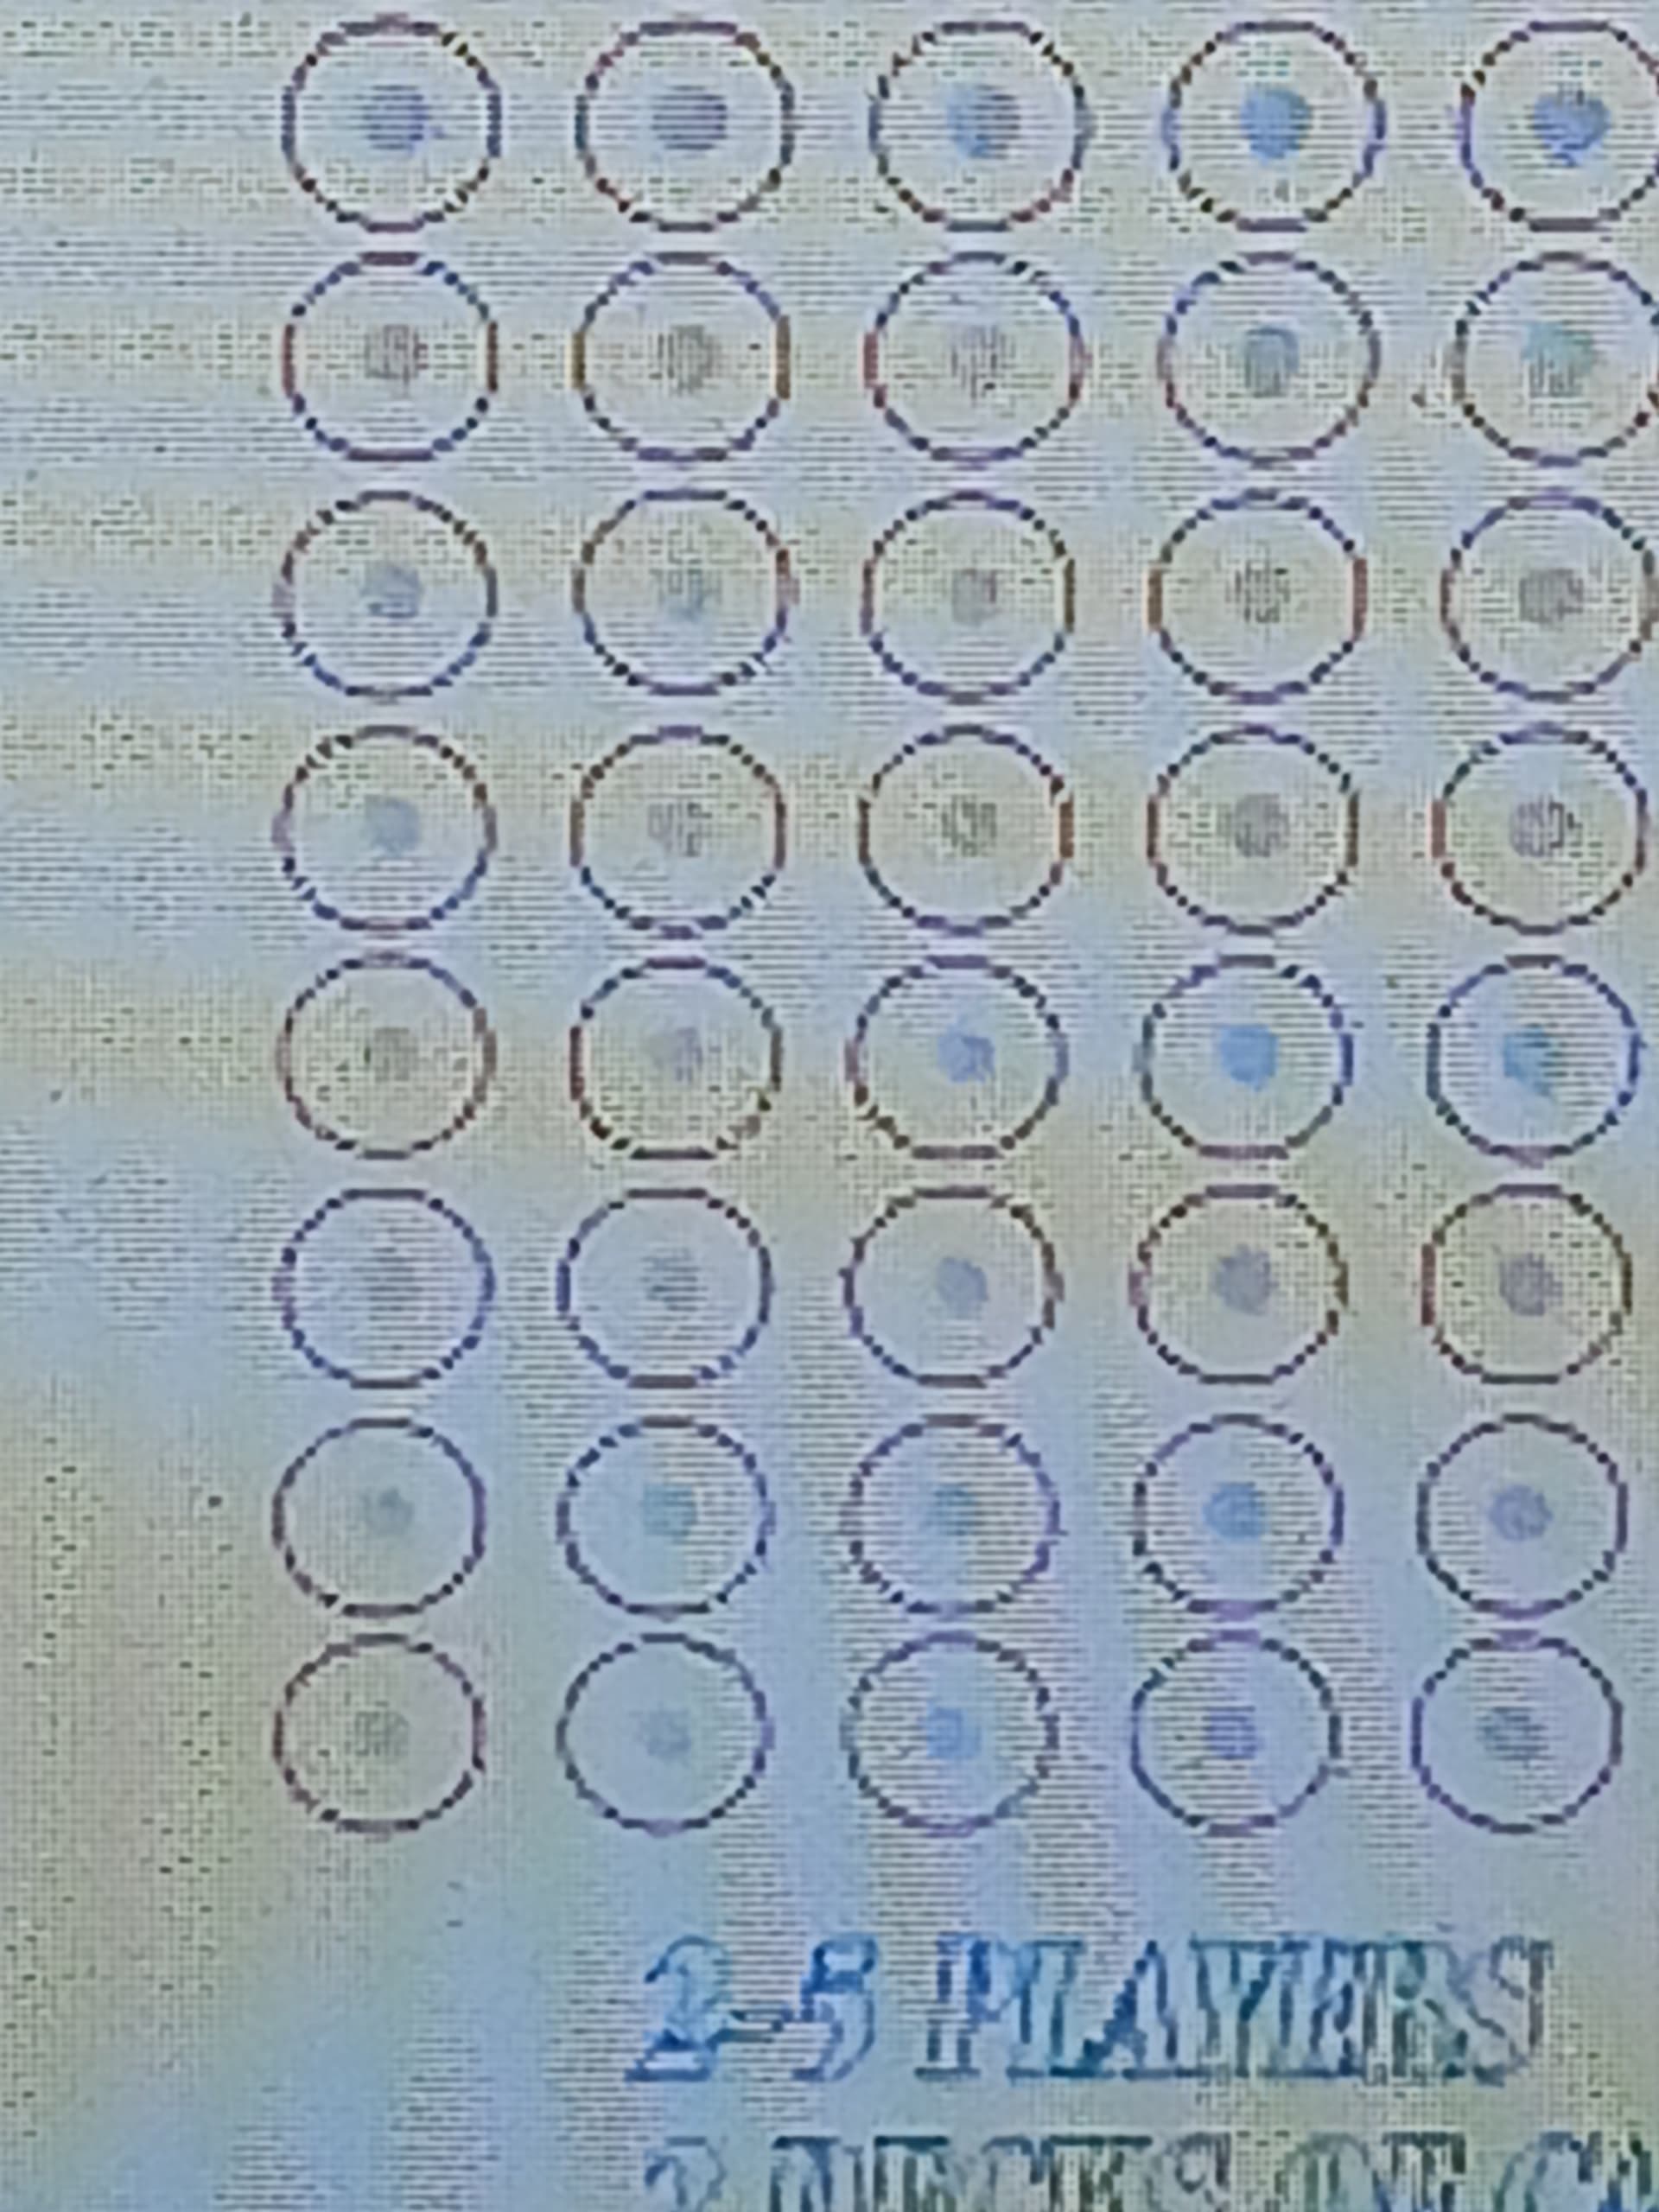
Now my screen with everything lined up, take note of the circles

Now the result after the burn

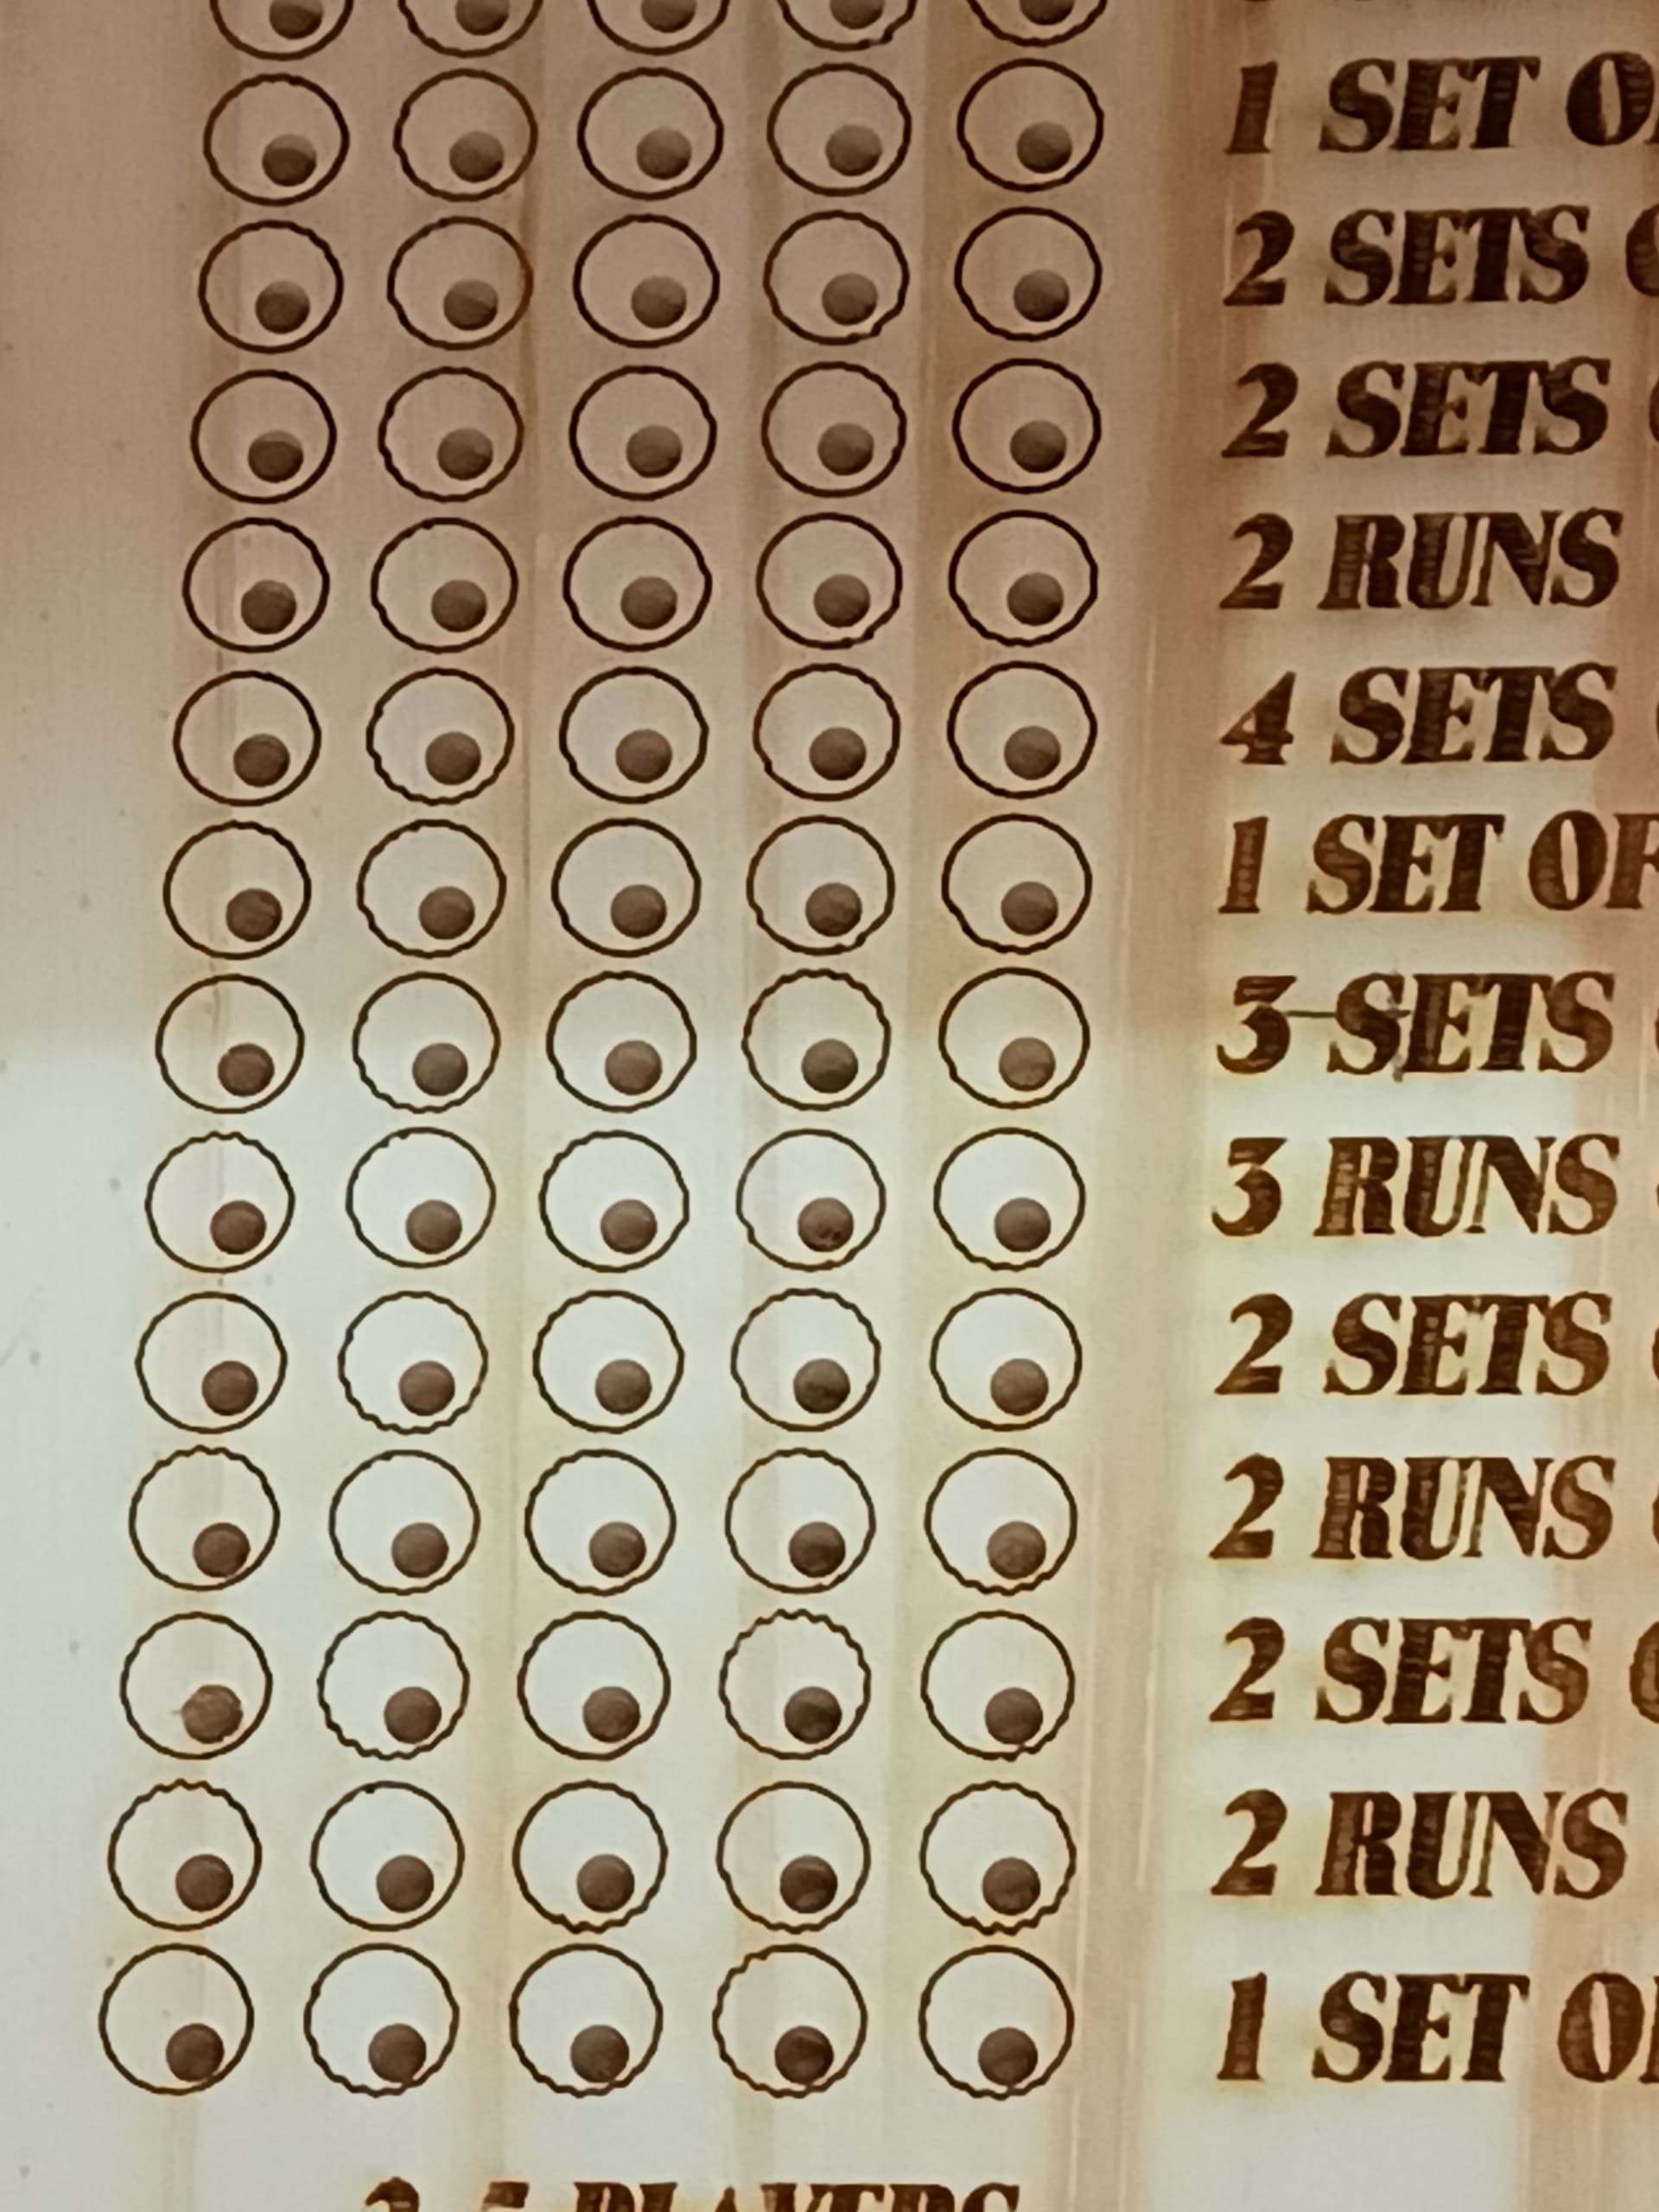
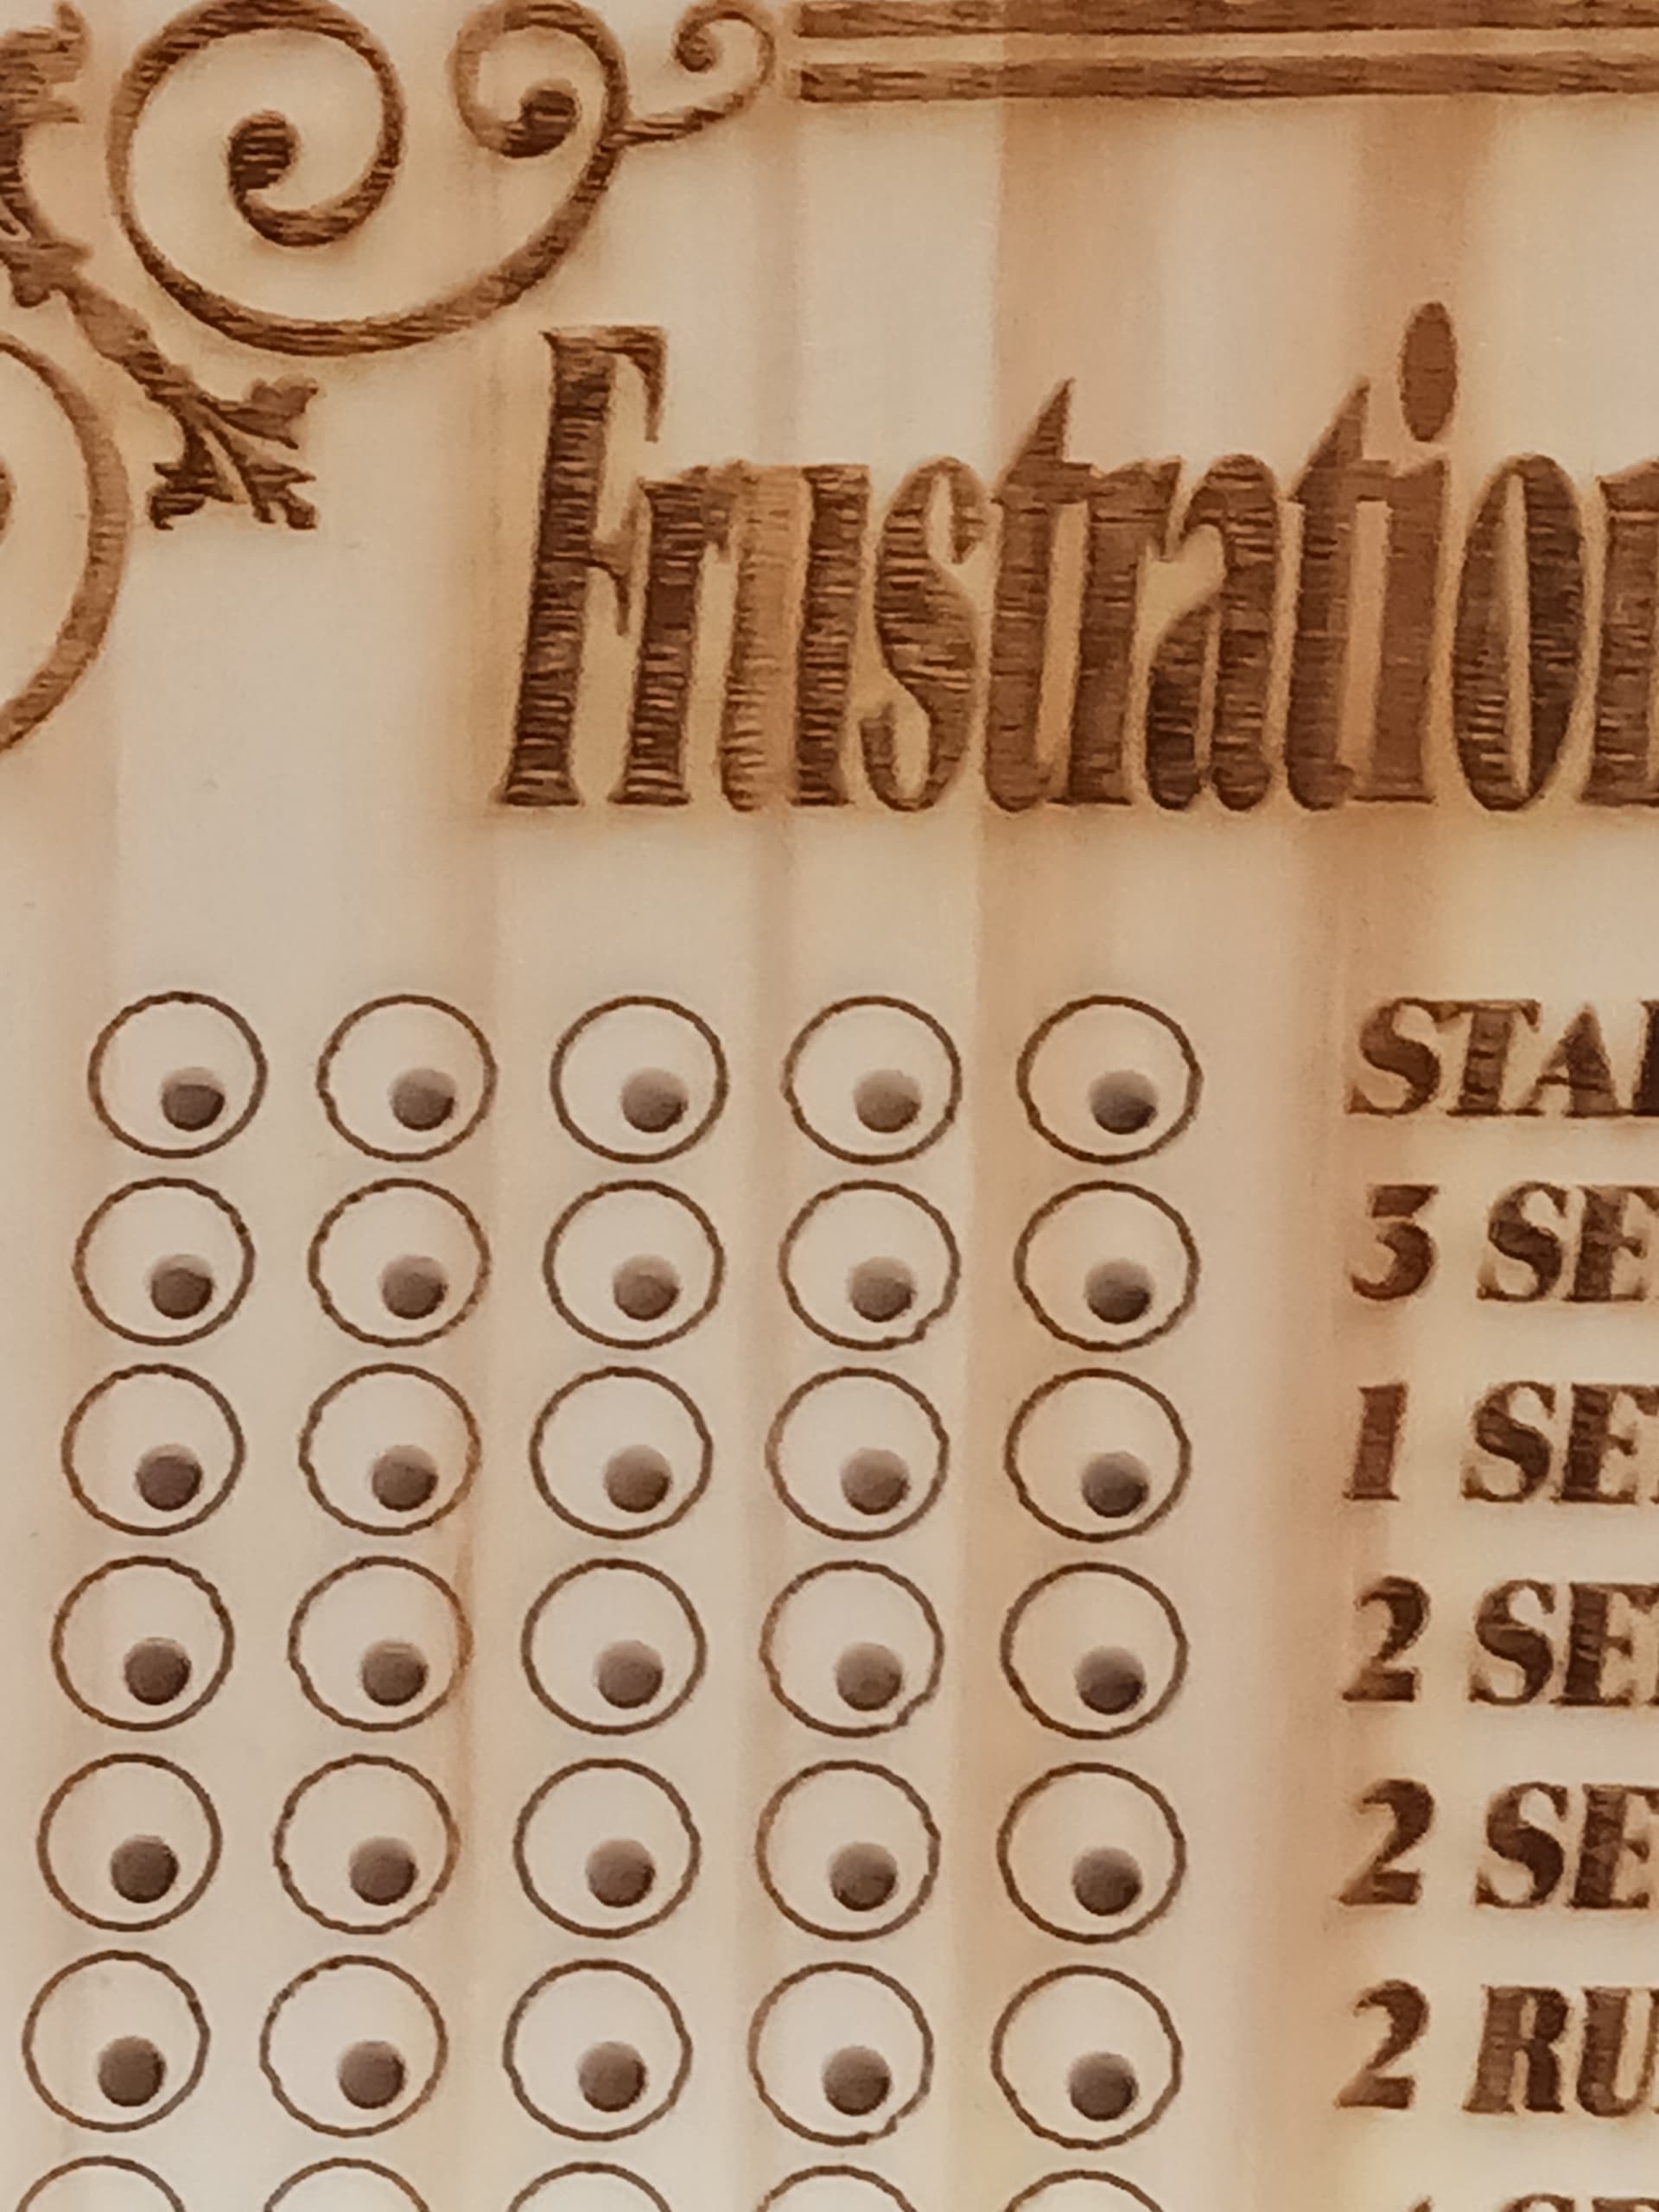
See how the circles are not evenly “off” center between the top holes and the bottom holes?
I do not know what else to do, I am frustrasted, I feel like I have wasted a lot of time and money.
If you’re having to shift by .4 inches in each direction that is an absolutely huge correction and I suspect something else fundamentally wrong in the alignment process. You should be within a couple of millimeters after camera alignment.
What camera do you have?
Can you detail out the steps you’re taking in the camera alignment process? Try not to leave out any movement or step that you can think of.
There are two things that strike me, the deviation is so evenly distributed and that your rings are very uneven in themselves. The latter could indicate a mechanical problem and should be checked/fixed.
What happens when you adjust your correction and how do you arrive at your numbers?
Can you show a “print+screen” of your computer screen while your camera is on and the image is refreshed?
I bought the 150 deg. camera from lightburn camera
I placed a packing paper over the entire bed (off white). Then using the printed calibration circles I glued it to 1/8" ply, I raised the bed to the cutting height of the calibration circles. Then I move the laser to the home position (top left). I then started the process of the “Calibrate Camera Lens”. The first one is in the center, and I had the ply (calibration circles) flat on the bed. For the other 8 positions, I had a 1" X 1" piece of wood under the ply to angle it towards the camera in the direction needed. As I said in the earlier post, I had no issues with getting numbers this time, but the left side is still the worst number at .32 for all three.
Once this was done, I lowered the bed as I was using a piece of 3/4" (.73") piece of pine to “Calibrate Camera Alignment”. In the “material thickness” of the Camera Alignment Wizard, I put .73". Once burned, I zoomed all the way in to double click on the centers of the targets, in the correct order.
Now that that was finished, I went in to the ‘Camera Control’ window and selected the lightburn camera. Then hit the “update overlay” button. I then used the circle drawing to make a circle as exact as I could around the #2 target. And I make the cut to a line cut. I pushed start and the laser cut the circle to the left and up of the taget in the wood. I do not think this was .4" away on either axis, but it was probaly abou .25" to the left and .08" up. I then used the X shift button to try to move the alignment, I moved it .1(units, as I do not know what they are) and hit the save settings button. I then hit start again, and the laser burned in exactly the same hole as it did the last time. Nothing moved. So, thinking this could be in mm, I moved the X shift to 6 units, thinking this could be in mm so it should move .25". I press start, and it burns in exactly the same place as the last 2 times.
So, I close Lightburn, open Light burn, start the camera, update overlay, draw a circle, and press start, and bam… it cuts even more to the left. So, I gset X shift to zero, save settings, close lightburn, open lightburn, update overlay, draw circle, hit start, and it’s back to the first 3 burns.
I keep doing this unknown how many times untilI get it to where it burns over the target. I then test this with a square, and a polygon that I drew, then burned. Then re-drew and burned again. They were perfect. So, the fact that both the X shift and Y shift say .4, does not mean that they were .4units away from the starting point, but that in the last ideration of this mind numbing task, thats what I moved them.
Now I take the drawing of the game in the last post. I center everything, and start the burn. and you see the results.
I do not know what else to do, I do not understand why I have to re-start the program to make the X shift move.
Thanks for reading all this, if you are still here, and for any advice you can give.
Ray
I just kept moving it till it burned on the target.
I can do this tonight when I get home from work.
So I assume this means you’re not using relative Z moves. Can you describe your process for focusing your laser?
I suspect this area is where the root cause is going to be.
Note that camera alignment will only work at a single distance from camera lens to material. So once calibrated, everything with the camera must be done with the distance from lens to material being the same.
I may be mistaken but I had thought the camera control adjustments followed the units set on workspace. I can test this later on.
Based your description I suspect there may be a misunderstanding of how the camera adjustments work. The adjustments do not change the location of the burn. They shift/scale the position of the overlay. I can’t recall but you may need to update the overlay to even see the adjustment take effect. An effective method for optimizing the adjustments is to create markers on the corners of the workspace, burn them, then use scale and shift adjustments with “Update Overlay” until the overlay matches the original placement of the designed markers.
You needn’t close LightBurn for this to work.