šŸ‘€ How to Reduce Chipping When Laser Engraving Glass

Laser engraving is a fast and efficient way to customize and personalize glass, but the finished result can sometimes look patchy and feel rough to the touch. Because of the high heat generated from the laser beam as it engraves the glass, tiny shards of glass are left on the surface which can feel rough and look uneven. Below are some techniques Amy with Epilog Laser has come up with to reduce chipping and roughness when laser engraving glass.

How does laser engraving work?

Before we get into tips on how to limit chipping, it is important to understand how laser engraving works. As the laser beam strikes the glass it heats up the glass. The contact of the hot laser beam on the glass results in microscopic fractures in the surface of the glass. These fractures, or chips, are what is perceived as the glass is engraved.

However, the glass isnā€™t actually engraved. If you look really close you will see microscopic fractures and tiny shards of glass laying on the surface. No material was actually removed (the way it is with sandcarving). This is considered more of a surface mark than an actual engraving.

Reduce chipping and roughness when laser engraving

When a laser strikes glass, it fractures the surface, but it will not engrave deeply or remove material. The fracturing of the glass surface produces a frosted appearance but can cause roughness and chipping depending on the type of glass being engraved. While the frosted appearance is desired, the roughness and chipping are not. To produce a smooth, frosted finish, here are some tips:

  • 300 DPI: Using a lower resolution, around 300 DPI, produces a better result on glass as you separate the dots you are engraving.
  • 80% grayscale: Change the black in your graphic to 80% black to further separate the dots for less micro-fracturing.
  • Jarvis dithering: Running with a Jarvis dithering pattern in the driver (youā€™ll find this under the raster speed and power settings) randomizes the separated dots for a smooth look when engraved.
  • Masking: Some people find that applying a thin, wet sheet of newspaper or paper towel a little larger than the engraving area also helps with heat dissipation and improves the engraving. Just be sure that there are no wrinkles in the paper after it is applied.
  • Dish soap: Using your finger or a paper towel, apply a thin coat of liquid dish soap over the area to be engraved (any kind will do). This dissipates the heat when engraving.
  • Polish: If there are small shards of glass, you can polish the area with a Scotch-Brite pad or something similar.
9 Likes

Thanks for the outline. This is always helpful to anyone doing this as each of us have our own process and idiosyncrasies that we think make the best engraving.

Couple things to clarify in your statement. Iā€™m sure you know, but I encourage people to not say a ā€˜laserā€™ beam is hot, it is not. Itā€™s simply an ā€˜electromagnetic fieldā€™ (emf) of a certain frequency. Much like sunlight is not warm, it is a wide range of emf.

I think this is very much the question and reasoning of being able to ā€˜laseā€™ anythingā€¦ as the beam is hot, but itā€™s not.

They work by exciting the molecules in to higher energy states which is the definition of heat.


I do a lot of slate, and the dpi is critical to a good engraving dependent on the material. It is hard to get a 0.1mm dot on glass and slate. You are in fact ā€˜chippingā€™ or ā€˜blowingā€™ out the material. It leaves ā€˜cratersā€™ in slate, much like it does on glass.

I find that I get good results using steel wool on glass as the ā€˜shardsā€™ are there on the glass and slowly fall away over time. Usually in someones fingerā€¦ :frowning:

Havenā€™t tried the ā€˜polishā€™ option, but I willā€¦ now

Havenā€™t had a lot of luck with coatings like dish soap or tape, but Iā€™m still trying variations and am open to suggestions.

Thanks for posting, this gets read by manyā€¦

Take care

:smile_cat:

I do quite a lot of glass engraving.

imo 300 dpi is still to fine, 150 or 200max gives better results.

I have found little difference adding a mask or soap, the only reason to mask is to try and reduce the power further, a light power and reasonable fast speed is important.

Some glass like crystal is to hard to engrave and large pieces will chip out before you get any result.

1 Like

Cheers @LaserCuttingPro

Thank you for commenting on my post. What lens are you using to create your glass engraving.
The lens you use has a lot to do with your dot size which affects the speed needed.many people think that actual engraving takes place of glass while using a CO2 laser.

Because glass is a ā€œnaturalā€ material (that is, its primary elements come from nature), one would think a CO2 laser would engrave glass pretty well. Ironically, it really does not engrave glass at all but it will mark it and with that contradiction, we will begin to understand how a CO2 laser beam interacts with glass.
In the most basic of terms, glass is made by heating silicon (sand). When heated hot enough, the silicon melts and becomes a thick, gooey fluid. This can then be poured into molds or blown by hand. As the molten glass cools, it remains transparent. To add strength or color to the glass, other elements are added. These are often metals such as lead, zinc, cobalt or even pure gold. In the case of lead, a considerable amount can be added to glass without affecting the transparency of the glass as you can see in 24% leaded crystal. 24 Karat gold on the other hand, produces a unique colored glass called cranberry.
Understanding this part of the process is important to a laser user because, as all experienced laser users know, you cannot mark metal with a CO2 laser and that is just as true when the metal is molten (in glass) as it is when metal is in a sheet form. So basically the problem with crystal is that the lead within heats up and creates major fractures in glass rather then micro fractures .

So, CO2 lasers canā€™t engrave glass, nor can they deal with the metal content of glass, yet we have all seen glass items marked by lasers. What gives?

This is really not as much a paradox as it might appear. Remember how glass is made? Silicon is heated to 2000 degrees or more until it becomes molten. It is then removed from its oven and manipulated in some way. This introduces two things into the glass beyond its basic elements: air and moisture.

Itā€™s the air and moisture thatā€™s trapped within the glass that makes laser marking possible with a CO2 laser.

As a laser beam strikes the glass, it heats up the glass elements including the silicon and any metal content but neither of these elements will react to the relatively low heat and frequency of a CO2 laser. What does react is the air and moisture trapped between the elements of silica and metal. Both water and air expand when heated. Because the glass itself is relatively rigid, when molecules within the glass are heated until they expand, something has to give to allow for the expansion. This results in microscopic fractures in the glass, especially at the surface of the glass. It is this chipping or fracturing that we see as engraving. Masking and and soaping helps with the air and moisture retention.

If the glass were actually being engraved, it would end up looking much like plastic after it has been engraved. There would be material actually missingā€”vaporized by the heat of the laser. But that isnā€™t what happens. If you look closely at the ā€œengravedā€ surface of glass, you will see tiny ā€œshardsā€ of glass laying on the surface. Look even closer and you can see the microscopic fractures within the glass.
This is why itā€™s nearly impossible to get a laser ā€œengravedā€ image to have a ā€œhigh definitionā€ image. With the glass fracturing first this way and then that, thereā€™s no way to control the reaction with any great precision. Itā€™s like a million tiny explosions taking place along the edge of the mark. When viewed normally, the mark might appear relatively straight and clean but a closer look will reveal what really takes place.
For years, there has been a debate as to how the quality of a lasered product compares to a sandblasted product. Especially laser salespeople sometimes wear a special pair of blinders preventing them from seeing the tremendous difference in quality between the two.
Glass, when both are done properly, sandblasting or rotary engraving for that matter, will always be superior in quality to a laser. A sandblasted line can easily be straight and clean where a lasered line is not.
Therefore, it should be clear that lasers are not the best way to mark glassā€”right? Wrong. In fact, in many applications, lasers are ideal for marking glass. They are less expensive, faster, more flexible and more forgiving than either mechanical engraving or sandblasting.

The main reason for this lengthy post reply is not to discount your knowledge @LaserCuttingPro it is as an educational tool for others in the forum on the quest to increase their knowledge in our field. From your post I am well aware you understand what you are doing.

Cheers :beers: & keep your laser cool :sunglasses:

Sas

2 Likes

Here is a good informative YouTube video in engraving glass with a CO2
FOUR WAYS TO LASER GLASS AND MAKE MONEY WITH YOUR LASER!

Hi @jkwilborn

Yes I agree that my description of a laser beam being hot was not scientifically accurate nevertheless I believe the message was well understood. Most that come in search of knowledge must begin with baby steps. It is like when we were kids our parents told us that if we play with matches we can get burned and it will hurt. They could have described it as burning our skin cells and without the protective covering of the epidermis, nerve endings are sensitized and exposed to stimulation.

We understood hurt.

Cheers :beers:

Sas

1 Like

Thanks for the detailed information, a good read

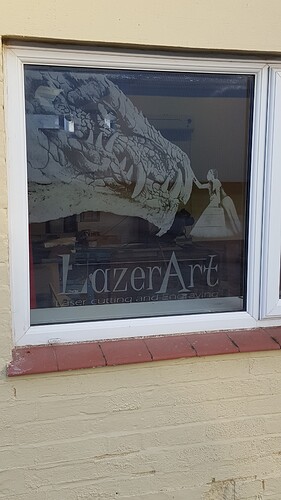
Thought you might like to see the main window to my workshop, took about 1.5 hours to do.

2 Likes

Awesome work. Very nice detail. Larger designs are a little easier on micro factures running into each other and eliminating detail offere by negative space in lines

If the glass doesnā€™t ā€˜leakā€™. Itā€™s poured at 2000 degrees, how could there be any possibility of moisture being ā€˜inā€™ the glass?

Thatā€™s a few degrees above the boiling pointā€¦

Very niceā€¦ How big is it?

Do you mind sharing the specifics, like dpi and speedsā€¦?

:smile_cat:

The moisture in the air present and interacting during the engraving process not during the pouring of the 2000 degree liquid glass being released. I sense a grammar differential between our posts. Sorry if it confused you.

Cheers :beers:

Sas

1 Like

Cannot remember specifics on this job, but would be similar to what I posted above.

is 800mm x 800mm in size
150dpi
250 or 300 mm/s
probably 12 or 15% power (100w tube)

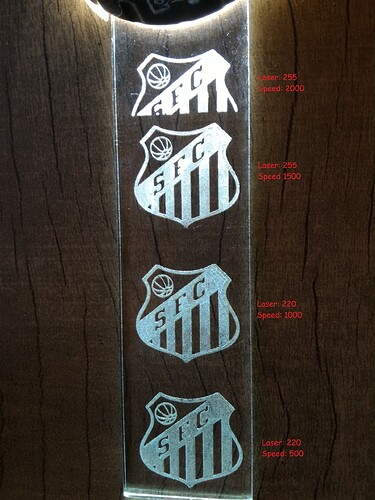
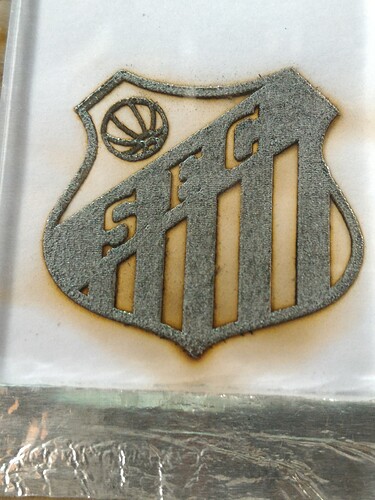
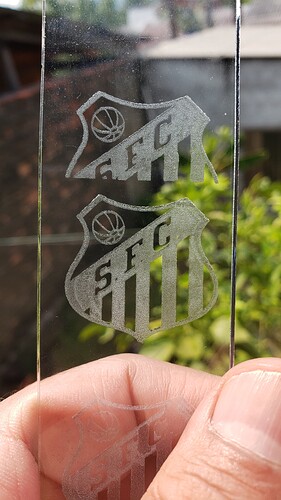
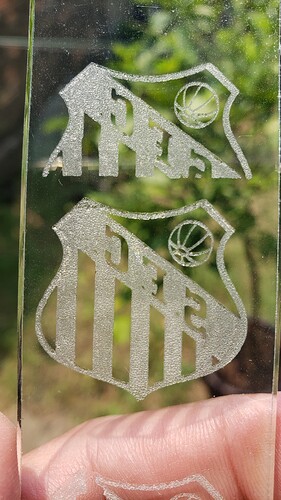
Iā€™ve done some glass engraving tests where I put a sheet of white printer paper and the glass is engraved on the back, the beam goes through the glass and burns the paper, leaving the engraving on the glass. In the photo, from the bottom to the top, the roughness decreases, the ones marked with S255 / F2000 and S255 / F1500 are almost smooth, you can barely see a relief by touch, I didnā€™t get any result like this engraving on the top of the glass with a coating of some ink. Unfortunately I havenā€™t registered the DPI.

Looks like the ā€˜blackā€™ background is burnt on it. Iā€™d expect just the shattered glass from the heat, not a burnt looking image.

Can you tell what it is? Does it wash off?

:smile_cat:

The black background as long as the paper is not removed, after it is removed and cleaned, it looks like frosted glass. In the first image of the previous post I am projecting light from above (like these acrylic lamps).

Thatā€™s more like what I was expectingā€¦

:smile_cat:

1 Like

Noob question here. When burning a vector fill, the 300 DPI, 80% grayscale, and Jarvis dithering tips are not relevant correct?

Correct. With a vector, itā€™s just ā€˜drawing linesā€™ā€¦

If you add fill, you will be able to adjust the dpi of the fill and how itā€™s laid down on the material.

:smile_cat:

1 Like

Trying to learn how to engrave on glass and everyoneā€™s feedback on the subject has been great. Your experiment peaked my interest. When you say ā€œthrough the glass and burns the papersā€, are you saying it literally burned through the glass until it reached the paper? or does the beam affect the paper while engraving because the glass is transparent and the beam also reaches the paper? What effect does this create on the glass? Iā€™m not too science, so if you could put it in laymans terms, itā€™d be appreciated.

The first time I tried to engrave on glass I didnā€™t know that the 450nm laser could not affect it and I went for a test, I put a white sheet of paper under it, I donā€™t even remember why, I think so as not to burn the wood that remains of support to the machine, the laser passes through the glass and burns the paper, the heat generated in this burning creates microfractures in the glass in a very subtle way, as in the photos I postedā€¦ at the highest speeds tested (2000mm/min) almost no you can feel it in the touchā€¦
In the second photo of this post it is after finishing the firing, before taking the glass off the paper and cleaning itā€¦ the result can be seen in the other photos, with and without light projection.

Interesting. Im trying to engrave on pint shaped drinking glases and shot glasses. I have an Aeon Mira 7, 60W, 2mm lens, and Im using a rotary attachment. Any suggestions? would a similar application of paper help? Iā€™d just try it, but materials are getting a bit pricey (running through a lot of glasses lol). Also, do you engrave using an image, or as a vector fill layer?