Losing position at end of job

I’ve just spent a long time upgrading an old machine to a Ruida controller + lightburn. Almost everything now seems to be working, happy days.

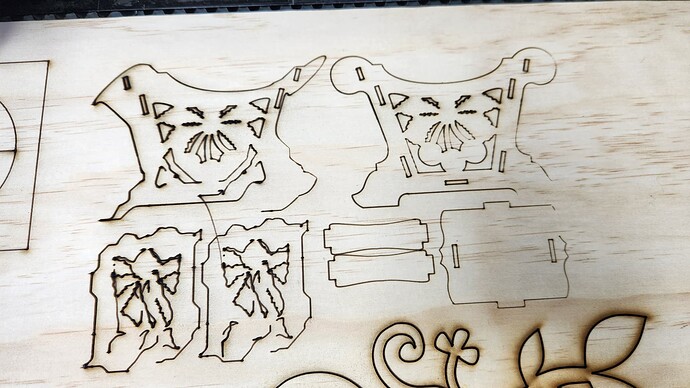
One thing that is occurring which I cannot seem to resolve is that during complex jobs there often seems to come a point where the controller seems to lose position. A good example of this is a recent cut I did where in one layer in light burn I have a circle with leaves and vines and chains, etc some complex geometry. All gets cut quite well. In the next layer I have the outline of two birds - very simple curves. The laser has tracked the initial cut file very well, but when it gets to the birds, it completely loses its mind. The birds are cut over the top of the existing cut path of the complex geometry, and their outlines are wobbly, not connected at the end, and just generally a piece of spaghetti. Occasionally it will even forget to cut a line.

I’ve had the above scenario happen on a number of occasions with different files.

So things I’ve tried:

  • Slowing down the machine maximum speed, ramping, and travel settings. I’m down to a max speed of 250mm/s at the moment, and ramping a little slower than that.
  • Doing material tests and getting my overrun offsets etc correct with a micrometer. All the squares tend to come out well enough.
  • Transferring the cut files to the ruins controller and hitting go. Still get screw ups late in the job.
  • Running the cut files from the PC via light burn. Still get screw ups late in the job.

Months ago I posted about issues with bearing, motors, etc, and was given some good advice. Given this was an old Chinese laser that had quite poor maintenance I replaced all the bearings, one of the motors, the gantry carriage and runners, end stops, and whilst putting in the new computer etc replaced wiring etc. I’m absolutely confident in the mechanical and electrical quality of the upgrades at this point, though am not well versed in things like stepper motor controllers to know if I should be chasing a software setting, communications setting, or controller issue.
Have you run this through preview? … I assume it appears OK… but?

If you don’t mind posting your artwork (.lbrn) file and a photo of the results… We can still look at it for any anomalies. We understand if you wish not to.

It sounds like you are right in that it’s unlikely your Lightburn file from the symptoms.

I’m trying to think of what could cause this and the only thing I can think of is speed/acceleration values… you artwork may show where this could occur.

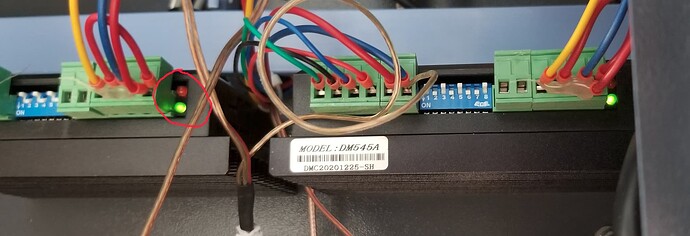
Have you looked at the motor drivers to see if one of them faulted? They have a green power led and a red fault led for indicators.

Can you tell if it’s one axes over another… does it shift in any single direction?

The Ruida, in most instances loads the whole file. Not sure exactly how it runs if you send it, at some point it tells the Ruida to execute the code… don’t know if the whole thing is loaded or not.

Photos would be good.

:smile_cat:

This took me a while to get back to. Life, work, uni all being what they are.

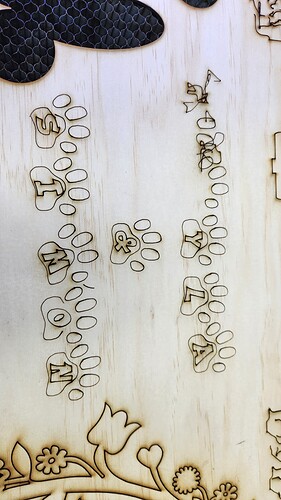
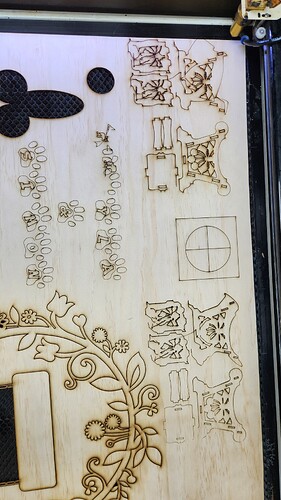
Ive attached a couple of photos to show whats happening. Ill try attaching a video, though it may be a bit big.

The dog paws with letter in them are a font, with the font available in the lightburn editor. I typed in what i was after, set the size and hit send. You can see it started to go awry with the S, got lazy around the O where a line was ended early, then went on to finish the K and A on the first line and went full spaghetti monster mode.

The other design s are from a file i downloaded from elsewhere. One is a dxf, the other a lightburn of the same file. The start of the project usually goes ok with the first parts of the box cutting ok, then we drop lines, then get lazy around corners, then go full spaghetti mode again.

The simple box containing a circle and crosshair was a design i did up in lightburn prior to this series of cuts to make sure the laser was able to cut to size, hold a circle, that the box was square, etc. I tightened the belts and got them as even as possible and made sure the frame + gantry were square before these test cuts today. Calipers reveal a very good result in terms of size and square.

I see no fault indicators on the motor drivers.

I did not realign the laser after squaring, and thats evident in the faded cuts but not relevant to the issue.

Heres a link to the box being cut


Still hoping for a little help on this if anyone here has some ideas or has seen it before.

This looks a lot like a communication problem destroying chunks of the job between the PC and the controller.

First of all, clear all the stored files from the Ruida controller’s flash memory, which you can do from LightBurn or the machine’s console. Ruida controller behave strangely when their memory fills up, so scrubbing it clean is always a good idea.

To diagnose the problem:

  • Use LightBurn’s Send button to send the job to the Ruida controller and store it as a named file in the controller’s flash memory.
  • Run that file from the laser’s front panel

If the stored file fails the same way each time you run it, then the data was damaged along the way, the file contains damaged data, and the controller is correctly performing the damaged commands every time.

If the job fails differently each time, then the problem is between the controller and the laser head, because the controller is running the same commands and producing different results.

To fix:

If the PC connects to the laser with a USB cable, switching to Ethernet will dramatically improve the results. USB was never intended for industrial applications and fails when confronted with typical machine noise.

If you’re already using Ethernet, there may be an overlap between the controller’s fixed IP address and the router’s DHCP assignments. The router can assign the laser’s IP address to another device, so that network traffic intended for the laser collide with traffic for the other device. These collisions occur randomly and are uncontrollable.

You must either:

  • Pick the controller’s IP address so it does not fall in the router’s DHCP range or
  • Adjust the DHCP range to exclude the controller’s address

How you tweak the router depends on the router; we’ve seen some cable-company routers refusing to be tweaked. Knowing the DHCP address range will go a long way toward isolating the problem.

Obviously, if you’re switching from USB to Ethernet, you must assign the controller’s IP address outside the DHCP range.

But, as the bluesman said: if it wasn’t for bad ideas, I wouldn’t have any ideas at all …

1 Like

My last Linksys I purchased, doesn’t seem to look at anything outside of the DHCP set range.

I found I had to put it within the dhcp range and use the devices mac address to bind an IP to that mac address…

Just a heads up

:smile_cat:

1 Like

Just a quick post to hold this topic open. I believe i have found a solution: its related to microstepping resolution and memory issues on the controller.

Ill come back to post with photos and an update.

1 Like

I have the same problem its definitely LightBurn problem.
i used to work with RDworks i had no issue.
It seems that the problem can be solve by turning all the settings off from optimization options.

A short summary is that i did not have a communications problem. The stepper drivers come with a default step resolution of 1/25000. Whilst neither the drivers nor controller was showing errors the symptoms match with the general idea that as the electronics either heat up or need to buffer an increasing amount of read/write commands memory is being allocated improperly and steps get messed up. The controller correctly recieves current position and thus shows spaghetti.

In my case setting the dip switches to 3600 steps / rev and adjusting the step length vendor settings on the x and y axis in lightburn was the fix. For me this was set to 0.59um initially. So 25000/3600 = X.
X * 0.59 = new step length value to use. Approx 5.55.

The X axis driver is set to 1 amp, matched roughly to the motors amp expectations, with dip switch 4 allowing half power (which is only half power during idle) to keep motor temps down.

This kept all my current calibrated measurements and took the hard work off the stepper drivers to interpret step values between the coordinates the controller was providing. The spaghetti stopped instantly.

Most importantly, I’ve now replaced almost all electeonics in the machine successfully, replaced almost all wiring, replaced the x axis motor and gantry carriage, fixed a few other issues such as a very slightly off square gantry (confirmed with a large rafter square, corrected with percussive coersion) and a bad roller causing impossible to fix lens alignment issues due to gantry droop, and have cleaned the previous cpuple of owners lack of maintenance out of the machine. Against all advice not to pull things apart on a partially working machine, doing so down to the skeleton means I’ve now got a machine which by all rights seems to be performing really well.

Ive also limited maximum speeds to 250mm / s. This now seems to be slower than what the machine is capable of, but thats future tuning.

As a laser newbie: 100w CO2, 1000mm x 600mm with a Ruida RDC6432G, DM542S drivers, including PC, Lightburn, Stand, Chilller 5200, high volume extraction fan, new gantry carriage, belts, 42 Nema 17 0.9 degree motor, and full wiring rework for under $2500 AUD / $1700 USD. I now also have some additional safety devices such as lid sensors and laser off switches (switch on wire between P and G terminals of laser power supply). I reckon thats winning, even if it has taken sporadic time over 6 months to find and fix the issues.

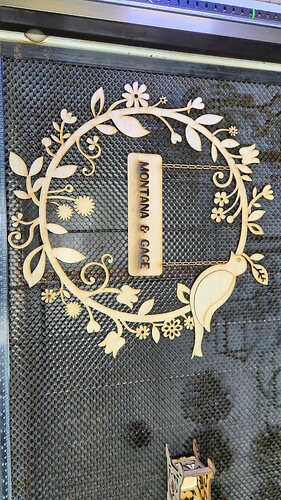
Example of complex cut and deep engrave

2 Likes

This topic was automatically closed 30 days after the last reply. New replies are no longer allowed.