I must have misremembered the price. I think it was $69 and the size was 200x290 which I think is the same as the ones being discussed here.
1 Like
@berainlb I believe you are correct.
1 Like
So I’ve got a question.
I just watched the video about the machine.
What’s wrong with using the software that comes with it?
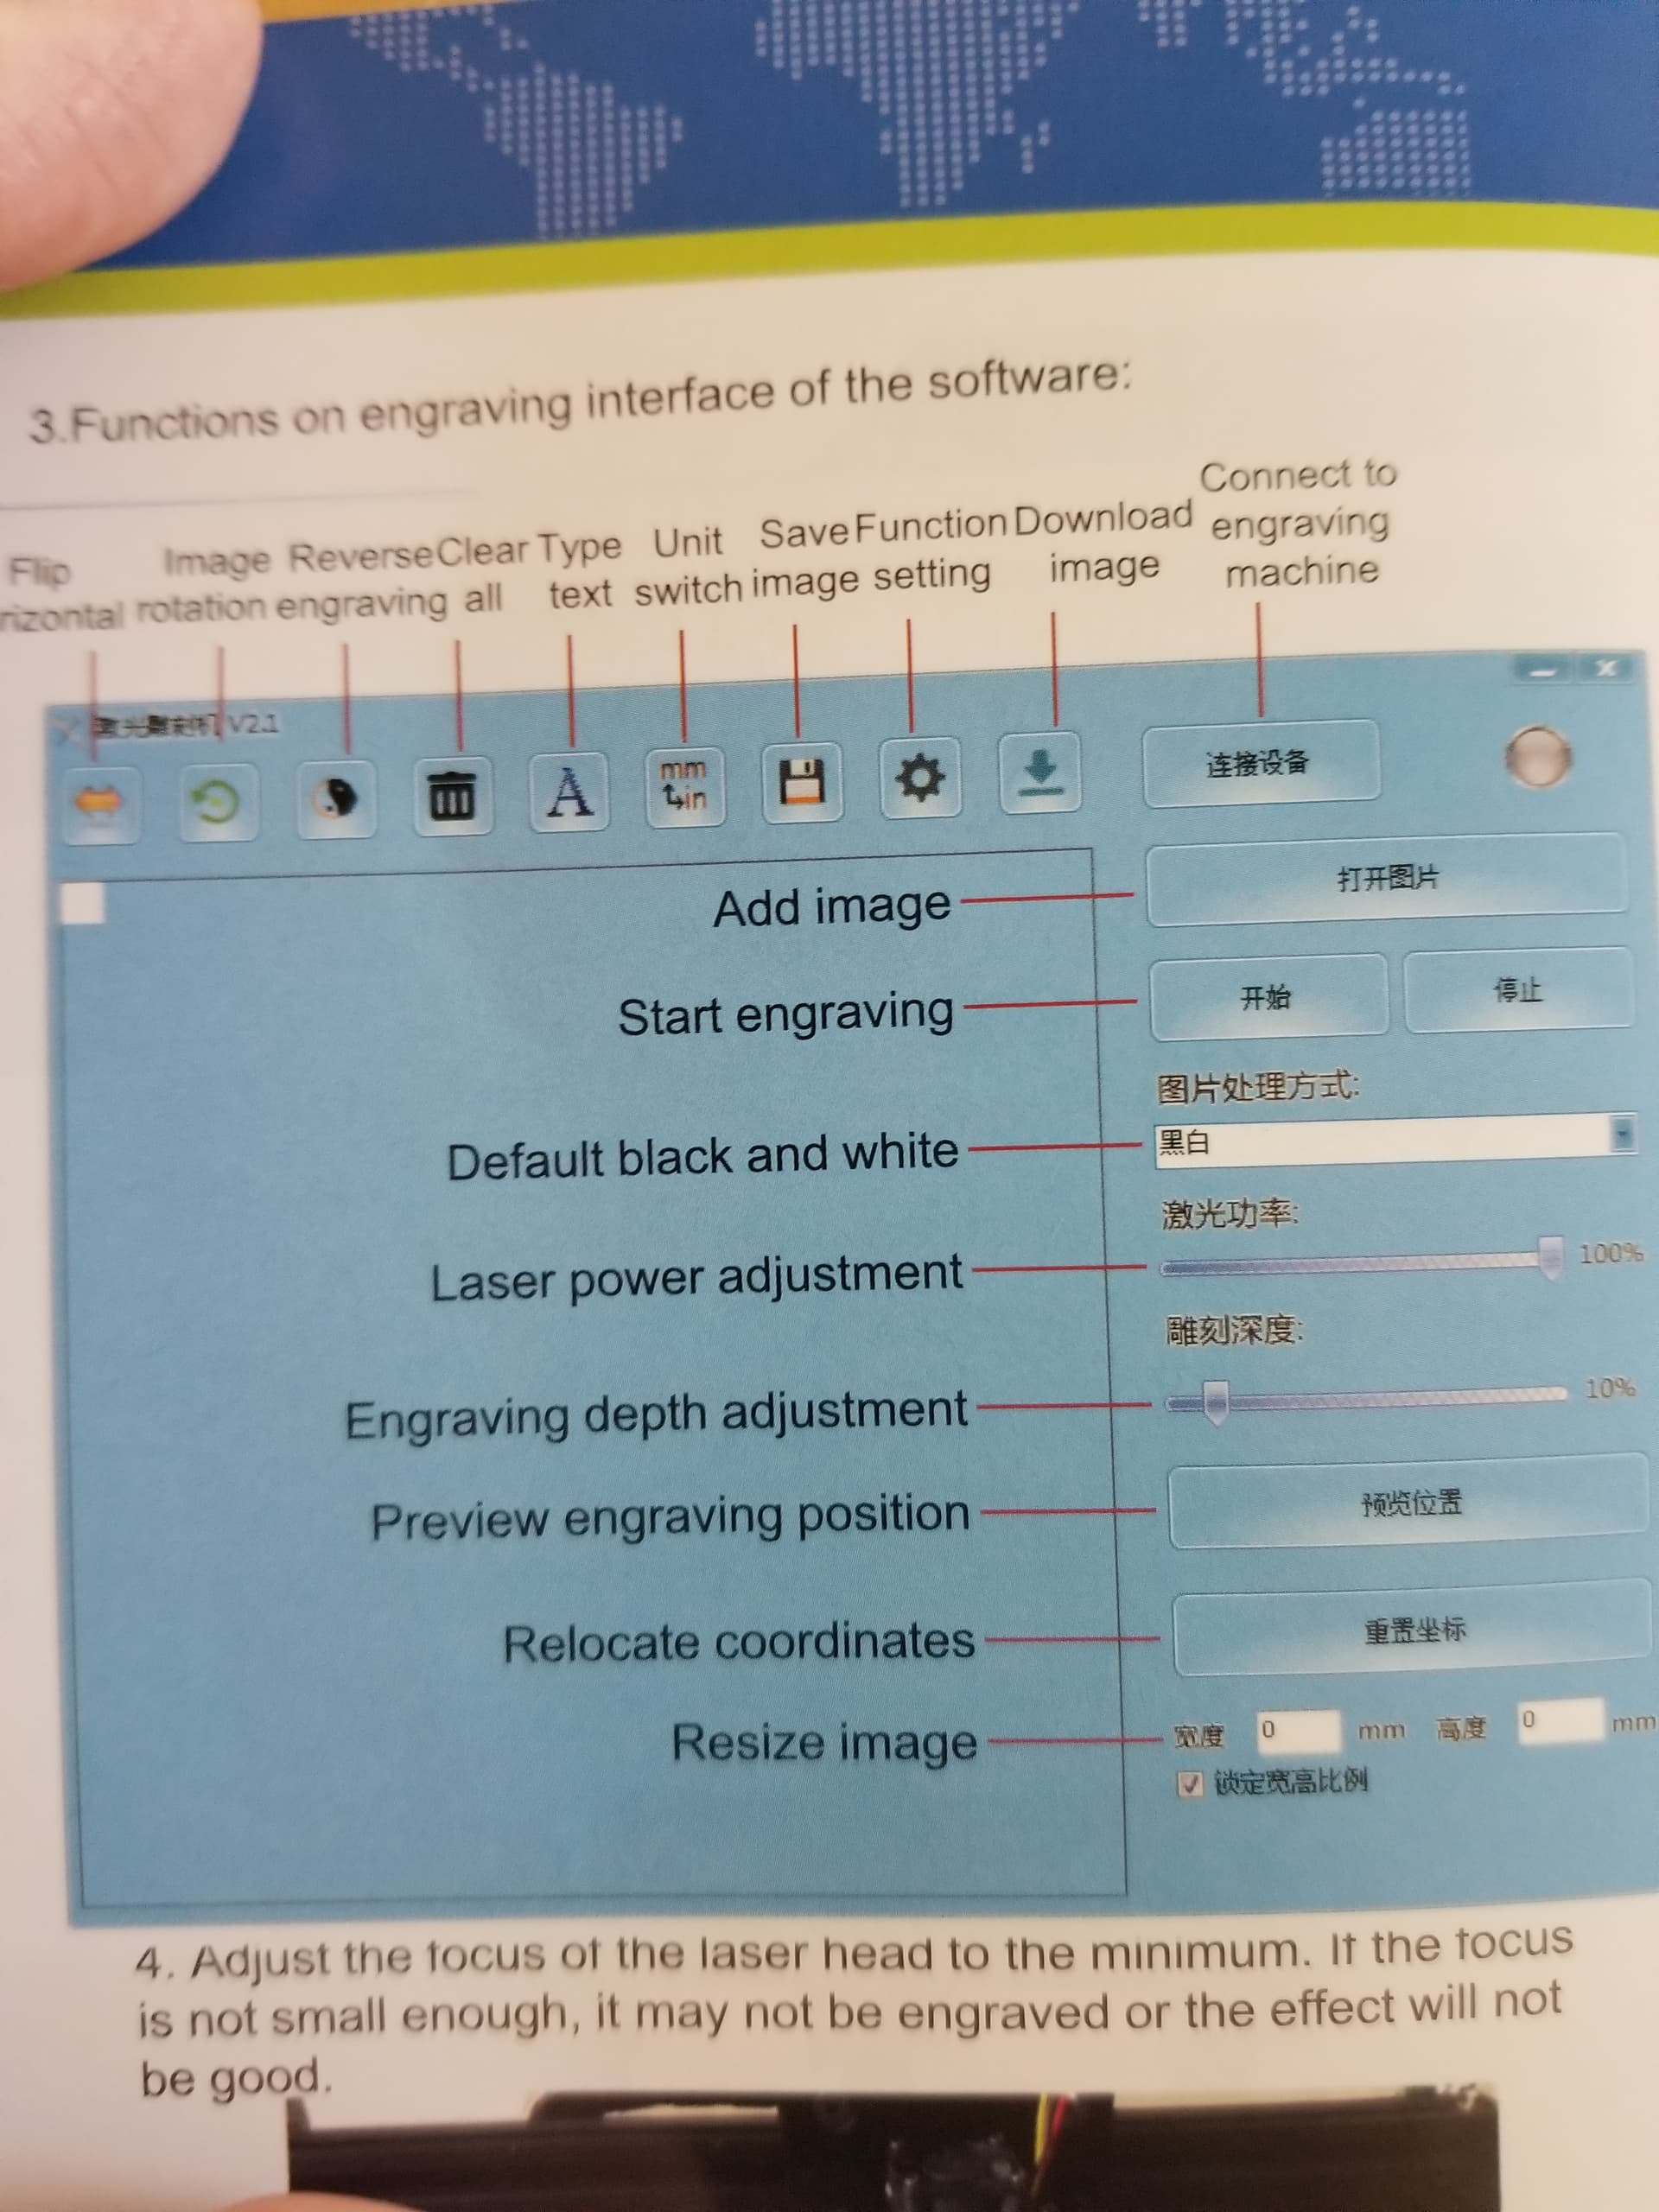
The complete GUI is Chinese, even the messages. That in itself is worth avoiding.
I have a 30 watt I plan on mounting on it… Looks pretty simple… knock on wood
I’m supposed to get the st-link programmer today…
Anyone have the jl1 board running on anything?
The switches are configured for a front/right home. Puzzled me when I first got it… went to the front/right then to the back/left where it stopped.
![]()
I think I saw that there was a language selection. But I may have also imagined it.
Part of this is we’re on a LightBurn forum and people wanting to use their software of choice. Also, the native software is very basic.
At that price it’d be tempting to set one up with a rotary as a dedicated mug/tumbler burner.
If you push the gear icon, you can set language to English and the interface will change to English.
I don’t have the windows machine here… Seems like they would just tell you that and you could change it. There are a few pages that are all marked up in English… Doesn’t sound logical, but wouldn’t surprise me.
Since I bricked it, it really doesn’t matter.
Sill looking for something that actually allows me to connect with the JL1 board. I though someone here had one partially working with software from ?
![]()
Back in this post I shared how I had taken an old Win7 laptop and downloaded @LsrSal’s zipfile… and extracted the two files (ROM.bin and upgrade.exe) to the Desktop. Connecting the USB cable and following the simple power-on procedure in that post… I had GRBL 1.1f loaded on this machine in about a minute. Was air-milling under Lightburn control in just a few minutes.

It was really quite easy using nothing more than a Windows laptop and the zipfile… but you do want to do this in one go, if possible, to avoid the possibility of confusion and/or “bricking” the board. The .exe file doesn’t provide any messages/status… just a popup window with a button and a progress bar. Upon clicking the “start upgrading” button it simply shows a green progress bar that runs to completion (hopefully) in less than a minute and then returns to the way it looked in the beginning. I also kept everything on the Desktop for this procedure… the .exe program apparently defaults to “rom.bin” in the same folder.
I’ve been doing a lot of ceramic tile, glass, and rotary stuff lately… that is exactly what I hope to do with this machine.
– David
1 Like
Now that’s amazing… It does have English… wonder why they just didn’t tell you to change it…
I though I’d clicked everywhere…
Even in English, it’s still a pretty lousy program…
![]()
Which is why we’re here.
I’m assuming that you’d be able to run the program under Wine for Linux. Something else I read implied it was a Java app so there may be a way to run “natively”.
I wouldn’t risk running the firmware updater in Wine though unless you had a way to recover.
Ok…I just ordered one.
I’m hopping that this will do a better job on my tiles than the J-Tech mounted to my CNC.
I would prefer for it to be able to run with Lightburn though.
I’ve blocked up the machine with hopes of trying the rotary fixture later… maybe today. Ran a simple engraving under LB control from my Chromebook…

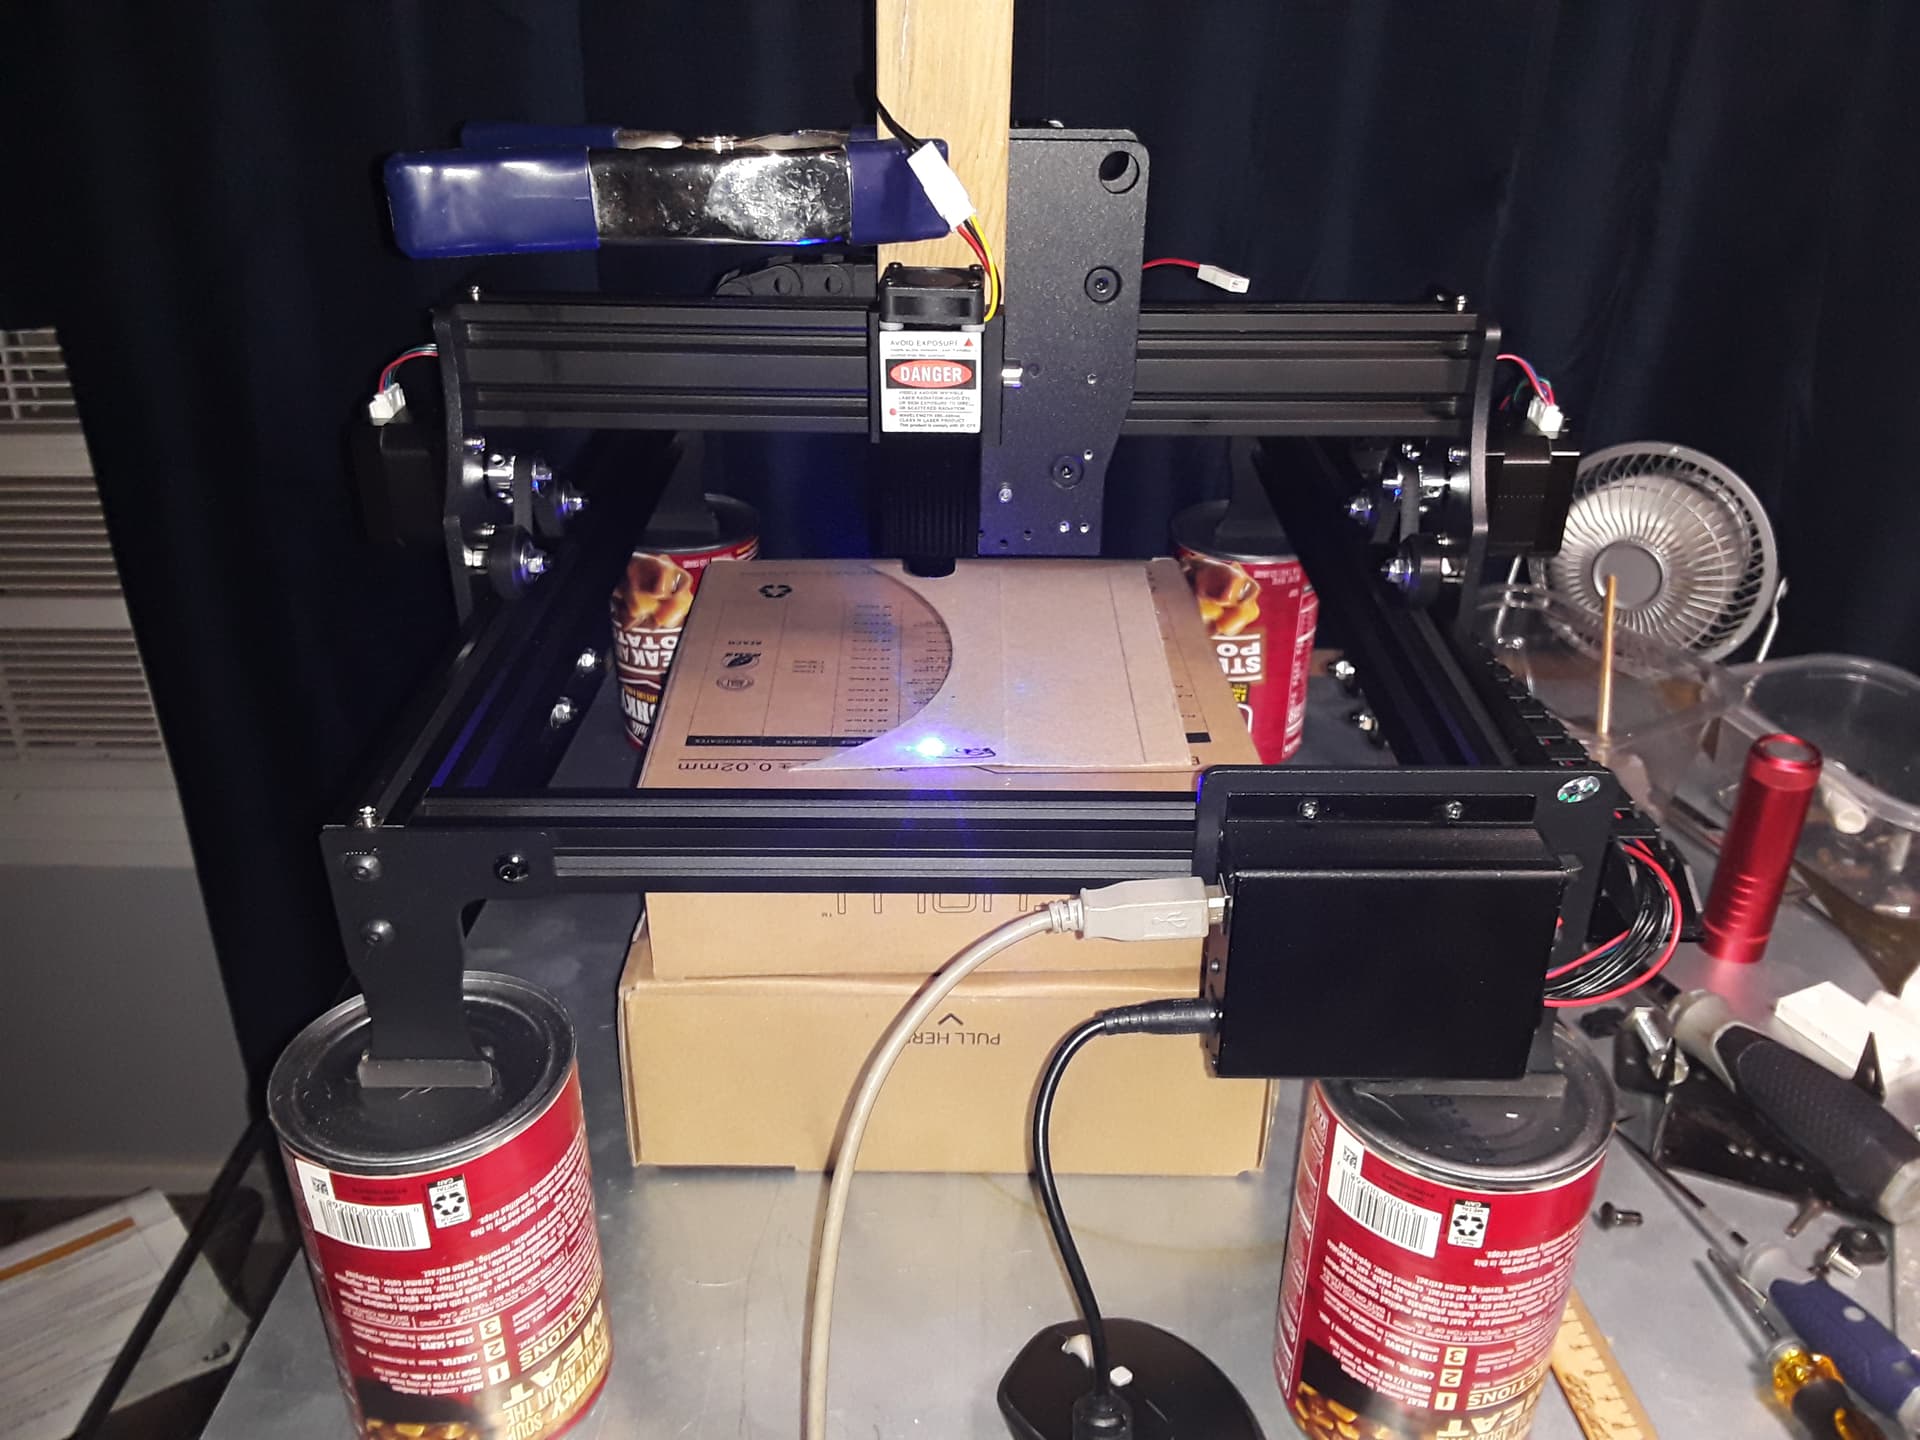

I haven’t figured out a Z-lift mechanism yet so simply attached the laser module to a flat stick and clamped it to the X-carriage. Also had to fish the laser leads out of the cable chain for a few links in order to get some slack for focusing.
I’ve also got to figure out why I can’t use “User Origin” as I normally do. It frames properly where I put it but when I “Start” it crashes left. “Current Position” framed and ran properly in this test.
– David
What is your opinion of the laser itself?
What binary did you flash on it?
I got two threads and I’ve totaly confused myself as to which binary I need to flash on the jl1.
Can you drop it here, so I know I get the right one…
When you set it up in the device settings, what corner did you set as home?
It appears wired to home front/right…
![]()
The machine itself is a “tank” and very impressively built… the laser module is a low-powered (claimed 3W) laser module as you might expect. But I’ve been doing ceramic tiles and glass with a little Eleksmaker 2.3W laser for quite a while so I suspect this one will be useful as well.
Hookupis a simple 3-wire connection – +12V/Gnd/PWM – that should allow any number of other modules to be installed should you find it necessary.
– David
Yes, I’ve seen your work. Very impressive compared to mine.
I’m hoping a dedicated laser will up my game.
And for $80.00,what the hell, why not.
1 Like
Jack,
@LsrSal’s zipfile is what I used… extract two files, “ROM.bin” and “upgrade.exe”. My post above is exactly what I did… it only took about a minute to actually to flash Grbl 1.1f on the board once I got my rarely-used Win7 laptop fired up and running. Nothing more than the Windows laptop, the zipfile, USB cable, and laser machine are required.
You’ll need to change a few GRBL settings to get things going in the right direction but the basics are there.
– David
I am expecting the programmer today, so I’ll give it a shot.
Thanks
![]()