When I import a .png file it looks fine in the software. But when engraving, the bottom of the image is a little compressed. It helps to put a point under it, so the design is not the lowest point, but isn’t there a better solution?
Yes: tune up your laser mechanics to eliminate the backlash / lost motion in the Y axis that’s distorting the motions.
This guide is for Sculpfun lasers, but your machine is likely similar enough that following all the advice will get it running properly:
https://diode-laser-wiki.com/documentation/guide-to-mechanical-adjustments/
Thank you, but I don’t think this is the problem. I make designs that are about 3 cm big (round) and engrave 50 pieces at the time. 10 colomns x 5 rows. They all have the same problem, but only on the bottom of the image. The rest of the image is perfect, so it can’t be the mechanical adjustments, i think? Than only the lowest pictures should have the problem.
Can you share a picture of what it looks like?
Given what you’ve described so far and based on similar problems, it’s mechanical backlash.
But I have been known to be wrong in public (![]() ), so you may get different suggestions.
), so you may get different suggestions.
Pictures, screenshots, and the LightBurn file will provide critical evidence of what’s going on.
If you look at the LightBurn preview, you will probably see a rapid move downward to the bottom of the first digit, probably from the upper side of the previous item. Then the next Y axis move is upward, whereupon the backlash causes a fraction of a millimeter of lost motion and produces the flattening.
Most likely, it’s a loose setscrew in (one of) the Y axis belt drive gears, but check all of the items in that tune-up guide to make sure you’ve considered all the possible sources.
Ok, I will ask my service engineer to look at it.
Maybe he can find the problem using the manual.
That is not the preview, that is the overall layout.
Use Alt-P to start the preview, make sure Show traversal moves is turned on, set the speed low enough to follow, then watch the path as it moves from one item to the next. I expect it’ll move downward from the top of one pattern to the year in the next.
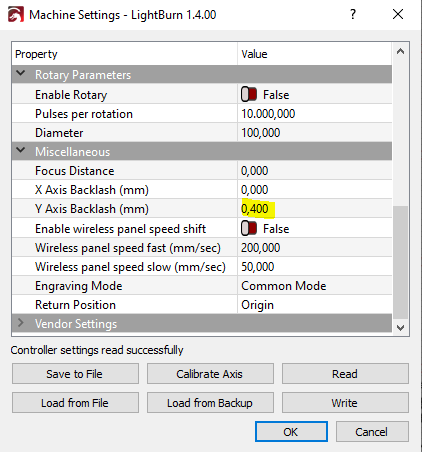
Yes, you were right! We fixed it. We had to change the Backlash to 0.400.
Sorry I doubted you. It was because I didn’t understand what you mean. Here is a screenshot of the settings. You find these settings under Edit in the Lightburn software.

It is much much better to eliminate mechanical backlash, rather than paint it over.
The Backlash distance moves the axis by that amount on each direction change to “take up” the backlash. That works for abrupt direction changes after traverse motions, but will produce imperfections in gradual arcs where the abrupt motion at the curve’s reversal point isn’t exactly the right amount.
But, if it works for now, run with it until it causes a problem.
Mark this thread Solved so other folks can benefit from the discussion …
We thought you meant this. Can you show where we can do it correctly? We didn’t find it in the manual. Maybe because of the language difference.
Your profile lists your laser as “the orange one”, which does not give us very much information to go on.
If it’s a desktop diode laser, the reference I gave in the first reply is pretty much the definitive collection of adjustments.
If it’s a large CO₂ laser with a Ruida controller, then these threads will give you some places to examine:
Good hunting!
It’s a big CO2 laser with a ruida controller.
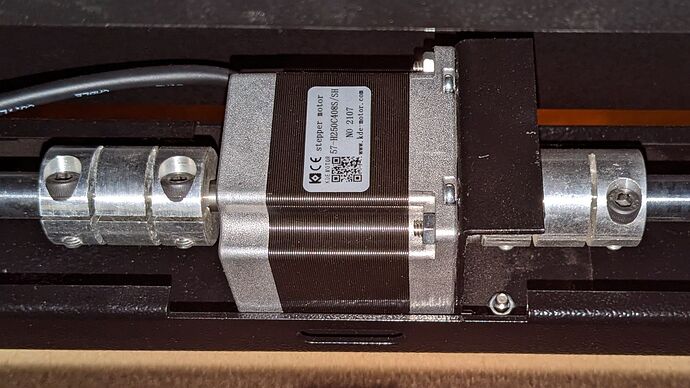
Because the backlash occurs on the Y axis (and assuming hardware similar to my machine), it’s likely in the couplings between the motor and the jackshafts across the back of the machine:

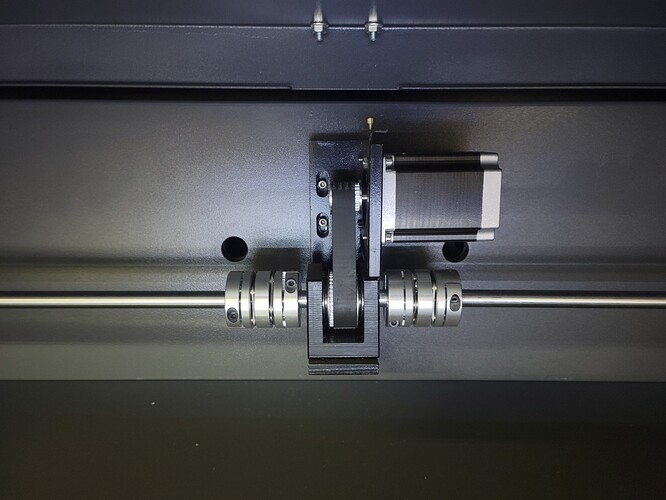
You may have a more complex arrangement:

In any event, carefully examine all those joints to find the slightly loose setscrew. It may be jammed on one side of the shaft flat, so try to loosen each screw: the one that moves was the loose one.
This topic was automatically closed 30 days after the last reply. New replies are no longer allowed.