Engraving photo-realistic images is one of the cooler things lasers can do, but it’s harder than most people realize.
The key things people get wrong when engraving images are:
- Going too fast
- Setting the DPI too high
There are three types of Lasers generally supported by LightBurn
- Glass tube CO2 lasers
- RF excited CO2 lasers
- Diode lasers
The first, glass tube CO2, uses gas excited by high-voltage power, almost like a neon tube. When the controller tells the laser to fire, it sends a signal to the high-voltage power supply, that dumps power into the tube, and the tube fires. It’s very fast, but it’s not instantaneous, and if the speed is too high, it’s possible for the on & off signals to be so close together that the power level in the tube doesn’t actually build up enough to cause the beam to fire. If you use really high DPI or speeds, this can happen. It also takes some time for the material itself to react to the laser - if you run fast, you will need to increase the power to get the desired reaction from the material. It’s a little like the difference between waving your hand over a candle quickly vs holding it there.
All lasers have a minimum size that the beam can be focused to. Higher wattage glass tubes produce a wider beam than lower wattage tubes - a 100w laser using a standard 2" lens might produce a focused point that’s 0.2mm in diameter, whereas a 40w can probably go as low as 0.07mm. Using a longer focal length lens will give you a wider spot, and a shorter focus distance will give a smaller spot. Knowing the size of this spot can help a great deal.
Imagine your laser is a 100w, with a beam spot of 0.2mm, and you tell the software to produce a pattern of alternating on / off dots, at 0.2mm intervals:
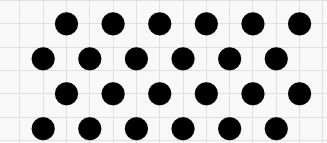
These dots have space between them that isn’t burned, so the resulting shade of the material will be about 50% darker than an un-burned area, and about 50% lighter than an area burned solid black.
Now, imagine that you think your 100w laser has a 0.1mm spot, so you tell the software to produce the same pattern of dots, but only 0.1mm apart:
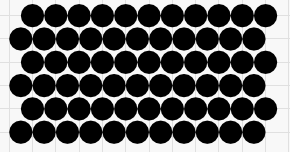
Nothing in the software can make the beam spot smaller, so the dots are spaced exactly as requested, but they’re too large, and covering up too much area - this pattern that was supposed to be 50% shaded is almost completely black instead.
If you go finer still, down to 0.05mm spacing (500 DPI) you can no longer even see the individual dots:
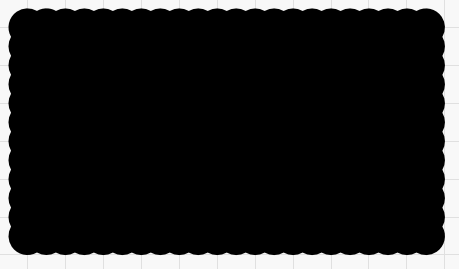
Remember - the above image is supposed to be 50% black, and instead it’s a solid mass.
If you want to find the smallest dot your laser can make on a given material, run a series of scans using finer interval settings, and look at the results.
Now, this isn’t the final word on the subject, as some materials, like wood, paper, and other organics darken more as you add more heat. Putting the dots close together like they are shown above can have the effect, on these materials, of producing a darker burn than when they are spaced out more, so you can still get shading. Other materials like stone, glass, anodized aluminum, or painted acrylic do not ‘burn’ - you’re altering the material surface in a way that produces a mark or doesn’t, and these are much less forgiving.