Setting up a Ruida controller to connect via Ethernet isn’t hard, but it’s not quite as simple as just plugging it in. Follow these steps:
1) Get the IP Address of your computer:
For Windows:
Open a command prompt (click the Start button, type CMD, and hit enter).
Type IPCONFIG and press enter.
You’ll see something like this:
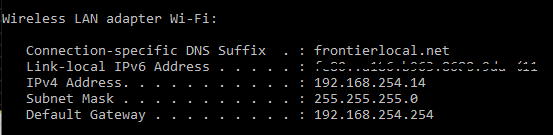
The one labeled ‘IPv4 Address’ is the interesting part - this is the network address of your computer on your local network. The first 3 groups of numbers will be the same for every device connected to your network, and the last number (the ‘14’ in my picture) will be different, and MUST be different, for each device. They all need a unique address so they don’t try talking over each other.
For Mac:
Open a terminal window (Command+Space, then type terminal). At the command prompt, type ifconfig and press enter. Near the beginning of the output, you should see something like:
en0: flags=8863<UP,BROADCAST, ...> mtu 1500
      ether 4c:c2:xx:xx:xx:85:xx
      inet6 fe80::2431::xxxx:xxxx ....
      inet 192.168.1.102
The line that starts with inet is the interesting one - That’s the IP address of your computer on your local network. You might have more than one network - en0 is the first, en1 is the second, and so on. One will be active, so use the inet address from that one.
The first 3 groups of numbers will be the same for every device connected to your network, and the last number (the ‘14’ in my picture) will be different, and MUST be different, for each device. They all need a unique address so they don’t try talking over each other.
2) Assign an address to the controller:
The next step is to assign an address to your Ruida controller that is different than the other devices on your network, but has the same first 3 numbers. The range of each of the numbers is 1 to 255. I recommend using a different chunk of the network space for your lasers so they don’t interfere with other things. To do this, pick a different set of ‘hundreds’ from where your PC is.
If your PC address is:         Set your laser to:
10.10.1.154                    10.10.1.54      (subtracted 100)
192.168.2.201                  192.168.2.101   (subtracted 100)
10.100.50.14                   10.100.50.114   (added 100)
You don’t absolutely have to do it this way, but putting the laser ‘100’ away from your PC reduces the chance that a new device connecting to your network will be given the same network address as your laser. There are ways to tell your home router that an ID is reserved, but that’s beyond the scope of this post.
Once you’ve picked a network address for the laser, you have to tell the controller what it is. On the Ruida controller, press the ‘Z/U’ button to enter the menus. Use the up/down arrows to move to 'IP Config+" and press the Enter button. You’ll see this display:
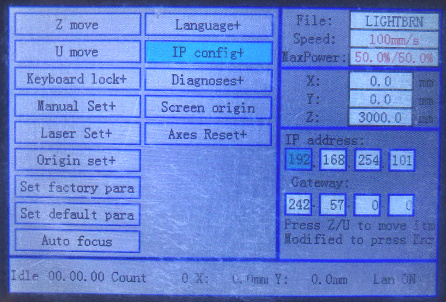
Use the arrows to change the values and move the cursor, and press Z/U to move from one value to the next. When done, press the Enter button.
3) Create a networked device profile in LightBurn
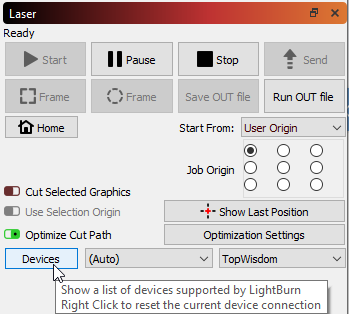
Now, in LightBurn, you need to manually create a controller profile with the IP address you’ve chosen. Click the ‘Devices’ button:
Then click ‘Create Manually’:
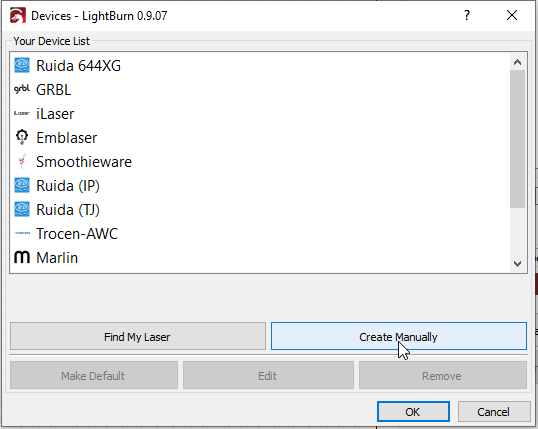
Choose ‘Ruida’ from the controller list, then choose Ethernet, and enter the same IP address you used on the controller itself. Set a name for the laser, and enter the bed area in mm (mine, for example, is 700 x 500 mm). Set the origin corner to the corner where your laser homes. When you’ve done all this, you’ll get a summary page to review, like this:

Click ‘Finish’, then you can make that laser the default device if you like, and click Ok to exit the device setup screen. If you made the new laser the default device, it should connect right away, otherwise you might have to choose it from the devices list.